
The AlmondB theme comes with a special plugin to add custom pages to a Moodle website. However, this plugin does not seem to work with the free version of the AlmondB theme. Thankfully, there is another Moodle plugin which is perhaps even better called Static Pages. In this article, we will install and use the Static Pages plugin to create two special pages – a Contact Us page and an About Us page. You can use this process to easily create your own custom pages. We will then customize the Home page top and bottom menus.
Install the Static Page Plugin
To download the Static Page plugin, go to this page:
https://moodle.org/plugins/local_staticpage
Click Versions and download the latest version. Then install it with the Moodle installer. The install ends in the Static Pages New Settings screen. There are three important changes we need to make to the Static Pages settings. For Data source of document title, change it from h1 tag to title tag. For Data Source for document heading, change it from h1 tag to title tag. The problem with use the h1 tag is that it leads to a double page heading. The solution to this problem is to simply not use the h1 tag – and remember to add a title tag to the head of your HTML document!
Then scroll down the page to Clean HTML code and change it from Yes to No. The problem with cleaning the code is that it can clean too much code to the point where the HTML form will not even work. Then click Save changes. Then skip the Notifications screen and click the General tab and scroll to the bottom of the screen:

Click Documents. This is an extremely simple screen that only accepts HTML documents. In other words, it only accepts documents that end in the dot html format.
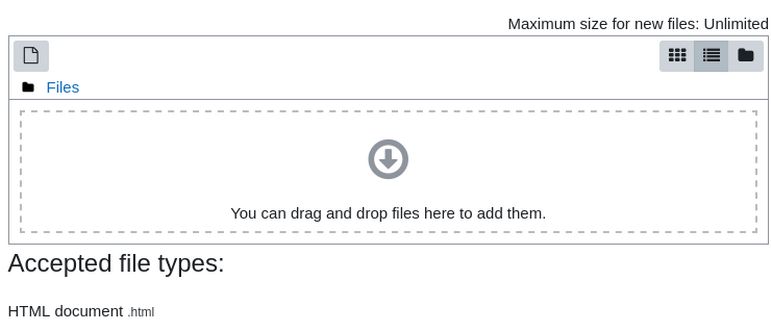
On this page, you drag and drop as many HTML documents as you want. Each HTML document will become its own static page with a link that can be posted in a Moodle or Joomla menu.
Note however that not all symbols which are allowed in the file names in the Moodle file picker are supported or suitable for page names. Your file names should only contain lower case alphanumeric characters and the - (hyphen) and or _ (underscore) symbols.
No local Moodle File Picker images
This static page generator is most easily used for text only HTML documents. The problem is that it does not work with the Moodle Editor and therefore does not work with the Moodle File Picker. You still have two options for adding images. The safest option is to use the website images folder we added in our previous article. This makes it less likely that you will wind up with broken links. Simply create a Text Only version of your document and place your compressed images inside of a folder. Then open your VPS and use the Hestia file manager to add the images to your Moodle website images folder. In this case, the link is:
https://collegeintheclouds.com/images/01-welcome.jpg
An alternative would be to load your images into another website that you control. For example, I have a Joomla website called https://collegeintheclouds.org/
I could create a folder called moodle with the Joomla Media Manager and then load the images into this folder. In this case, the image link is https://collegeintheclouds.org/images/moodle/01-welcome.jpg
In a moment, we will review how to add an images to your HTML pages using what are called absolute, full or complete URLs.
Learn HTML and CSS
Ideally, you should know some of the basics of HTML and CSS in order to create your own custom HTML pages for your Moodle website. You should also learn how to use the free Bluefish HTML editor to create and edit HTML documents. I have created a website that covers these skills which you can read at this link: https://learnhtmlandcss.com/
Create your first HTML document
While the easiest way to create and edit HTML documents is with the Bluefish editor, we can use a normal text editor to create our first simple document. Open the text editor and copy paste the following:
<html><head>
<meta charset="utf-8" />
<title>Contact Us</title>
</head>
<body>
<p>The best way to contact us is via email which is david spring at protonmail dot com</p></body></html>
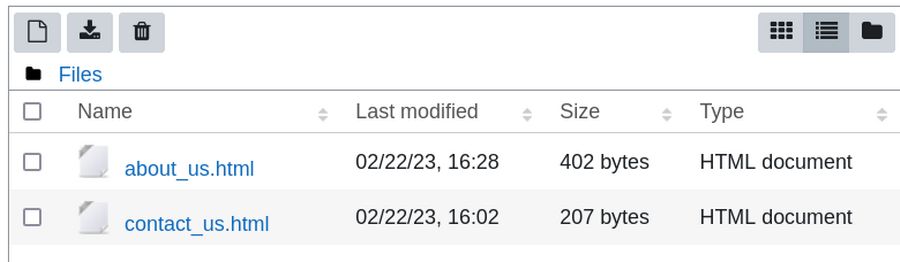
Then save the document in your website articles folder as contact_us.html. Then go to the Static Pages plugin Documents screen and drag the HTML file into this screen:
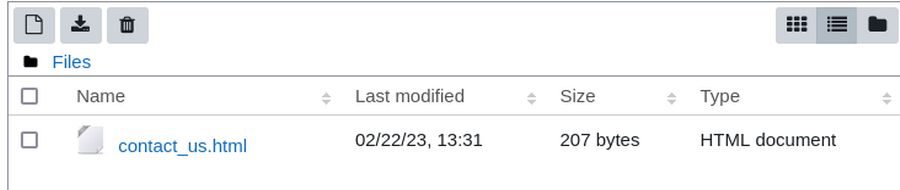
Then click Save changes. Then click on the General tab and click Static Pages, List of static pages which states: The static page is available and can be linked to at the following standard URL:
https://collegeintheclouds.com/local/staticpage/view.php?page=contact_us
The static page should be available at the following clean URL, but actually a browser won't be able to download and view it due to a non-2xx HTTP status code (perhaps there is something wrong with your webserver or mod_rewrite configuration):
https://collegeintheclouds.com/static/contact_us.html
Click on the first link to view the page. Then click on the second link to see the Page Not Found error page. One can solve this problem by adding an htaccess file to our website root folder. However, by default, Moodle does not use an htaccess file and adding this file would significantly slow down web page loading (which is already pretty slow with Moodle due to its massive file size).
Also, we are going to create only a few static pages and the length of the URL really does not matter. We will therefore simply use the URLs generated by the Static Page Plugin. As we have just seen, to access a static page, the link is:
http://www.yourmoodlesite.com/local/staticpage/view.php?page=[pagename]
Here is what our Contact Us page looks like:
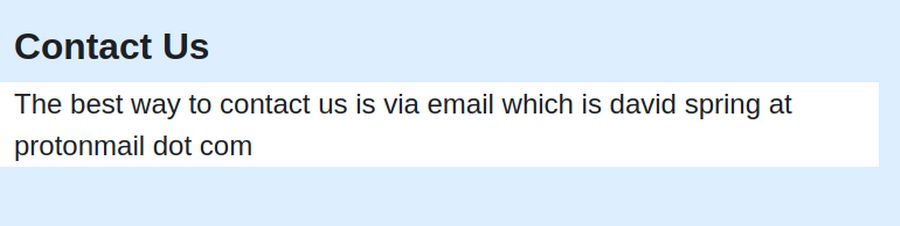
This is a plain page. It would be better if we added a header image.
Create an About Us Page with a Header Image
We will create menu items for our new pages in a moment. First, we will add an About Us page with a header image. Before we create our About Us page, place the header image in your VPS Moodle site file manager images folder. Here is the link to our header image: https://collegeintheclouds.com/images/header_1500.jpg
Copy paste the absolute URL to create the image link:
<img src="/https://collegeintheclouds.com/images/header_1500.jpg" width="1200" height="332" alt="header">
Open a text editor and copy paste the following:
<html><head>
<meta charset="utf-8" />
<title>About Us</title>
<style>
img {width: 100%; height: auto; margin-right: auto; margin-left: auto;}
</style></head>
<body>
<img src="https://collegeintheclouds.com/images/header_1500.jpg" width="100%" height="auto" alt="header">
<p>I am a semi-retired college instructor interested in promoting computer security and the use of free open source programs. </p></body></html>
Save the file as about_us.html. Then drag the file into the Static Pages Documents screen.
Then click Save changes. Then click General, Static Pages, List of Pages. Here is a link to the About Us page:
https://collegeintheclouds.com/local/staticpage/view.php?page=about_us
Here is the header image in the About Us page:

Customize the Main Menu
Our final task is to customize the Main Menu. Here is the default appearance of the Almondb theme Main Menu:

Features has a series of pages that are all dead links. We will delete all of these.
Pages has links for About and Blog. We will change this to About Us.
Courses has links to All Courses and Course Search. We will change this to just All Courses.
Smooth has internal page anchor links to several Home page boxes. We will delete all of these.
Teachers leads to block 8 which we have disabled. We will change this to Contact Us.
Documentation links to the Almond website. We will change this to a link to the College in the Clouds Curriculum website (college in the clouds dot org).
To make these changes, go to Appearance, Themes, AlmondB, Front Page, Header Choice. Then expand the Nav Link box. Here are the first three top level menu items:
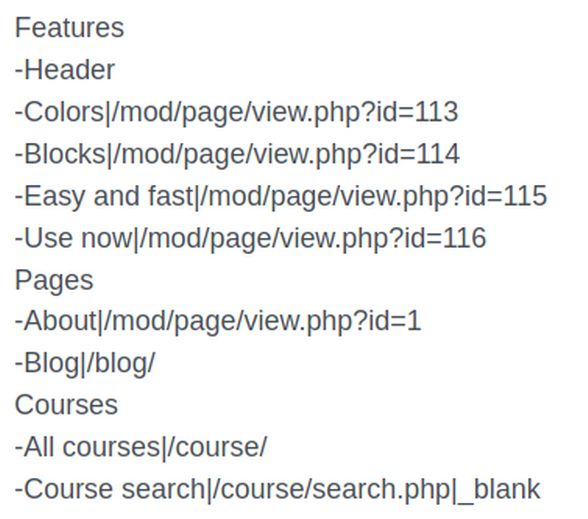
Note that the top level menu items (Features, Pages, Courses) do not have a dash in front of their names. Here are the last 2 menu items:

There are two different kinds of menu items. External links are:
Menu Item Name|full_external_link.com
Internal links are:
Menu Item Name|/internal_folder/view.php?id=X
Here are the new links:
About Us|https://collegeintheclouds.com/local/staticpage/view.php?page=about_us
Courses|/course/
Contact Us|https://collegeintheclouds.com/local/staticpage/view.php?page=contact_us
College in the Clouds Curriculum|https://collegeintheclouds.org/
Then scroll to the bottom and click Save changes. Then view the result.
Customize the Bottom Menu
Here is the default bottom menu:
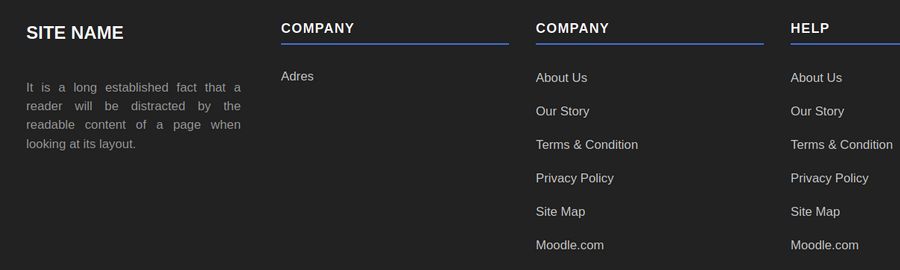
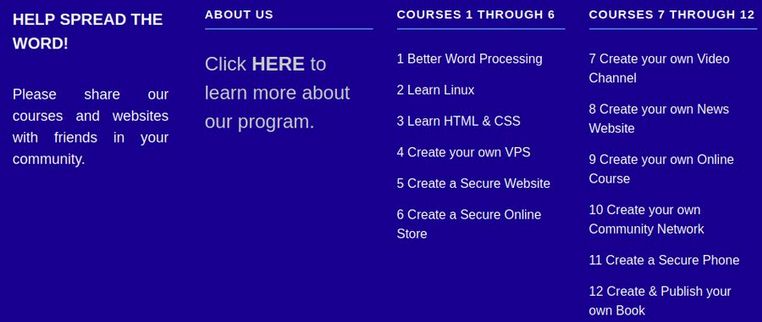
The footer has four columns Change the column 1 header from Site Name to Help Spread the Word! and change the caption to
Please share our courses and websites with friends in your community.
The second column has Company followed by address. But in the back end, it is actually shown as column 4. Replace the name Company with About Us Then replace the word address with
Click HERE to learn more about our program.
Select the text and change the color to white. Then select the word HERE and click B for Bold and then click the Link Icon.
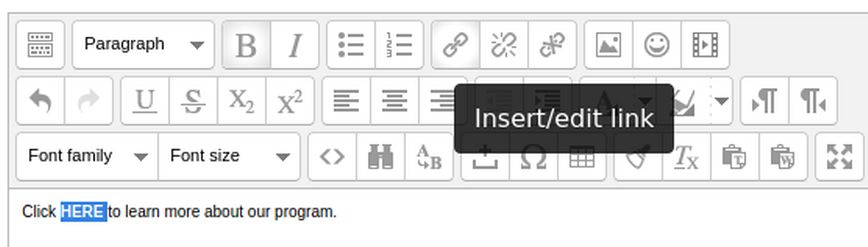
The LINK icon brings up this screen:
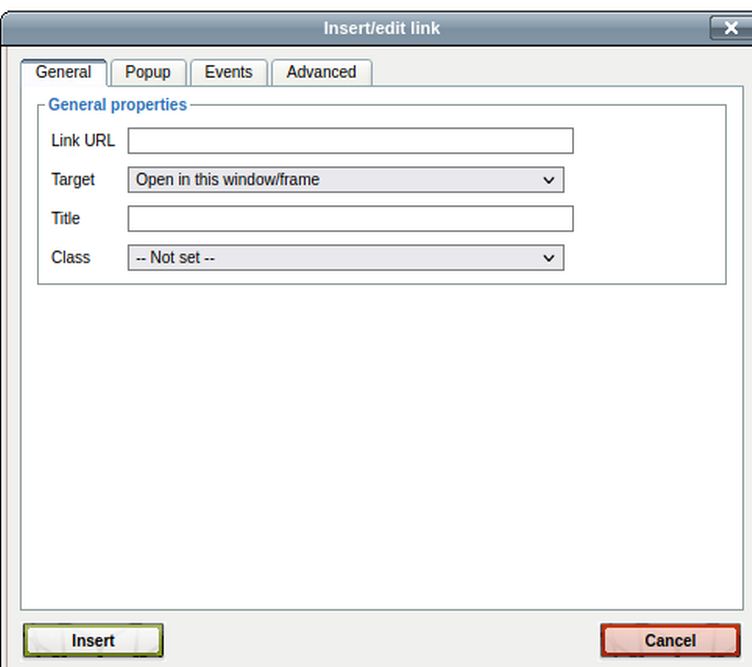
Insert the link in the URL box. Then change the Target to Open in a new window. Then click Insert. Then select the entire text and change the font size to 24.
Then click on the code button again to see this code:
<p><span style="font-size: x-large;">Click <a href="https://collegeintheclouds.com/local/staticpage/view.php?page=about_us" target="_blank"><strong>HERE</strong> </a>to learn more about our program.</span></p>
Then click Save Changes and view the result. We need to increase the font size of the text in the footer. Add this to our custom CSS box:
.footer-dec p {font-size: 18px; color: #ffffff;}
.footer-menu li a {font-size: 16px; color: #ffffff;}
Column 2 Menu Title: Courses 1 through 6
1 Better Word Processing|https://betterwordprocessing.com/
2 Learn Linux|https://learnlinuxandlibreoffice.org/
3 Learn HTML & CSS|https://learnhtmlandcss.com/
4 Create your own VPS|https://createyourownvps.com/
5 Create a Secure Website|https://createasecurewebsite.com/
6 Create a Secure Online Store|https://createasecureonlinestore.com/
Column 3 Menu Title: Courses 7 through 12
7 Create your own Video Channel|https://createyourownvideochannel.org/
8 Create your own News Website|https://createyourownnewswebsite.com/
9 Create your own Online Course|https://createyourownonlinecourse.org/
10 Create your own Community Network|https://createyourowncommunitynetwork.org/
11 Create a Secure Phone|https://createasecurephone.com/
12 Create & Publish your own Book|https://createandpublishyourownbook.com/
Click Save and view the result:
Customize the Bottom Footer
Here is the default bottom footer:

Here is what the social links code looks like:

We will delete all of the social links for now. Here is the code for the Copyright line:
<p>Copyright © 2022 Designed by <a href="https://www.themealmond.com">themesalmond.com</a>. All rights reserved.</p>
Change it to this:
<p>Copyright © 2023 College in the Clouds <a href="https://collegeintheclouds.com/">collegeintheclouds.com</a>. All rights reserved.</p>
Then save changes and view the result.
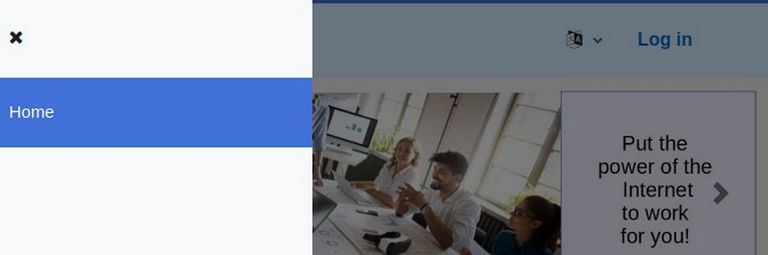
Fix the Disappearing Menu Problem
The Main Menu now displays well on wide screens. However, at screens narrower than 990px, the Main Menu suddenly disappears and is replaced by a Mobile Menu (also called a Hamburger Menu). This would be OK if the Mobile Menu displayed the same menu items as our Main Menu. However, there is a problem with the coding and the only menu item that is displayed is the Home Menu:
There are several issues causing this problem. Normally, this could be fixed by adding some CSS to our theme custom CSS box. However, because the Main Menu is a Bootstrap Menu, the Disappearing Menu problem can only be fixed by editing a file called header2.mustache. To edit this file, open your VPS and go to your website user account. Then click Files, web, domain, public_html, theme. Then click on the Almondb theme to open it. Then open the templates folder and in it, open the frontpage folder. Then scroll down and click header2.mustache – which will download a copy of this file to your home computer file manager.
We need to make three changes to this file. For the first change, open the file with a text editor. Here is Line 22:
<button class="navbar-toggler aabtn d-block d-lg-none px-1 my-1 border-0" data-toggler="drawers"
The term navbar-toggler is the name Bootstrap gives to our Hamburger or Mobile Menu. The term d-block is a Bootstrap term meaning Display this block. The term d-lg-none is a Bootstrap term meaning do not display this block on Large or XL screens. In Bootstrap, Large screens start at 992 pixels – meaning the hamburger menu only appears on small and medium screens which are 990 pixels or less in width.
To make it easier for logged in admins to reach the admin page, we want to change this line so that the hamburger menu always appears our Home page. Therefore, change Line 22 to read:
<button class="navbar-toggler aabtn d-block px-1 my-1 border-0" data-toggler="drawers"
The second change is on Line 27. Here is Line 27:
<a href="/{{{ config.homeurl }}}" class="navbar-brand d-none d-xl-flex align-items-center m-0 mr-4 p-0 aabtn">
The term navbar-brand is the website logo or domain name which appears in the upper right corner of our Home page. The term d-none means to not display the navbar brand. The term d-xl-flex means to display the nav-bar brand on extra wide screens. We want to display the navbar brand on Large and XL screens. To do this, change d-xl-flex to d-lg-flex. Here is the new Line 27:
<a href="/{{{ config.homeurl }}}" class="navbar-brand d-none d-lg-flex align-items-center m-0 mr-4 p-0 aabtn">
The third is on Line 47. Here is Line 47:
<div class="navbar-nav d-none d-lg-flex my-1 px-1">
The term navbar-nav is the Bootstrap term for our main menu. The combination of d-none d-lg-flex means to only display the main menu on Large and XL screens. This line is why our Main Menu disappears on Medium and Small screens! We want to always display the main menu on our Home page. The bootstrap term for display always is d-flex. So change d-none d-lg-flex to d-flex. Here is the new Line 47:
<div class="navbar-nav d-flex my-1 px-1">
Then save and close the file. Then in our Hestia File Manager, rename the existing file to old-header2.mustache.
Then click Add to load our changed file. Then view the Home page to see the result.
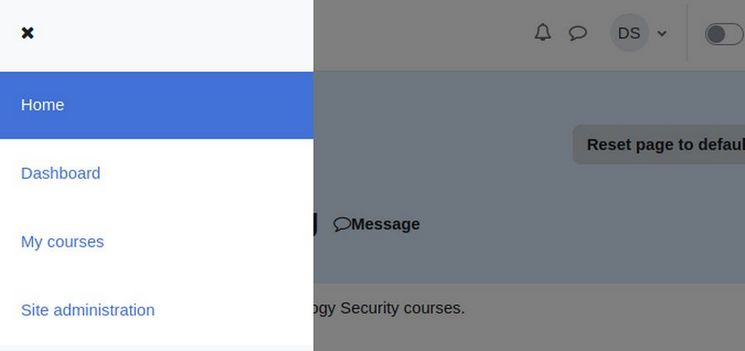
Change the browser window width from very wide to very narrow. Hopefully, the Main Menu no longer disappears and the Hamburger menu no longer appears on the Home page.
Hamburger Menu still works on logged in pages!
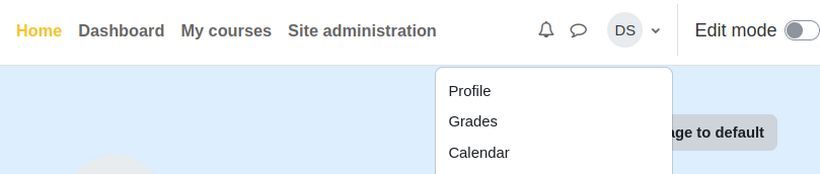
We do need the Hamburger menu to appear on all of our course and admin pages since Moodle uses this menu for student and teacher course navigation. Thankfully, the hamburger menu does appear on these pages. To reach these pages from the Home page, click on your Initials in the upper right corner and click Profile.
Make the screen narrower to see the hamburger menu. Then click on the Hamburger menu.
To prevent the Hamburger menu from being covered by the slideshow on large and XL screens, add to the AlmondB theme Advanced tab custom CSS:
.drawer {z-index:99;}
.drawercontent {z-index:99;}
Get Home Page Menu Items to appear on the Hamburger Menu
Log in as the Site Admin and go to Site Administration > Appearance > Themes > Almondb > Front Page > Front Page Header Choice >Front page nav link. Copy the menu items you want to appear in the Hamburger menu. Then go to Site Administration > Appearance > Themes > Theme Settings > Custom menu items. Paste the menu items into this box. Then click Save changes and view the result.
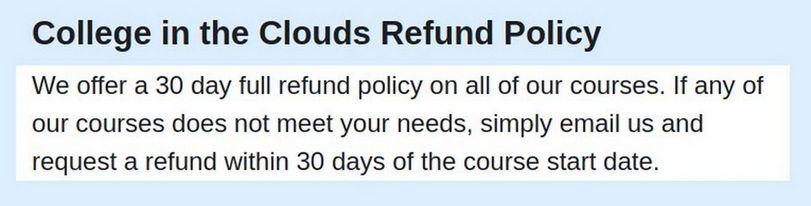
Create a Refund Policy Static Page
We need a Refund Policy page to add to our Stripe payment account, which we will set up in the next chapter. Open a Text Editor and copy and paste the following:
<html><head><meta charset="utf-8" />
<title>College in the Clouds Refund Policy</title>
</head><body>
<p>We offer a 30 day full refund policy on all of our courses. If any of our courses does not meet your needs, simply email us and request a refund within 30 days of the course start date. </p>
</body></html>
Save the file as refund_policy.html and then load the file with the Static Pages plugin. Here is the link to our Refund Policy page:
https://collegeintheclouds.com/local/staticpage/view.php?page=refund_policy
What’s Next?
We will next take a look at Moodle School Administration tools and processes.