
In this article, we will explain how to structure your course into as many sections and sub-sections as you need and in a manner that will help students understand your course organization without being overwhelmed by having all content sections visible on the student's course Home page.

Each Part, when clicked on, displays 4 chapters - and each chapter when clicked on displays 4 sections. This helps the student understand that the course is divided into three parts and each part is divided into four chapters. Providing the student with this structure helps them understand their progress through the learning process.
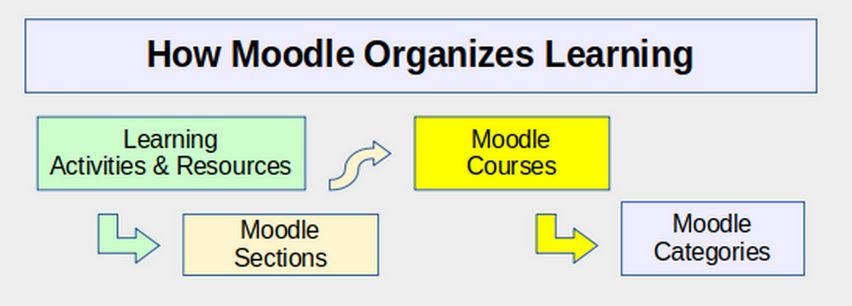
Moodle organizes learning into Activities and Resources that are placed in Sections and Topics that are placed in Chapters that are placed in Categories.
A Moodle category is a group of related online courses. For example in the Science category you can have courses on Physics, Chemistry and Biology. A Moodle course is an online series of web pages where teachers can organize their course into a series of lessons which Moodle calls topics and then add learning materials, such as documents, videos and quizzes to each topic.
By default, only administrators and managers can create categories and courses. Once courses are created, and once you have added users to your Moodle website, you can then assign one of more users to the role of teachers to your new course. Teachers can then edit the default Moodle course structure and add more topics and add learning materials to each topic to create their own courses. Course pages can be hidden while they are being created. You can also choose a starting and ending date for your course.
A student can be enrolled in a course by first adding them as a User to your Moodle website. Then select the course and enroll Users to the role of student in your course. Student access to course activities is controlled by their enrollment dates, not course dates. The dates are useful for activity completion in courses.
The course summary and image are shown on the student’s dashboard. The two most common ways to display course materials, activities and resources is by Topic or by Week. The default course is displayed by topic. Topics are organized into a series of numbered topic sections. Alternately, you can display your course in a Weekly format where the sections are named as weeks. Whether you are using the Topic format or the Weekly format, each section can be thought of as a class session. If you only have a few sections or class sessions in your course, you can elect to have all of your sections appear on the same course page (This is the default option). However, if you have a lot of sections or class sessions, or if you have a lot of learning materials in each section, you can elect to display each section as its own web page.
How to Avoid the Moodle Scroll of Death
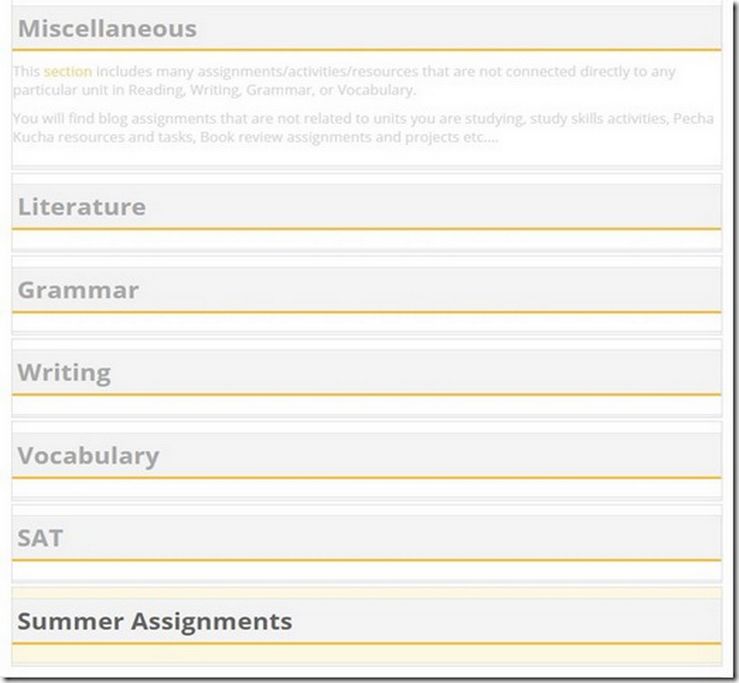
Even if each section or topic is displayed on its own web page, the problem with the default Moodle Course Structure is that complex courses, with a lot of topics or sections, will be displayed on the Course page as a series of 30 or more topics. Called the Moodle Scroll of Death, displaying all 30 to 40 topics on the same page can result in cognitive overload for students.
For example, each of our 12 courses at College in the Clouds is designed to be taught as a College level course. Each course is divided into nine chapters. Our intention is to provide Information Technology instructors with a curriculum they can use in the typical US College Quarter structure which consists of 9 weeks of instruction and 3 weeks for review and project completion. Each of the 9 weeks or 9 chapters is divided into four sections or class sessions. If the course is structured so that all students maintain the same weekly schedule, then it would be best to display each chapter in a Weekly format with a week for review and project completion after each 3 weeks of chapters.
On the other hand, if your course is a self-paced course where students proceed at their own pace, then use the Topic format rather than the weekly format. Either way, each course chapter would be a Moodle Section and each of our Chapter Sections would be a Moodle Sub-section.
A Moodle Plugin comes to the Rescue
None of the default Moodle course format options are suitable for a single course with a lot of sections. Thankfully, there is a Moodle Plugin called Flexible Sections Format that can provide us with the ability to create Moodle sub-sections and child sections.
https://moodle.org/plugins/format_flexsections
The flexible sections course format looks similar to the topic format except that there is no parameter “Number of sections”. Instead, sections can be added and removed as needed. Also, new sections (aka sub-sections) can be added or nested inside of another section.
Each section (regardless of its nesting level) can be shown expanded or collapsed. Teacher can change it in edit mode. If a section is displayed collapsed, its name is displayed as a link to the separate page and on this separate page the link “Back to … ” is displayed. If teacher hides a section all nested sub-sections and activities underneath that hidden section become hidden as well. If a section has both activities and subsections, activities are displayed first.
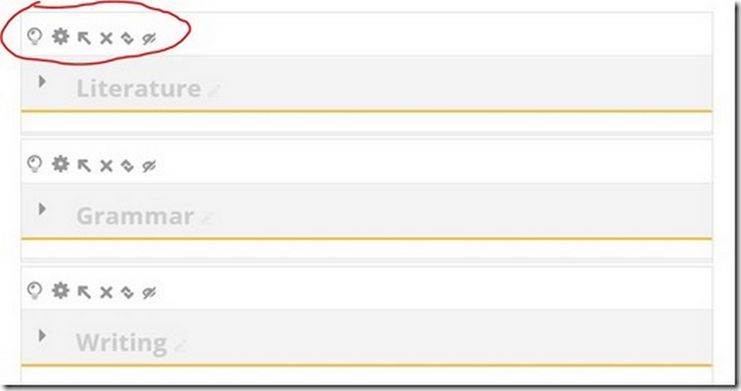
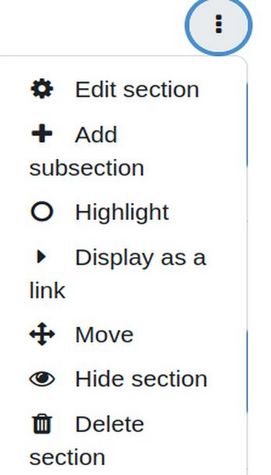
Section edit icons can be used to Control Top Level Sections, highlight, make sub-section top section level, delete section, move section, and hide/show section.
To download Flexible Sections, go to the following page:
https://moodle.org/plugins/pluginversions.php?plugin=format_flexsections
Then download the latest version 4.0.1.
Install the Flexible Sections Plugin
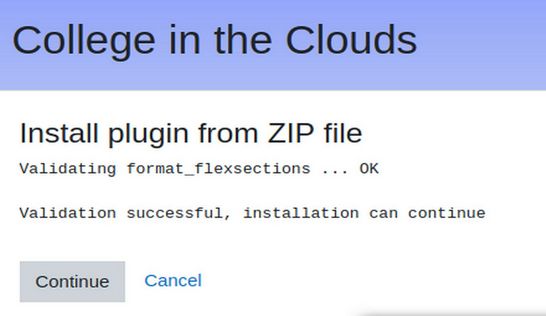
Go to Site administration, and click Plugins, Install plugins. Then drag the downloaded plugin zip file into the plugin box. Then click Install Plugin.
Click Continue. This brings up a Server check page. Then click Continue. The next page shows that we have 441 plugins. Click Upgrade Moodle database now. The response was success. Click
Continue. Then click Site Administration in the top menu. Then click Courses, Manage Courses. Then select an existing course and click Edit Settings. Then scroll down to Course Format. Then use the Format dropdown arrow to select Flexible sections format.
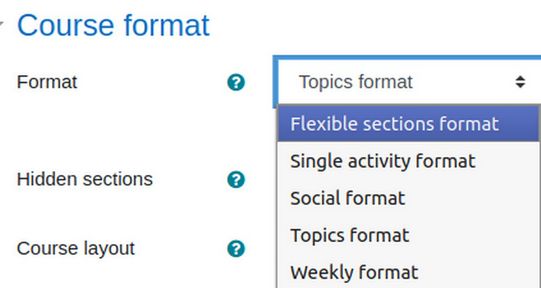
Then click Save and Display. This takes us to the course page. Click on Edit Mode. Then click on the three dots for Topic 1. Here are the options for the normal Topic format:

Here are the new options for the Flexible Sections format:
The Topic sections then appear in boxes and, when edit mode is turned on, you can now add sections within sections. Here is the typical College in the Clouds course structure we will convert into Moodle Sections:
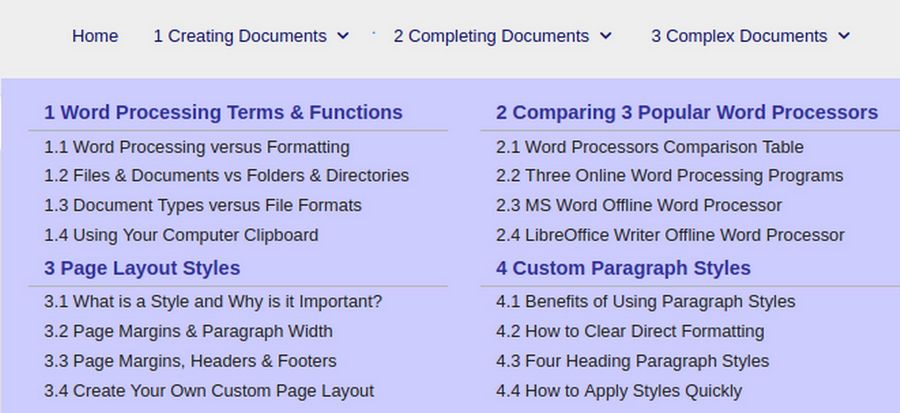
The above course is divided into three sections called Part I, II and III.
Each part is divided into four sections called Chapters.
Each chapter is divided into four sub-sections (with each sub-section holding the content for a single class session).
Here is how we will link our Joomla website curriculum to our Moodle course structure.
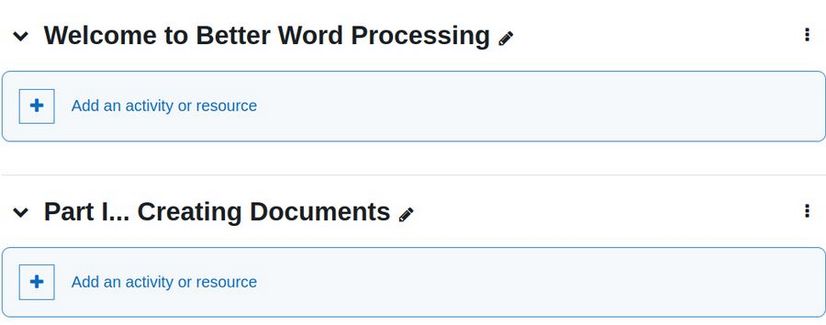
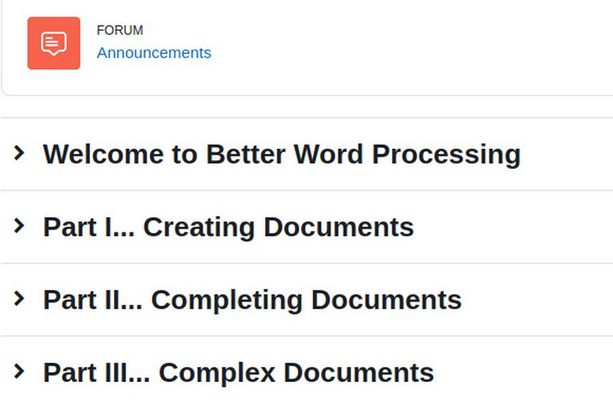
Rename Topic 1: Welcome to Better Word Processing
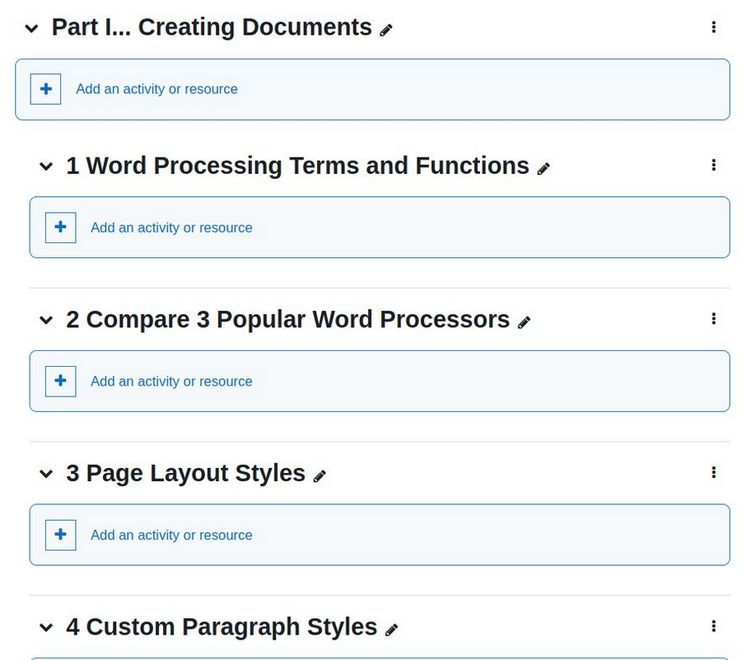
Rename Topic 2: Part I... Creating Documents
Then click on the three dots to the right of Part I to add four sub-sections (Chapters). Name these sections:
1 Word Processing Terms and Functions
2 Compare 3 Popular Word Processors
3 Page Layout Styles
4 Custom Paragraph Styles
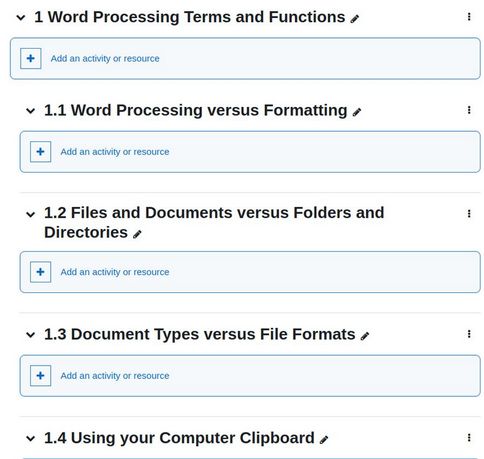
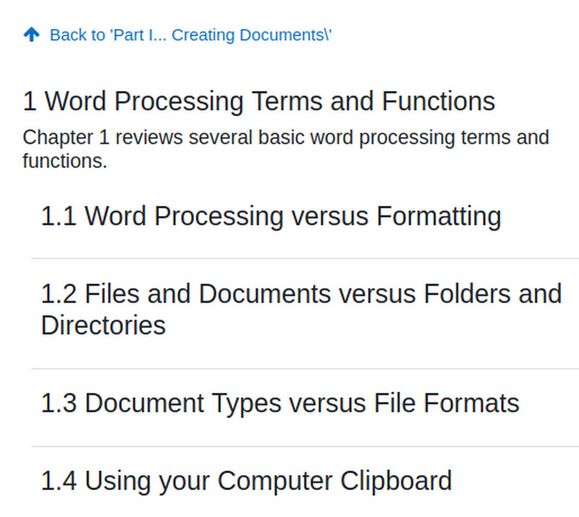
Then click on the three dots to the right of Chapter 1. In each chapter add 4 sub-sections (chapter sections such as 1.1, 1.2, 1.3 and 1.4). For Chapter 1, name these sub-sections:
1.1 Word Processing versus Formatting
1.2 Files and Documents versus Folders and Directories
1.3 Document Types versus File Formats
1.4 Using your Computer Clipboard
Repeat the above process to add sub-sections to chapters 2, 3 and 4.
Then rename the next section Part II... Completing Documents Then add Chapters 5 through 8 and add 4 sub-sections inside of each chapter.
Topic 4 Rename Part III... Complex Documents
Then add Chapters 9 through 12 and add 4 sub-sections inside of each chapter. Then turn off Edit Mode and click Collapse All and view the result. Here are the four top level topics:
Click on Part I The four chapters in Part 1 are displayed.
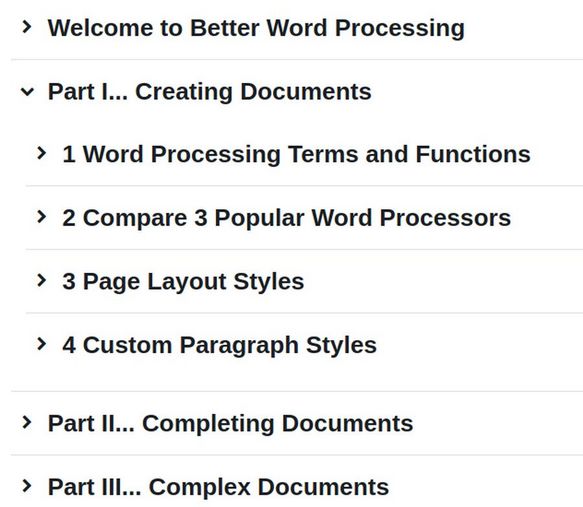
Click on Chapter 1 to display the four sections in Chapter 1.
When the student has finished with the content in any subsection, a link takes them back to the original course section:
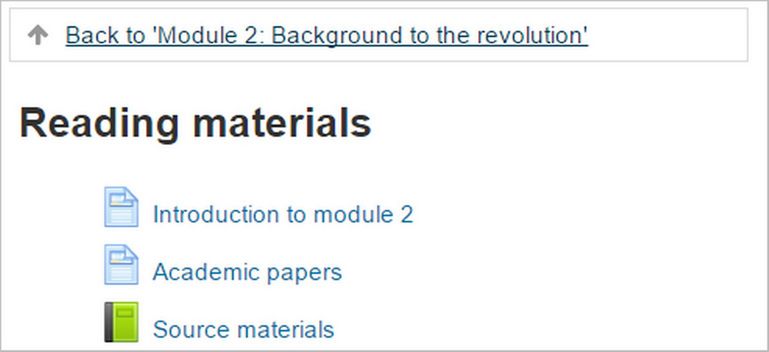
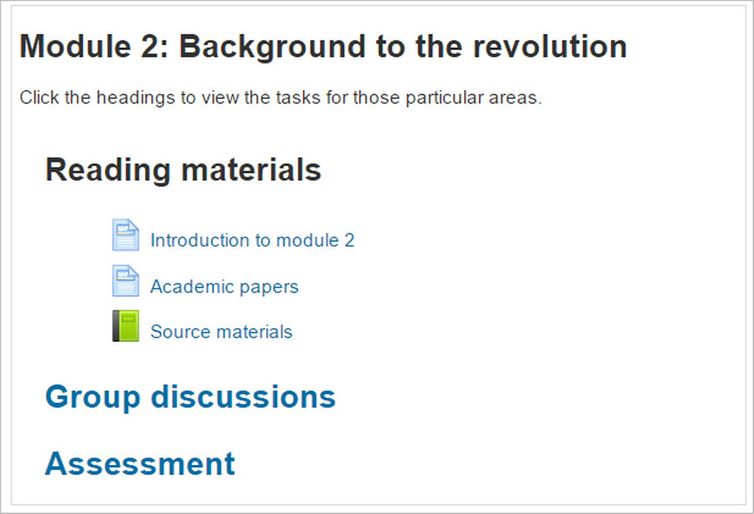
You can make some subsections collapsed and some expanded (such as with 'Reading materials' in the next screenshot). Expanded subsections show their title and content in a similar way to using labels to divide up activities in a regular course format:
What's Next?
Now that we have a way to display as many sections and sub-sections as needed in as many levels as needed, in the next article, we will review how Moodle helps you to organize and place content inside of each section.