
In this article, we will provide a process for setting up a Moodle course as well as an annual and quarterly course schedule. Previously, in Article 3.1, we divided our first course, called Better Word Processing, into an Introduction followed by 3 Parts.
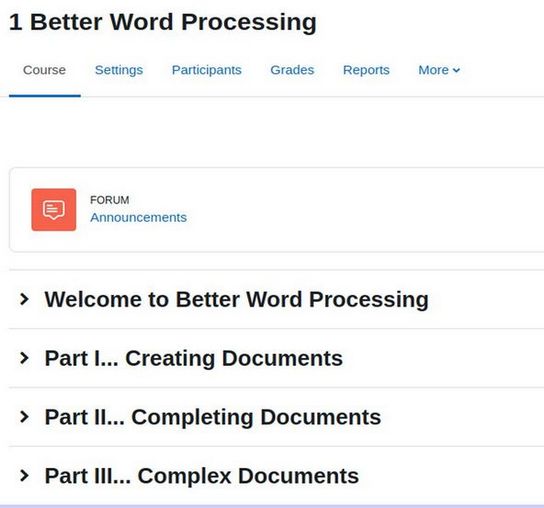
Each Part, when clicked on, displays 3 to 4 chapters – which Moodle calls Sections:
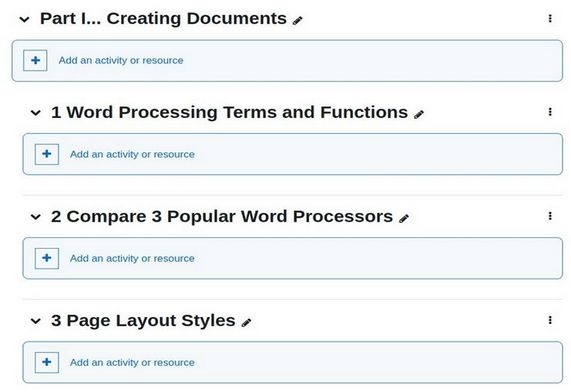
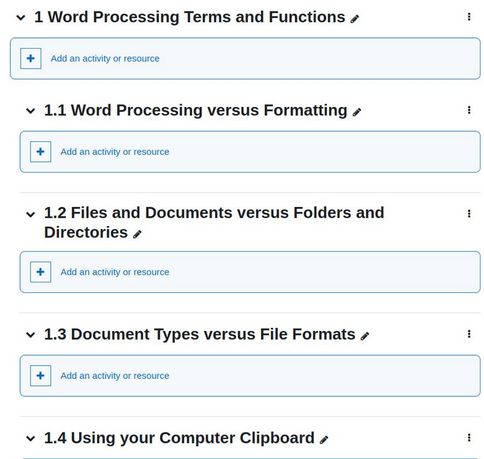
Each chapter when clicked on displays 4 sub-sections:
Each of our 12 courses at College in the Clouds is designed to be taught as a College level 5 credit course. The assumption of a 5 credit course is that the class will meet for 5 hours per week. This can be 1 hour each day Monday through Friday or for two hours twice a week (for example, 1 to 3 pm on Mondays and Wednesdays) with a one hour small group session after the large group video conference sessions. In addition, students are expected to spend at least 10 hours per week preparing for their class sessions and or completing projects and quizzes after their class sessions. It is also assumed that a full time schedule would be 3 five credit courses or 15 credits. Multiply 3 times 15 hours per course results in a full time commitment of 45 hours per week.
Each of our courses is divided into nine new topic chapters and three review chapters. Our intention is to provide Information Technology instructors with a curriculum they can use in the typical US College Quarter structure which consists of 9 weeks of instruction and 3 weeks for review and project completion. Each of the 9 weeks or 9 chapters is divided into four sections or class sessions or Moodle Sub sections. a week for review and project completion after each 3 weeks of chapters. Each course chapter is a Moodle Section and each of our Chapter Sections is a Moodle Sub-section.
The purpose of dividing your course into a series of sections and sub sections is to break up long complex tasks into a series of shorter more manageable tasks. Here is a table showing how a typical school or college is divided into Departments (which Moodle calls Categories). Departments are then divided into a series of courses. Each course is divided into a series of chapters – with each chapter divided into a one hour sub-section which is commonly referred to as a class session. In addition, each class can be divided into two 30 minute topics, three 20 minute topics or 4 15 minute topics.
|
Name |
Example |
Technology |
Divided into |
Book Pages |
Web Pages |
Weeks |
|
School |
College in the Clouds |
Joomla & Moodle Websites |
3 to 4 Departments |
Many |
Many |
Many |
|
Department |
Computer Information |
Moodle |
3 to 4 Courses |
Many |
Many |
Many |
|
Course = Book = |
Better Word Processing |
Joomla Course website |
3 Parts |
420 to 480 |
36 |
36 plus 8 to 12 review |
|
Part |
Creating Documents |
Helix Mega Menu |
3 Chapters plus 1 review |
140 to 160 |
12 |
12 + 4 Review |
|
Chapter |
3 Page Layout Styles |
Joomla Category |
4 Sections |
40 to 60 |
4 |
1 Week |
|
Section |
3.1 What is a Style? |
Joomla Article |
2 to 4 Topics |
10 to 15 |
1 |
1 class |
|
Topic |
Font Families |
Topic |
1 to 4 Paragraphs & 1 + images |
2 to 3 |
Topic Heading |
15 to 30 minutes |
Notes: Each Class Session or Joomla article or web page is covered in 1 Hour with each topic taking 10 to 30 minutes.
Set Up an Annual and Quarterly Course Schedule
Before we create individual courses, we need to plan our Annual and Quarterly Course Schedule. A typical college in the US divides the Academic Year into four quarters. These are Fall, Winter, Spring and Summer. Fall Quarter is Mid-September to Mid December. This is followed by a two week Winter Break. Winter Quarter is January through March followed by a one week Spring Break. Spring Quarter is April through June followed by a 1 to 2 week Summer Break. Summer Quarter courses have a more compressed schedule of 8 weeks (July and August) instead of 12 weeks. Therefore a 4 credit course of 48 contact hours – which is 4 hours per week for 12 weeks becomes 6 hours per week for 8 weeks to cover the same content. Here we will simply describe the schedule for a single instructor teaching a full load of four 4 credit courses for Fall Quarter 2024.
While in-person courses often meet during the day time, online courses are typically held on evenings as students may have jobs during the day time. To provide 5 contact hours per week, we will assume course video conferences will be held in two hour blocks with two courses meeting on Mondays and Wednesdays (either 4 to 6 pm or 7 to 9 pm Pacific) and two courses meeting on Tuesdays and Thursdays (either 4 to 6 pm or 7 to 9 pm Pacific). This will leave Wednesdays, Thursdays and Fridays free for small group meetings with students. Grading quizzes and revising curriculum for the video conference sessions will be done Mondays and Tuesday mornings. Below is an example weekly schedule.
Fall Quarter Courses Instructor Schedule
|
Time |
Mon |
Tues |
Wed |
Thur |
Fri |
|
10 |
C1 Grade |
C3 Grade |
Office |
Office |
Office |
|
11 |
C1 Grade |
C3 Grade |
Office |
Office |
Office |
|
12 |
C1 Rev |
C3 Rev |
Office |
Office |
Office |
|
1 |
C2 Grade |
C4 Grade |
Office |
Office |
Office |
|
2 |
C2 Grade |
C4 Grade |
|||
|
3 |
C2 Rev |
C4 Rev |
|||
|
4 |
C1 Jitsi |
C3 Jitsi |
C1 Jitsi |
C3 Jitsi |
|
|
5 |
C1 Jitsi |
C3 Jitsi |
C1 Jitsi |
C3 Jitsi |
|
|
6 |
Dinner |
Dinner |
Dinner |
Dinner |
|
|
7 |
C2 Jitsi |
C4 Jitsi |
C2 Jitsi |
C4 Jitsi |
|
|
8 |
C2 Jitsi |
C4 Jitsi |
C2 Jitsi |
C4 Jitsi |
Notes:
Weekly projects and Quizzes due: Each course has four projects due and 4 quizzes due each week on Saturday evening at 11 pm.
Office Hours: Wednesdays, Thursdays and Fridays from 10 am to 2 pm. Students may schedule one 1 hour appointment per week.
Grading Time estimate: 48 projects and 48 quizzes per course per week. Each Quiz has 5 questions. 1 minutes per quiz and 2 minutes per project = 3 hours grading per course per week.
Summer quarter classes will meet for three hours on either Monday – Wednesday or Tuesday – Thursday to provide 6 contact hours per week. In addition, there will be 12 hours of Office hours on Wednesdays, Thursdays and Fridays.
Finally, while some of our 12 courses at College in the Clouds will only be taught once a year, a few foundational courses will be offered 2 to 4 times per year.
Below is a table showing our course offerings each quarter:
|
Quarter |
MW 4 to 6 |
MW 7 to 9 |
TTh 4 to 6 |
TTh 7 to 9 |
|
Fall |
1 Better Word Processing |
2 Learn Linux & Libre Office |
5 Create a Secure Website |
6 Create a Secure Online Store |
|
Winter |
7 Create your own Video Channel |
2 Learn Linux & Libre Office |
8 Create a Community Network |
6 Create a Secure Online Store |
|
Spring |
9 Create your own online course |
2 Learn Linux & Libre Office |
5 Create a Secure Website |
6 Create a Secure Online Store |
|
Summer |
11 Create a Secure Phone |
12 Publish your own Book |
4 Create your own Virtual Private Server |
6 Create a Secure Online Store |
Here is the 2024 Fall Quarter Calendar
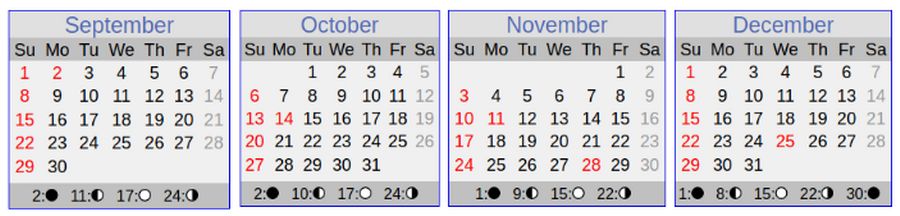
Course 1 & 2: Mondays September 16 through December 9 (excluding November 25) plus Wednesdays September 18 through December 11 (excluding November 27).
Course 3 & 4: Tuesdays September 17 through December 10 (excluding November 26) plus Thursdays September 19 through December 12 (excluding November 28).
Create a Course Syllabus for each course
A Course Syllabus is a summary of the course. It should include the primary topics and learning objectives. Ideally, it should also summarize the unique features of the course. It should also summarize the start and end dates, meeting times and total sessions as well as a way to contact the course instructor for more information.
The course syllabus may also include information about course projects, grading procedures as well as information about the course instructor.
Here is an example of the course syllabus for our first course:
Welcome to our course on Word Processing skills. The purpose of this course is to introduce you to a more structured way to share words, ideas, files, documents and other forms of information. This course will give you a better understanding and more control over how you create and format documents. We will start with simple one page documents, 2 page brochures and 20 page reports. We will then work our way up to formatting an entire 400 page book.
What is Different About this Course
This course is different from most other Word Processing courses in at least 6 important ways:
#1 Our goal is helping you learn better word processing skills.
#2 We explain real document creation and sharing security.
#3 We use many more images to assist visual learners.
#4 We provide many examples of better word processing methods such as how to create feature boxes.
#5 We focus on the role page layout, paragraph styles, text appearance and images play in the readability of documents.
#6 We introduce a new concept and word processing workflow called the Universal Source Document – where the same document can be used to create a printed handout or an online web page.
This course has video conference meetings on Monday and Wednesday evenings from 5 to 7 pm from September 16, 2023 to December 11, 2024 .Prior to each meeting, students are expected to read the course curriculum which is posted on this website: https://betterwordprocessing.com/
The course includes 24 two hour class sessions and 12 one hour small group sessions for a total of 60 Class Contact Hours. Class size is limited and early enrollment is advised. The course fee is $960 per course which is $16 per contact hour. However, we offer an Early Bird special of 50% off ($480) for students who sign up for the course at least two weeks in advance. This is only $8 per contact hour. You can enroll in any of our courses up to six months in advance.
Enrollment is a two step process. First, go to College in the Clouds dot com and fill out our Program Application form. Once accepted into our program, we will email you a Program Username and password which you can use to log into the website. Then go to the course(s) you are interested in and click the Enroll Now button to enroll in one or more of our courses.
For more information, contact the course instructor, David Spring M. Ed. Davidspring at protonmail dot com.
Course Cost Analysis
5 credit courses at 5 contact hours per week x 12 weeks = 60 contact hours times $16 per contact hour = $960 per course.
Early Bird special is 50% off = $480 per course = $8 per contact hour.
Instructor Actual Pay per hour: Instructors provide 5 contact hours per course per week and 3 more hours grading and revision per course per week for a total of 8 hours per course per week times 12 weeks for a total of 96 actual hours per course per quarter. Assuming students pay an average of $480 per course, and $80 per student per course goes towards course administration, accounting and web services, instructors are paid $400 or $4 per student per hour per course.
Create a Course Outline for each course
The course outline can be used to create course sections and sub-sections. Here is an example of the course outline for our first course:
Better Word Processing Course Outline
This course is divided into three parts. Each part is covered in about 4 weeks. The first part is 4 chapters covering essential skills for formatting simple documents. The second part is 4 chapters covering skills needed to complete your documents. The third part is 4 chapters covering skills needed to create more complex documents. Each chapter or section is further divided into four sub sections with each sub-section covering a particular class topic.
Part 1 Creating Documents
1 Word Processing Terms and Functions
1.1 Word Processing versus Formatting
1.2 Files & Documents versus Folders & Directories
1.3 Document Types versus File Formats
1.4 Using your Computer Clipboard
2 Compare 3 Popular Word Processors
2.1 Word Processors Comparison Table
2.2 Three Online Word Processing Programs
2.3 MS Word Offline Word Processor
2.4 Libre Writer Offline Word Processor
3 Page Layout Styles
3.1 What is a Style and Why is it Important?
3.2 Page Margins, Headers and Footers
3.3 Create Your Own Custom Page Layout
3.4 Custom Paragraph Styles
4 Part 1 Review
4.1 Word Processing Terms Summary
4.2 Word Processing Programs Summary
4.3 Page Layout and Paragraph Styles Summary
4.4 Part 1 Projects
Part 2 Completing Documents
5 Format Text
5.1 When to use Character Styles
5.2 Create Character Styles
5.3 Font Family Options
5.4 Add Free Custom Font Families
6 Format Images
6.1 Format Images with MS Word
6.2 Format Images with LO Writer
6.3 Create and Use Image Styles
6.4 Add a Caption to an Image
7 Format Tables, Lists and Feature Boxes
7.1 Format Tables
7.2 Custom Table Styles
7.3 Use Tables to Create Feature Boxes
7.4 Format Lists
8 Part 2 Review
8.1 Format Text Summary
8.2 Format Images Summary
8.3 Format Tables Summary
8.4 Part 2 Projects
Part 3 Format Complex Documents
9 Create a Custom Book Template with Libre Writer
9.1 Create 9 Custom Book Page Styles
9.2 Add Custom Book Page Styles
9.3 Add a Table of Contents
9.4 Add Custom Paragraph Styles
10 Create Graphs and Charts
10.1 Create Custom Colors and Gradients
10.2 Create a Diagram with Libre Draw
10.3 Create a Chart with Libre Calc
10.4 Create a Presentation with Libre Impress
11 Finishing, Converting and Sharing Documents
11.1 Finishing your Documents
11.2 Dangers of Sharing Documents
11.3 How to Safely Convert and Share Documents
11.4 Benefits of Universal Source Documents
12 Part 3 Summary
12.1 Custom Book Template Summary
12.1 Charts and Graphs Summary
12.3 Finishing and Sharing Documents Summary
12.4 Part 3 Final Project
Moodle Course Creation Assumptions
Moodle makes several assumptions about courses that may not actually be true. A key Moodle assumption is that each topic or section will be one week long. This may be true for an Elementary School course, but it will likely not be true for a College Level course.
Example Category and Example Course Template
A way to help instructors create courses is to create an example category with one or more example course templates. Moodle offers a plugin called Course Creator that can be used to copy any existing course within the category, based on a template that is added in any category and or as a blank or shell course. https://moodle.org/plugins/local_course_creator
Course Creator gives users a quick way to create courses within a category. Install Course creator by clicking on Plugins, Install Plugins. To see the Course Creator, log into your Moodle site as an administrator or teacher and go to Site Administration, Courses, Manage Courses and Categories. Then click on any category to select it. By default, the screen opens in your first category. In our case, this category is called Information Sharing Essential Skills:
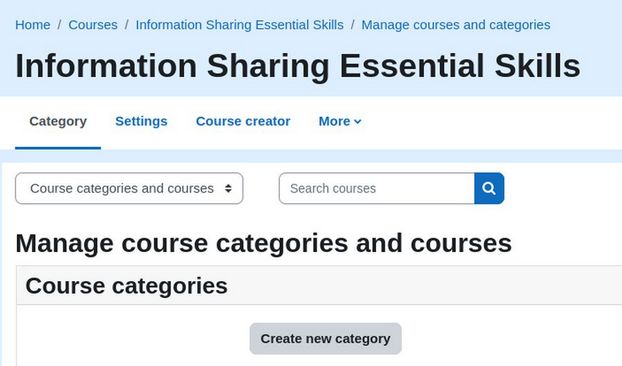
Note the Course Creator Menu Item below the category name.
Adjust the Course Default Settings
Before we use the course creator, we should adjust the default course settings. Go back to Courses and click Course Default Settings. By default, each new course is set to use the Topics format. Another common course format is the Weekly format. However, in a previous article, we installed a plugin called Flexible Sections course format. The Flexible Sections format allows us to create Sub-sections inside each section.
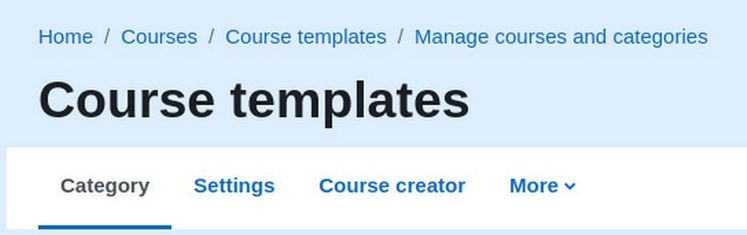
Change the default to Flexible Sections and click Save Changes. Then click Courses, Manage Courses and Categories. Then click Create a New Category. Change the Parent Category to Top. Call it Course templates. Then click Create Category.
Then click Course Creator
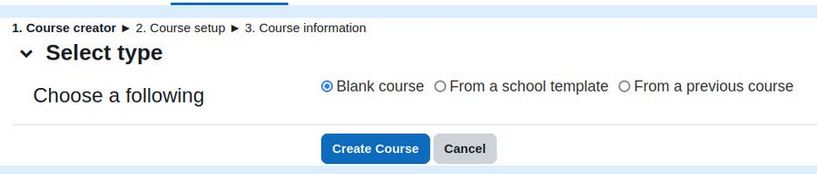
Leave it at Blank Course and click Create Course. For Course Full Name and Short Name, type Flexible Sections Course Template. For Course Visibility, change it from show to Hide. Then click on Course Format and increase the number of sections from 4 to 12. Then for course information, type in 12 for the number of chapters and 48 four the number of sections. Then click Save and Display. This opens a new Course Home page with 12 topics:
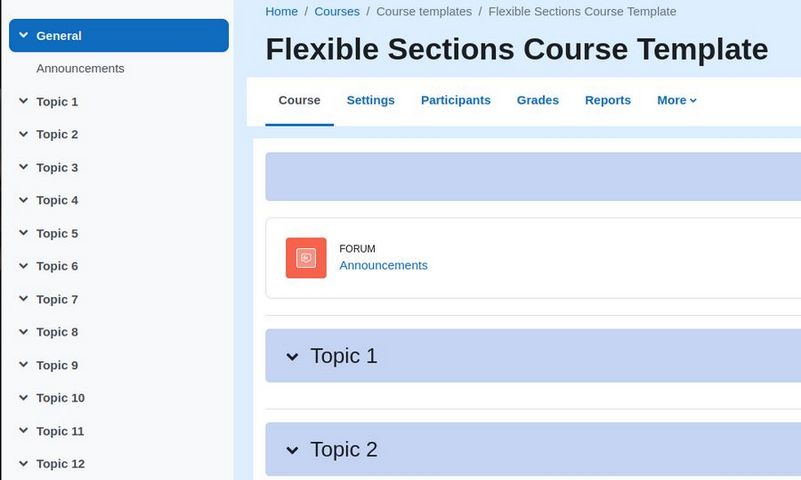
Turn on Edit Mode and then rename Topic 1: Welcome to our course
Rename Topic 2: Part I... First Steps
Then click on the three dots to the right of Part I to add four sub-sections (Chapters or Weeks). Name these new sections:
Week 1 Topics
Week 2 Topics
Week 3 Topics
Week 4 Topics
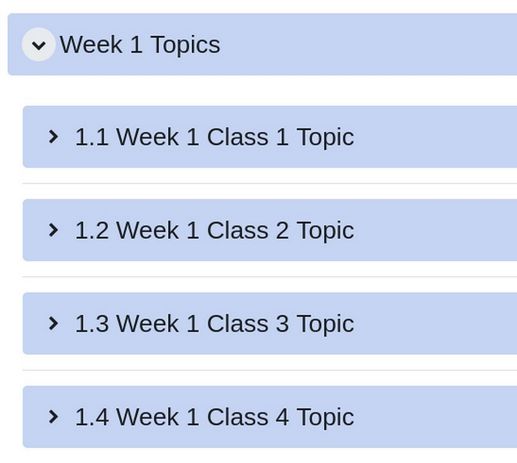
Then click on the three dots to the right of Week 1. In each chapter add 4 sub-sections (chapter sections such as 1.1, 1.2, 1.3 and 1.4). For Week 1, name these sub-sections or class topics:
1.1 Week 1 Class 1 Topic
1.2 Week 1 Class 2 Topic
1.3 Week 1 Class 3 Topic
1.4 Week 1 Class 4 Topic
Repeat the above process to add sub-sections to Weeks 2, 3 and 4.
Then rename the next section Part II... More Steps. Then add Weeks 5 through 8 and add 4 sub-sections inside of each week.
Rename the next section Part III... Final Steps. Then add Weeks 9 through 12. Then add 4 sub-sections inside of each week. Then turn off Edit Mode and click Collapse All and view the result. Here are the four top level topics:
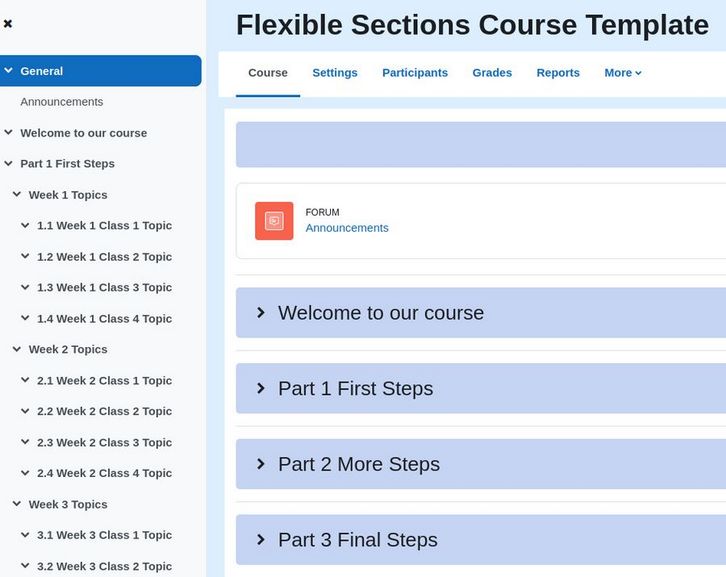
Click on Part I The four weeks in Part 1 are displayed.
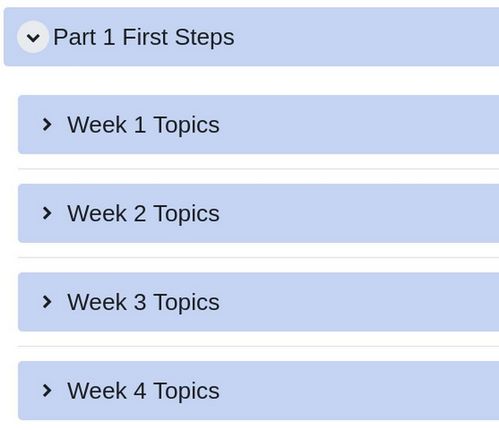
Click on Week 1 to display the four sections or topics in Week 1.
Create a copy of the Course Template and move it to another category
To copy this course template, go to Site Administration, Courses and click Manage Courses and Categories. Note that we have moved the Course templates category to the top of the list of categories and clicked on its eye to make it a hidden category:
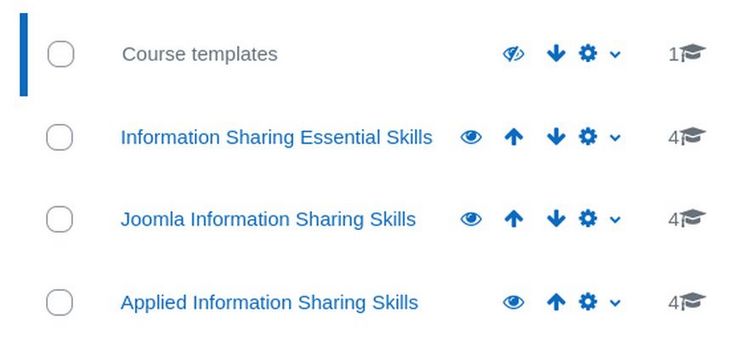
There is only one course in the Course templates category:

Select the course and then click the Copy icon. For full name and short name call it Course made from template. Change the visibility to Hide and check the teacher to add any teachers to the new course. Then click Copy and View. It should reply Course copies in progress. It will say Process pending during which it makes a backup of the course template and then use the backup to create the new course. The process may take several minutes. When it is done, the table will say Complete with a green check mark. Click on the Course made from template to go to that course home page – where all the week sections and sub sections have been made.
Then go to Site Administration, Courses, Manage Courses and Categories where the course has been added to the Course templates category. Select it and use the drop down arrow to choose a different category:
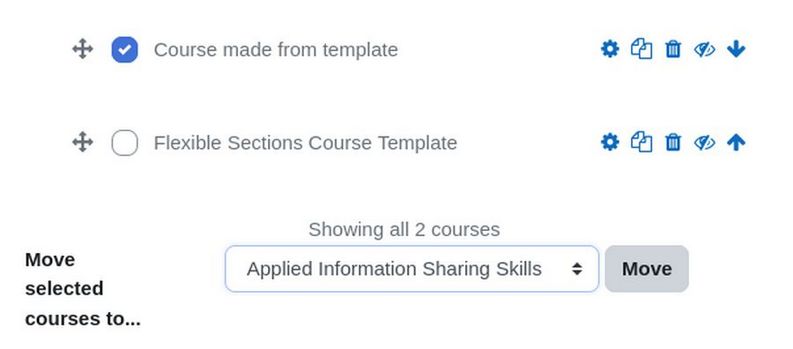
Then click Move. Then click on the selected category to see the new course has been moved.
Use Course Creator to copy the Course template
Go back to the Course templates category and click Course Creator. Change type from Blank Course to Previous Course. The Flexible Sections Course Template should already be selected:
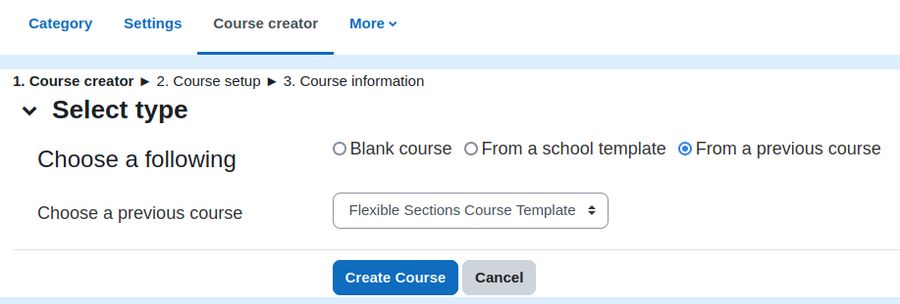
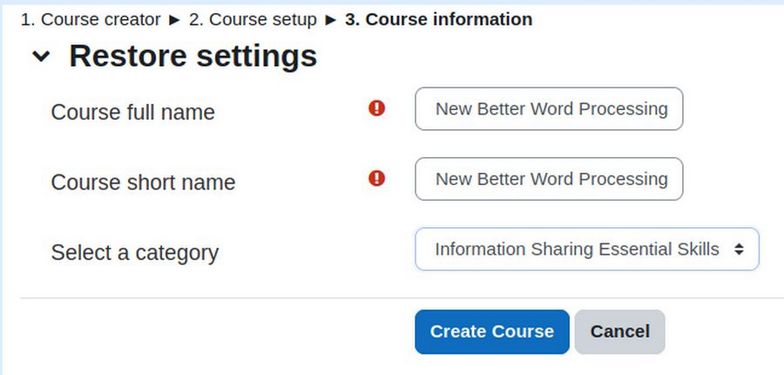
Click Create Course. This brings up the Backup settings screen with lots of options. Leave only the following checked: Include Activities and Resources. Include Blocks. Include Calendar Events. Include Question Bank. Include Custom Fields. Then click Next. Add a Course full name and short name. Select the category. Then click Create Course.
This process went much faster and ends in the new course home page.
What’s Next?
In the next article, we will add activities to our course sub-sections to create a predictable lesson process for our course.