
There are several tasks you will want to configure before going live. The most important ones are listed below.
Add Moodle Cron Jobs
Moodle requires periodic updates to several functions. The Moodle background tasks (e.g. sending out forum emails and performing course backups) are performed by a script which you can set to run at periodic intervals. This is known as a cron job. Do not skip setting up the cron process on your server for your Moodle. Your site will not work properly without it! Thankfully, Hestia makes it easy to add Cron Jobs. For more information on setting Cron jobs with Hestia, see this article:
https://createyourownvps.com/final-steps/8-firewalls-backups-and-appearance/8-3-use-hestia-to-run-a-cron-job
Note that the command for the Moodle cron job in Hestia is slightly different than the command shown in the Moodle Cron Job documentation. Specifically, you need to use php8.1 rather than just php. Thus, the command is
/usr/bin/php8.1 /path/to/moodle/admin/cli/cron.php
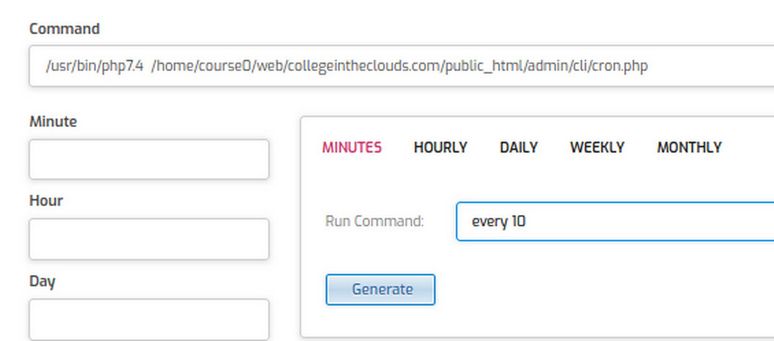
Note that there is an empty space after 8.1 and before the forward slash in front of the word path. In the future, the php version may change. To make the actual Moodle cron job, log into your Hestia user panel. In the Hestia User Panel, click Cron. There are no current Cron Jobs for this user. Click Add Job. Copy paste the command into the top box (adjust the path for your user and domain name):
/usr/bin/php8.1 /home/course0/web/collegeintheclouds.com/public_html/admin/cli/cron.php
Then use the drop down arrow to select every 10 minutes. Then click the Generate button to generate the proper time code.
Then click Save and Back.
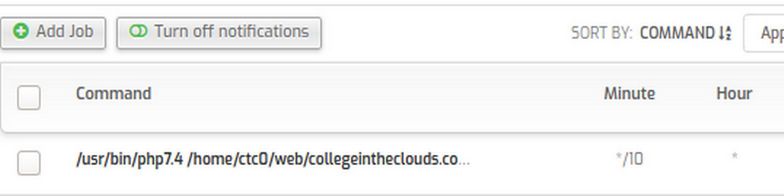
Then wait 30 minutes and log into your Hestia User email account.
If you see one or more emails with the Moodle Cron Job command, you know that you have properly set up your Moodle Cron and that the command is working.
Stop Moodle Cron Jobs from Sending your emails every 10 minutes
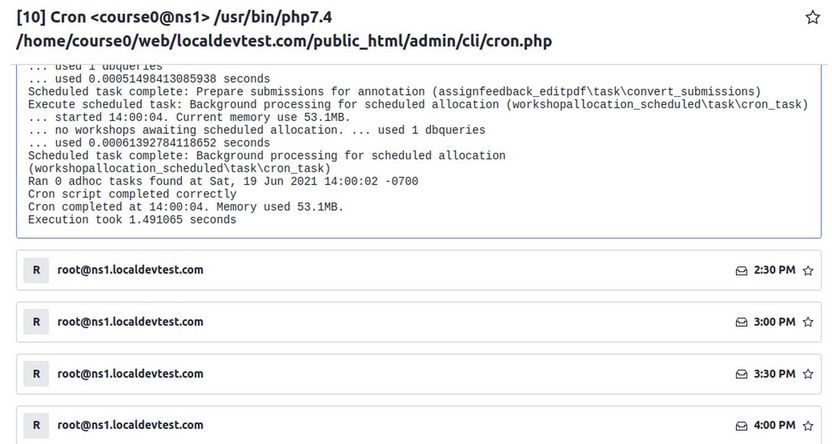
Now that we know the command is working, we need to change the command so that the Moodle cron job does not fill up our email in box. Go back to your Hestia User panel and click Cron Jobs. Then select the Moodle cron job to edit it. Change the command to add an empty space at the end and then copy paste >/dev/null
Here is my command with the full path:
/usr/bin/php8.1 /home/course0/web/lcollegeintheclouds.com/public_html/admin/cli/cron.php >/dev/null
Then click Save and Back. Adding >/dev/null should stop you getting an email every time the Moodle cron job runs (every 10 minutes). To check this, open your email account and verify that the Moodle cron job emails have been stopped.
Fix Moodle Cron Problem
As of November 2023, you should verify that Moodle Cron is working properly. Log into your Moodle site as the admin and go to Site Administration. Then click Reports, System Status. Sadly, you could find that Moodle Cron stopped running in November 2023! It turns out that this was caused by a tiny update to PHP which was then updated to Hestia PHP settings. The problem is located in this folder: grep -riE 'disable_functions|pcntl' /usr/local/hestia/data/templates/web /etc/php
To get Moodle Cron running again, start a root SSH session. Then copy paste the following command to remove function pcntl_signal from directive disable_functions for PHP 8.1 CLI:
sed -i -E 's/(^disable_functions.*),pcntl_signal(.*$)/\1\2/' /etc/php/8.1/cli/php.ini
Check to make your sure your Moodle Email System works
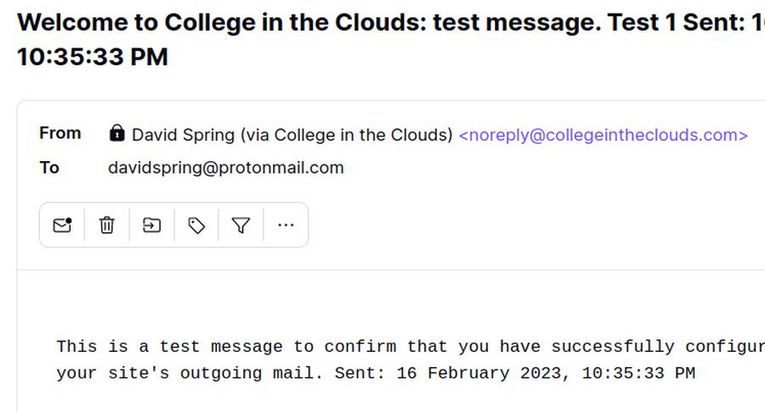
Both Hestia and Moodle have steps that need to be taken to set up an email system. In Hestia, we have already set up a secure custom domain-related email address in article 1.2, Step 5. For the Moodle process, log into your Moodle site and send a test email. Click Site administrator, Server, Outgoing mail configuration. Scroll down to “Test outgoing mail configuration.” Click on the blue text. This screen will appear:
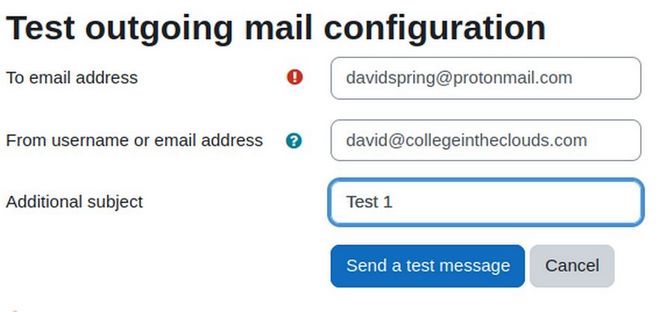
Enter your email address and click Send a test message. It should reply email successfully sent. Then log into your Protonmail account and see if you got the test message.
If you did not receive an email copy of the message, check the settings in Site administration > Plugins > Message outputs > Email. Don't skip this step as Moodle uses email to recover lost passwords.
Increase the Maximum Moodle Upload Size
We need to increase the maximum file size upload limit in order to install some later extensions. To see the current limit, go to Site Administrator > Server > PHP Info. Scroll down to Core settings, then "Uploaded Max File Size". In article 1.2, we have previously adjusted our PHP INI file to 100 MB
Turn off Guest Login.
By default, Moodle allows the public to log into your Moodle website and look at your courses. If this is OK with you, then leave guest log in enabled. However, if you do not want to allow guest log in, then go to Site administration and click the Plugins tab. Then click Authentication/ Manage authentication. Then scroll down to Guest login button and change the setting from Show to Hide. Then click Save Changes.
Set Up Moodle Backups
Both Hestia and Moodle have programs to back up your Moodle website. The easiest option is to use the Hestia backup system which automatically creates a new backup every day.
However, in order to keep the size on your VPS hard drive down, Hestia also deletes the old back up when it is replaced with a new one. Because the backup files are compressed, each backup is likely to be about 100MB.
Use Hestia Packages to Increase the Number of Backups
If you would like to Hestia to keep more backups, and have enough space on your hard drive, log into your Hestia VPS Admin account and click Users.
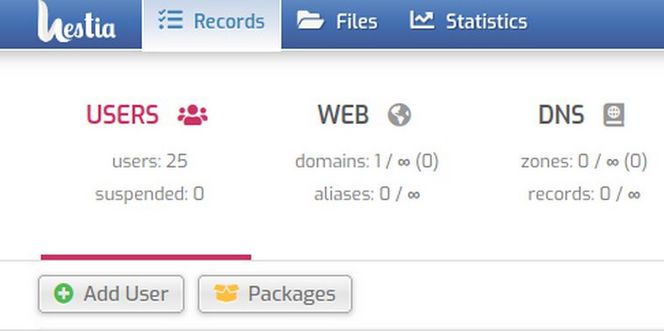
Then click Packages which brings up this screen.
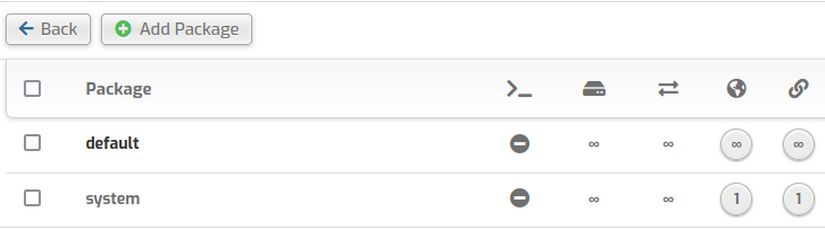
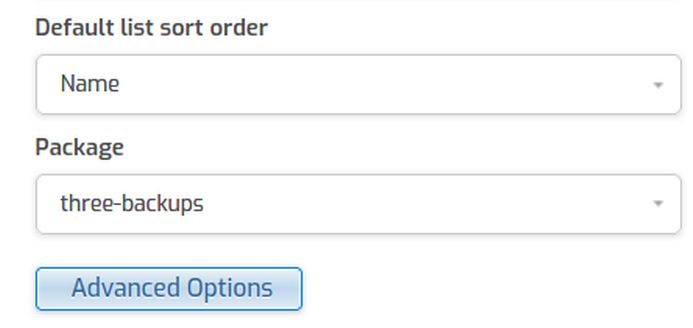
Hestia allows us to create custom packages so that different domain names can have a different number of backups. The default package is called default. It can not be changed. While you can create a completely new package, the easiest thing to do is to select and copy the default package. Then change the name of the package to three-backups and type 3 for the number of backups:

Click Save to save the change. Then click Back. Look in the far right column to see that this package will keep 3 backups. To change the package assigned to a Hestia user, click Users. Then select a user and click on the hidden Edit pencil. There is now more than one type of package which is just above the Advanced Options button. Change the package from Default to three-backups:
Click Save. Then Back.
How to Take a New Back Up
Log into a Hestia User account. Then click on Backups.
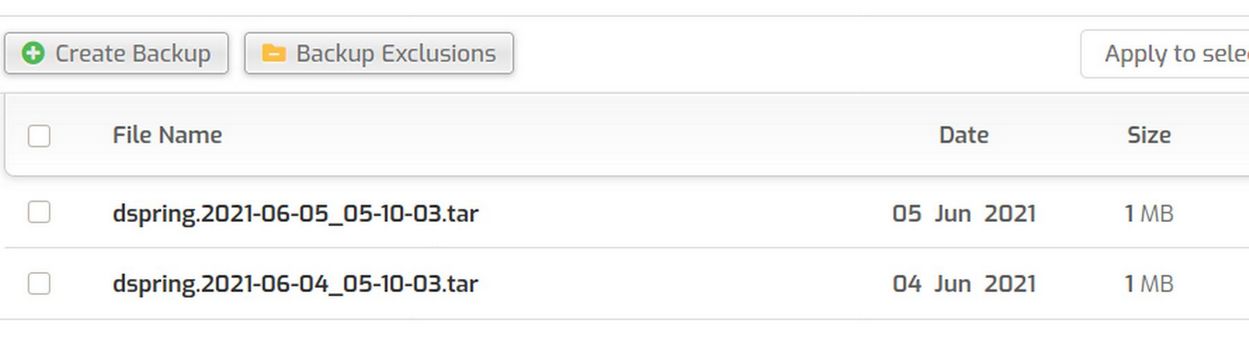
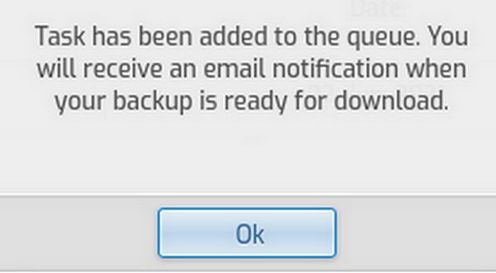
Here you can see how many backups have been taken automatically and what there file size is. To create a new backup, click Create Backup. This screen will appear letting you know that a new backup has been scheduled. Click OK.
To download an existing backup, select it. Then click the hidden Download icon.
Then place the backup compressed file in a folder on your home computer called Moodle Website backups. Ideally, you should download a backup at least once a month so you have older backups in addition to recent ones.
Restore your Website from a current backup
To revert the website back to its recent prior state, click on Backups and select a recent backup. Then click the hidden Restore icon. Wait a few minutes. Then open a new browser and clear the cache. Then view the website.
Restore your website from a downloaded backup
To restore your website from a downloaded backup that is more than three days old, we need to go to our Hestia User account and click Files. Then open the tmp folder and add the tar file to the tmp folder. Next, start an SSH session into our VPS. Type mc and press Enter to open Midnight Commander. Navigate to the root folder, then the home folder, then the user folder, then the tmp folder. Select the tar file and click File, Move to move it to /backup folder.

Click OK. Check to make sure it is now in the Hestia /backup folder. Then type exit to close Midnight Commander. Then, copy paste the following command:
v-restore-user username username.2023-01-01_00-00-00.tar
Where username is the name of the Hestia user and the date is the date on the file. Then press Enter. The restore will begin with WEB, then DNS, then the rest of the files and end with the root prompt. Then type exit to close the SSH session.
Then open a new browser tab and visit the website. For more information on the Hestia backup and restore system, visit this web page:
https://createyourownvps.com/final-steps/8-firewalls-backups-and-appearance/8-2-use-hestia-to-set-up-a-vps-backup-system
Moodle Course Backups
Moodle course backups are a way to create a copy of a course and then download it to reuse the course in some other category, some other year or some other Moodle school. They are not a substitute for a Moodle website full backup – which is best done in Hestia.
Also I recommend against automating course backups as they will slow down your server and use up your bandwidth. Instead, I recommend that your or course instructors periodically take a manual back up of each course.
As an instructor, you can Back Up a Moodle Course by creating and downloading a Moodle Backup File (.mbz). An .mbz file is a compressed archive of a Moodle course that can be used to restore that course within your existing Moodle site or a different Moodle site. Instructors should back up their courses at the close of each semester to reuse the course in a future semester.
This course backup includes all files added by the Instructor except for student grades. The backup does NOT download files submitted by students.
The contents of the .mbz cannot be accessed from your computer (outside of Moodle). For example, you cannot extract PDFs from the backup file, but if the course is restored on a Moodle server, files that were uploaded into the original course (and links to files stored elsewhere) will appear in the restored course.
Instructors can create and download an .mbz file of any course they teach to archive course Resources, Activities, and Settings for safekeeping.
The Moodle Course Backup Files include Resources (e.g., Files, Folders, Pages), Activities (e.g., Assignments, Quizzes and Quiz Questions, Questionnaires), Settings (e.g., Course Format, Theme, Course Completion settings, and settings for Assignments and Quizzes). You must have the Admin or Teacher role in a course to create and download a Moodle Backup File.
Create a Moodle Backup File (.mbz)
To take a manual course backup, go to Site Administration, My Courses and click on the course you want to create a copy of. In the More drop down, click Course reuse. This screen will appear:
By default, this tool is set for Import. To change it to Backup, click on the Import button in the upper left corner. Then click Backup. (There is another option called Copy course that simply creates a copy of the course to use to create a different course for the same semester. So click Backup instead).
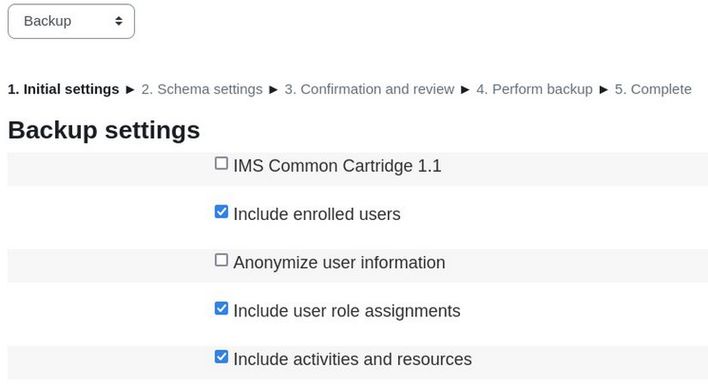
Uncheck include enrolled users. Then click Jump to final step. Moodle should reply that the backup file was successfully created. Click Continue. This opens a page called Import a backup file. Scroll down to User private backup area. Your backup file is the top of the list.
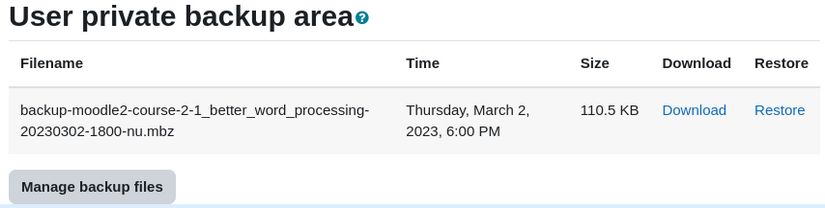
To the right of the file name to download, click Download.
Note: Do not select Restore here as this will simply restore your Backup in the Moodle course you just backed up.
Click Manage Backup Files to see this screen:
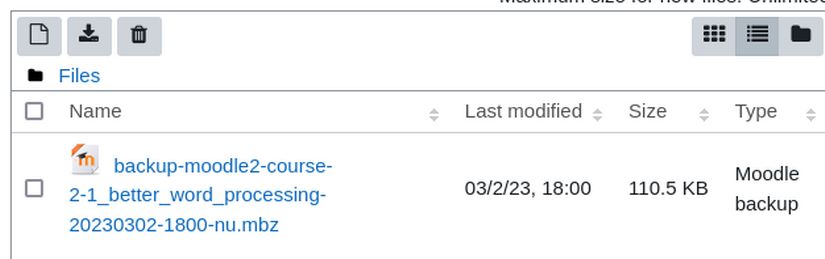
Click the file to bring up the Download and or Delete options.
Import a Course from a Moodle Course Backup File
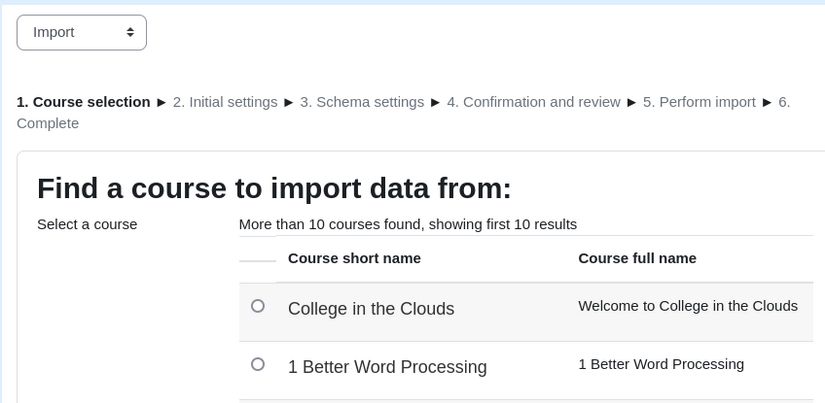
Because the import process is "additive," it is best to import a backup file into a new, empty course. Once you have been notified that your empty course for the new semester is ready, log into Moodle. Under My Courses, click the name of the new course to open it. The new course will open with the default settings, blocks, number of sections. Use the Import function to quickly copy content from a previous Moodle course and reuse the content for the current term.
Under More Course Settings, select Import. The Find a course to import data from page will open. The Find a course to import data from page will list up to 10 courses available for you to copy. On the Find a course to import data from page, select the radio button for the course to copy, then click Continue. The Import Settings page will open. Leave the settings at their default values. Select Jump to final step. The Perform Import page will open showing the progress of the import.
Depending on the size and number of items to copy, this may take a few minutes. Once the import process is complete, a confirmation message will appear. Click Continue. You will be returned to the new course.
After completing the Import process, be sure to attend to these important tasks to finish preparing your course for the new term. These tasks include updating text in Labels, Section names, etc. For example, look for any references to dates and the term taught. Also update your syllabus or other resources. In addition, update due dates for activities such as Assignments and Quizzes.
What’s Next?
This is just the beginning. In the next chapter, we will review how to set up the initial Courses and Users structure of your Moodle website.