
In this article, we will provide a Step by Step guide explaining how to update your Moodle website.

The average Joomla site has about 40 data tables while the average Moodle site has over 400. Because Moodle is about twice as big and ten times as complex as a Joomla site, updating a Moodle Site to the latest version of Moodle is much more difficult than updating a Joomla website to the latest version of Joomla. Updating a Joomla site takes only minutes. You first update your extensions. Then update Joomla. It is common to update a Joomla site to the latest version of Joomla about every two months. However, updating a Moodle site can take an hour or more. I therefore recommend updating the minor versions of a Moodle site only about once a year.
In addition, I do not recommend updating to the first major release of Moodle as it is common to have bugs which need to be worked out. For example, I updated to Moodle 4 only after Moodle 4.1 came out, which was in February 2023. After that update, I also used Hestia to update PHP to PHP 8.1 for this website. Because Moodle updates minor versions about every six months, I updated to Moodle 4.3 in January 2024.
However, to increase the odds that all of my Moodle custom plugins and themes will still work, I left the PHP version at PHP 8.1.
Moodle follows a half-yearly cycle for the new version releases. The six-monthly release is termed as Major release. Major versions are intended to introduce new features & functionality in Moodle core.
About every two years, Moodle provides a long-term support release (LTS). The most recent LTS was Moodle 4.1. The next LTS will be Moodle 4.5. Here is a table of recent releases:
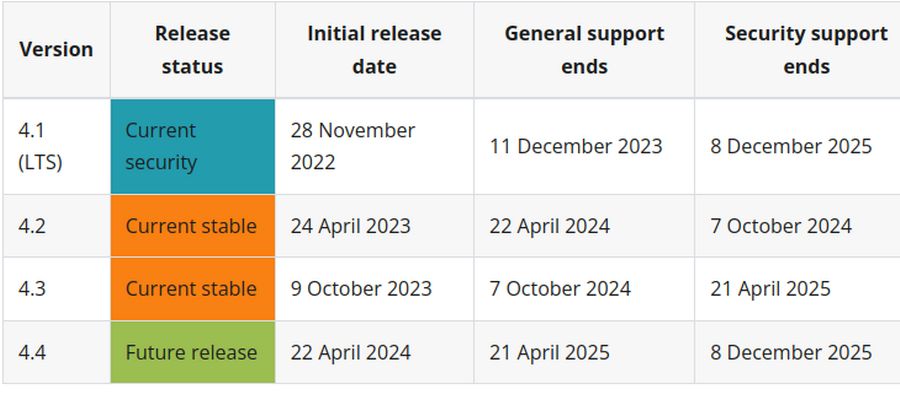
In addition to Major releases, Moodle provides Minor Point releases (4.3.x) about every 2 months - February, April, June, August, October, December. Each Major release averages about 100 changes. Therefore in a typical year, Moodle has about 200 changes. A few of these changes are to provide new features. But most of the changes are to update their code to the latest versions of PHP – which is the underlying language that both Joomla and Moodle are written in.
PHP has been changing rapidly in recent years to make programs written with PHP (such as Joomla and Moodle) faster and more secure. This requires a yearly dance where we need to alternate between updating Moodle versions and updating PHP versions.
PHP 8.1 support was added to Moodle in March 2023 with Moodle 4.1.2. PHP versions supported by Moodle 4.1: 8.1 but not 8.2. PHP 8.1 support ends in November 25 2024.
PHP versions supported by Moodle 4.2 PHP 8.1 or 8.2. PHP 8.2 support ends in December 08 2025.
PHP versions supported by Moodle 4.3 PHP 8.2 or 8.3. PHP 8.3 support ends in November 23 2026.
In January 2025, I will either update to Moodle 4.5, or if Moodle version 5.1 is available, and if the custom themes and plugins I use have been updated to Moodle 5.1, then I will update to Moodle 5.1 and after that I will update PHP to PHP 8.2. All of this means that I only update on the odd versions of Moodle.
A second difference between updating Joomla and updating Moodle is that I rarely create a Joomla test site to perform updates on before updating the live sites. But Moodle sites are so difficult to build and maintain that I always create a Moodle test site which I use to test updates on before doing the updates on a Live Moodle site. We will therefore begin the process of updating your Moodle site by explaining how to create a Moodle Test Site. Thankfully, this process only needs to be done once.
Steps to Create and Update with a Moodle Test Site
Creating and Updating with a Moodle Test Site (also known as a duplicate site) can be divided into 12 basic steps:
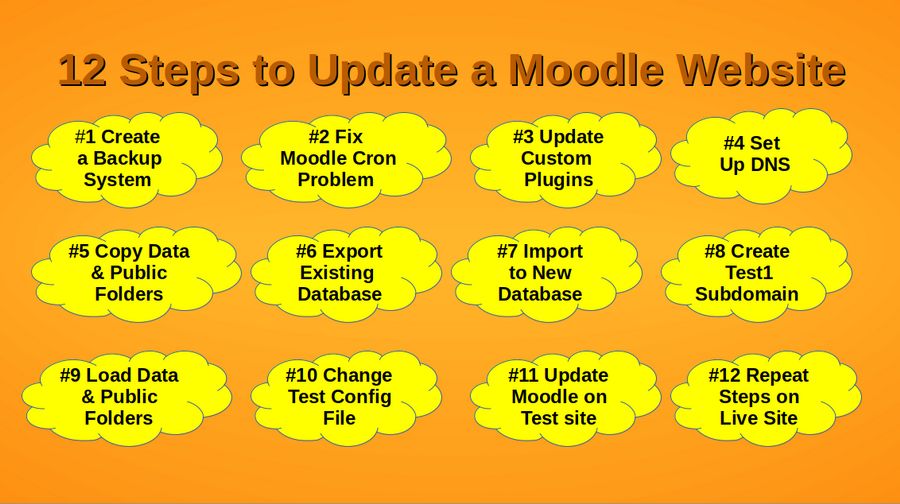
Here are these 12 Steps:
Step #1 Create a Moodle Site Backup System
Step #2 Fix Moodle Cron
Step #3 Update all custom plugins.
Step #4 Set up DNS for a test1 subdomain
Step #5 Copy the Moodle data & public folders
Step #6 Export your existing database
Step #7 Import into a new Database
Step #8 Create a Test Subdomain
Step #9 Load the Moodle data folder & public folder to your Test Site
Step #10 Change your Test Site Configuration File Settings.
Step #11 Update Moodle on your test site.
Step #12 Repeat these steps for your Live Site.
Let’s review each of these 12 steps.
Step #1 Create a Moodle Site Backup System
There are a huge number of things that can go wrong with a Moodle Update. The Moodle Update Forum is filled with posts by people who suffered a problem during the Update but failed to have a backup they could use to roll their site back to a pre-update version. Even if you create a Test Site (which we will do next), and all goes well with your Test Site update, you can still run into an unexpected problem when updating your Live Site. However, failing to update your Moodle Site increases the risk of hacker attacks – because hackers are notorious for hacking school websites.
Cost of Hacker Attacks on Educational Organizations
Hacking is currently a very lucrative business. Hackers begin attacking educational and business organizations within minutes of going online. In July 2021, a computer security firm called Sophos released a report summarizing the prevalence of ransomware attacks on educational organizations. Here is a link to this 19 page report: https://secure2.sophos.com/en-us/medialibrary/Gated-Assets/white-papers/sophos-state-of-ransomware-in-education-2021-wp.pdf
The report surveyed more than 5000 Information Technology Decision (IT) Makers from around the world. Nearly 500 of these decision makers were from the Education sector. These IT department heads reported that in 2020, 44% of all organizations were hit with ransomware attacks. Of those who were hit with a ransomware attack, the hackers were successful in encrypting their data and bringing down their websites 58% of the time. Of those whose data was encrypted by hackers, 33% were forced to pay the ransomware blackmail. The average blackmail payment was $112,435 US dollars.
However, attacks on victims in the education sector had the worst outcomes. Those who paid the ransom got back just 68% of their data on average, leaving almost a third of the data inaccessible. The total bill for recovering from a ransomware attack in the education sector, considering downtime, people time, device cost, network cost and ransom paid by victims in the Education sector was, on average, US $2.73 million – the highest across all sectors surveyed. After a hacker attack, many educational organizations reported that they needed to completely rebuild their entire database and information systems from the ground up. Sadly, despite the prevalence of Windows ransomware attacks, most educational organizations continue to use insecure Windows computers to access their websites and databases.
Real website security requires not allowing hackers into your website and database in the first place. This in turn requires eliminating any security holes in your website code, your website server code and in the code of any and every computer that has back end access to your website and database. The most common security hole used by hackers to take over your website is the Windows operating system. Even if your server is using the Linux operating system, if you or a member of your staff accesses the server with any hacker-infected Windows computer, then all of your passwords could be compromised. Nearly all current ransomware attacks use security holes in the Windows operating system.
Therefore, if you want real security, you and your staff should convert all of your computers from Windows to Linux and learn how to replace insecure Windows programs with secure Linux programs. I have written a course that explains how and why to convert from Windows to Linux. Here is a link to this course: https://learnlinuxandlibreoffice.org/
In addition to switching from Windows to Linux computers, it is essential to create a series of backups for your Live Moodle site before performing an Update. These backups should take place over a period of weeks and even months as it may take that long to learn that an Update has caused a problem requiring rolling your Live Site back to a pre-update version. While Hestia will by default take one full backup of every website every day, it does not keep any of the previous backups. We therefore need to create a better Backup System for our Moodle sites than we use for our less error prone and more reliable Joomla sites.

Change server backups timing from once a day to once a week
Log into your Hestia Admin panel. Then click CRON. Then scroll down to Line 7: sudo /usr/local/hestia/bin/v-backup-users
Click Edit. It is set to run every day at 05:10 Universal or London Time:
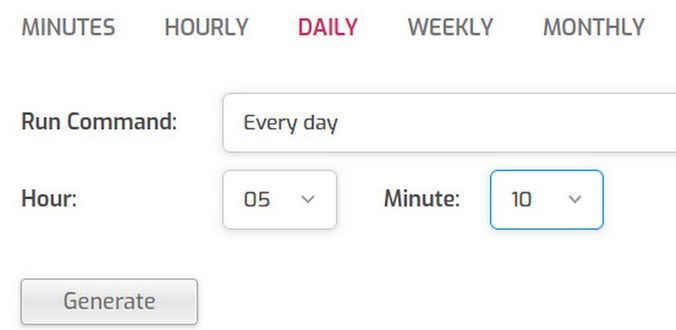
Click Generate to get this:
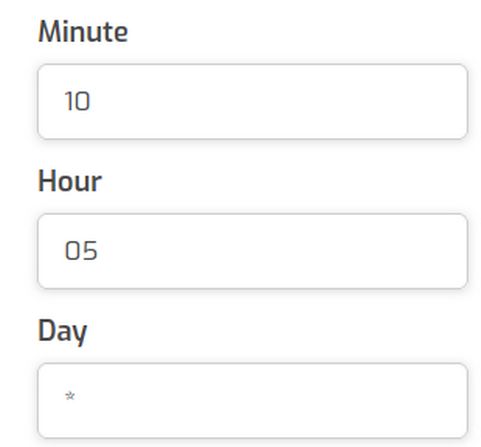
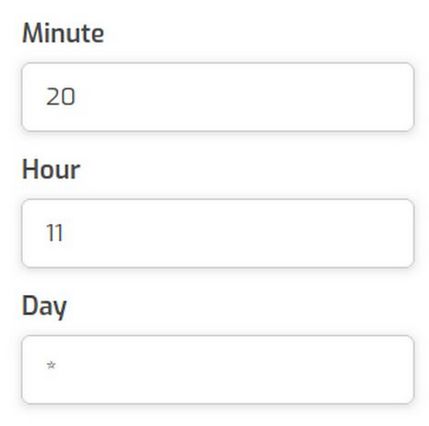
There is 8 hours difference between London time and Pacific Standard time. Therefore, 05:10 am London time is the same as 9 pm the previous evening on the US West Coast. We would rather have the backups ran at 3 am Pacific which is 11 am London time. We also want backups ran once a week on Saturday rather than once a day. So we will change the Generate box to Weekly, Saturday at 11 hour, 20 minute:
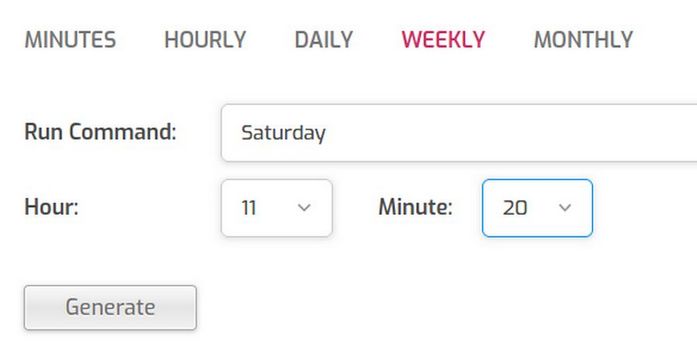
Click Generate to get this:
Click Save then Back. Now each Hestia User account will be backed up once a week on Saturday 3:30 am Pacific Standard time instead of once a day at 9 pm Pacific time.
Create a Package with 5 Backups
The next step in creating our Moodle Site Backup System is to click User, Packages. There are two packages called default and system. To add a new package, we could click Add Package. But it is easier to just click the icon to duplicate the default package. Then click default-copy to edit the new package. Change the Package name to 5-backups. Increase the backup number from 1 to 5. Then click Save and Back. Then Back again.
Then edit your Hestia Moodle User account. Scroll down to Package and change it from default to 5-backups. Then click Save and Back. This will give us one back up per week of our Moodle Live Site and Test Site for 5 weeks – which will allow us to easily restore our site to a backup up to 5 weeks after doing an update.
Download monthly backups
What we really want is to be able to restore fro a backup up to 50 weeks after doing an update. A common tactic of hackers is to hide in your website files for weeks or even months before taking down your site. It is therefore useful to download month backups of your most important sites. Hestia makes it very easy to download backups.
Just go to your User account and click Backups. Select the backup you want and click the Download icon. It will be about 200 MB. Put the download file in a 2024 Moodle Backups folder.
Take an Update Backup: In addition to the weekly and monthly backups, you should take a manual backup just before placing your site into Maintenance Mode to start the Update process. Note that you can not take a backup while your site is in Maintenance Mode.
Step #2 Fix Moodle Cron & Other Problems
Before you update your site, you should verify that Moodle Cron is working properly. Log into your Moodle site as the admin and go to Site Administration. Then click Reports, System Status. Sadly, you could find that Moodle Cron stopped running in November 2023! It turns out that this was caused by a tiny update to PHP which was then updated to Hestia PHP settings. The proble is located in this folder: grep -riE 'disable_functions|pcntl' /usr/local/hestia/data/templates/web /etc/php
To get Moodle Cron running again, start a root SSH session. Then copy paste the following command to remove function pcntl_signal from directive disable_functions for PHP 8.1 CLI:
sed -i -E 's/(^disable_functions.*),pcntl_signal(.*$)/\1\2/' /etc/php/8.1/cli/php.ini
Step #3 Update all custom plugins
Before we update Moodle on our test site, we need to update all of our custom plugins. The above command will fix the Cron problem. However, if you go to Plugins, Plugins Overview, you should now see a bunch of custom plugins that need updating before we update Moodle. Update each plugin one by one. Note new configuration settings which you can research later. But for now, just accept the default values.
Next, click Plugins, Plugins Overview.
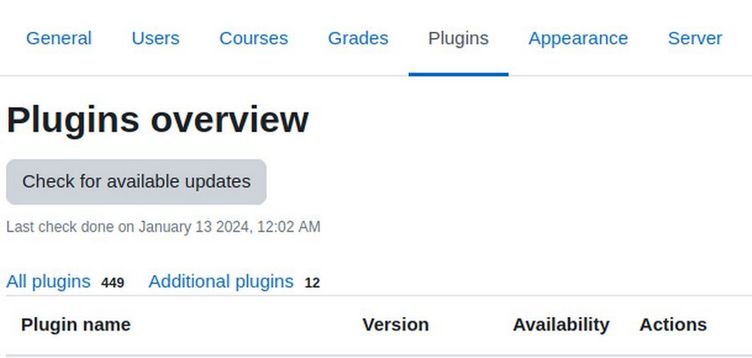
Our site has a total of 450 plugins. Note that only 15 are Additional Plugins. We begin by creating a table of these 15 additional plugins. The Plugins Overview List indicated that 12 of the 15 have Updates.
|
Plugin Name |
Category |
Update Avail? |
Notes (new version #) |
|
Checklist 3.9.3.2 |
Modules |
Yes |
3.9.3.5 2023 Oct |
|
Jitsi 3.3.5 |
Modules |
Yes |
3.3.9 2023 Oct |
|
Signup sheet 5.3.0 |
Modules |
No |
2023 Jan Tutorial Booking test it. |
|
Checklist block 3.4.0 |
Blocks |
Yes |
3.4.2 2023 Oct |
|
Mass Actions |
Blocks |
Yes |
7.1.3 2023 August |
|
Flexible sections Format |
Course |
Yes |
4.0.6 2023 Dec |
|
Filter Codes |
Filters |
Yes |
2.4.3 2023 Nov |
|
Dates |
Reports |
No |
Test it. |
|
Themes Almondb |
Themes |
Yes |
401.23.101 2023 Oct |
|
Themes LearnR |
Themes |
Yes |
4.2.r8 2023 July |
|
Events reminder 2.7 |
Local |
Yes |
2.7.1 2023 Nov |
|
Static Pages |
Local |
Yes |
4.1.r2 2023 Oct |
|
Contact Form |
Local |
Yes |
1.3.1 2023 Oct |
|
Course creator 3.9 |
Local |
No |
2021 June but GitHub Closed Issues indicates corrections done in Feb 2023. Test it. |
|
Stripe 1.15 |
Payment |
Yes |
1.24 2023 Sept |
|
Test all Plugins |
After Moodle Update |
on test site before |
Moodle Update of Live Site. |
Next, update each of the 12 plugins above one at a time to the latest version. Then click Save Changes. This ends in Notifications page. Click Plugins Overview again to update the next one. A few plugins have new settings to note for later research. For now, accept the default settings and click Save Changes.
Before we create our test site, we should also fix a few other problems. First, there is a problem with the Moodle Drawer menu not displaying properly on narrow screens. We can fix this by changing the AlmondB theme Advanced tab custom CSS to:
.drawer {z-index:1099;}
.drawercontent {z-index:1099;}
Second, there is a problem with the Moodle Language selector preventing the Login Link fro appearing on some screen widths. We can hide the language selector by going to Site administration, General Tab, Language > Language settings and changing the Display Language Menu setting from Yes to No.
Third, after updating the Static Pages plugin, the About Us menu item does not display properly. We can fix this by going to the Almond B Front Page settings and change the About URL from -About|/mod/page/view.php?id=1
to
-About|https://collegeintheclouds.com/local/staticpage/view.php?page=about_us
We also need to change this same link in Appearance, Theme settings.
Fourth, we need to fix the Moodle blog so that public can view it without logging in. Moodle calls this Auto login for guests. Go to site admin, Users, Permissions User Policies. Auto login guests Default is no, uncheck the box to change it to yes. Clear the cache. Also in each actual blog post, we need to set Publish to Anyone in the world. Also, we need to go to Appearance, Blog and change Blog visibility to the world.
Fifth, when we updated the AlmondB theme, the special CSS we used for the top and side menu was lost. This Disappearing Menu problem can only be fixed by editing a file called header2.mustache. To edit this file, open your VPS and go to your website user account. Then click Files, web, domain, public_html, theme. Then click on the Almondb theme to open it. Then open the templates folder and in it, open the frontpage folder. Then scroll down and click header2.mustache – which will download a copy of this file to your home computer file manager.
We need to make three changes to this file. For the first change, open the file with a text editor. Here is Line 22:
<button class="navbar-toggler aabtn d-block d-lg-none px-1 my-1 border-0" data-toggler="drawers"
The term navbar-toggler is the name Bootstrap gives to our Hamburger or Mobile Menu. The term d-block is a Bootstrap term meaning Display this block. The term d-lg-none is a Bootstrap term meaning do not display this block on Large or XL screens. In Bootstrap, Large screens start at 992 pixels – meaning the hamburger menu only appears on small and medium screens which are 990 pixels or less in width.
To make it easier for logged in admins to reach the admin page, we want to change this line so that the hamburger menu always appears our Home page. Therefore, change Line 22 to read:
<button class="navbar-toggler aabtn d-block px-1 my-1 border-0" data-toggler="drawers"
The second change is on Line 27. Here is Line 27:
<a href="/{{{ config.homeurl }}}" class="navbar-brand d-none d-xl-flex align-items-center m-0 mr-4 p-0 aabtn">
The term navbar-brand is the website logo or domain name which appears in the upper right corner of our Home page. The term d-none means to not display the navbar brand. The term d-xl-flex means to display the nav-bar brand on extra wide screens. We want to display the navbar brand on Large and XL screens. To do this, change d-xl-flex to d-lg-flex. Here is the new Line 27:
<a href="/{{{ config.homeurl }}}" class="navbar-brand d-none d-lg-flex align-items-center m-0 mr-4 p-0 aabtn">
The third is on Line 47. Here is Line 47:
<div class="navbar-nav d-none d-lg-flex my-1 px-1">
The term navbar-nav is the Bootstrap term for our main menu. The combination of d-none d-lg-flex means to only display the main menu on Large and XL screens. This line is why our Main Menu disappears on Medium and Small screens! We want to always display the main menu on our Home page. The bootstrap term for display always is d-flex. So change d-none d-lg-flex to d-flex. Here is the new Line 47:
<div class="navbar-nav d-flex my-1 px-1">
Then save and close the file. Then in our Hestia File Manager, rename the existing file to old-header2.mustache. Then click Add to load our changed file. Then view the Home page to see the result. Change the browser window width from very wide to very narrow. Hopefully, the Main Menu no longer disappears.
What’s Next?
In our next article, we will set up a Moodle Test site which we can then use to test updates before doing an update of our Live site.