
We previously created a Moodle Category called Course templates. We then created a 12 week course in that category called Flexible Sections Course Template. We divided this course into 3 parts with each part taking 4 weeks. The first Week in Part 1 was divided into four topics each of which we will call a sub section or a lesson.
Different meanings of the word Lesson
We will use the term Lesson to mean an individual hour long class session with its associated Activities – including a reading assignment, a video watching assignment, a video conference class session and a quiz. We will use use Lesson 1.1 as an example of how to use various Moodle tools to create a lesson.
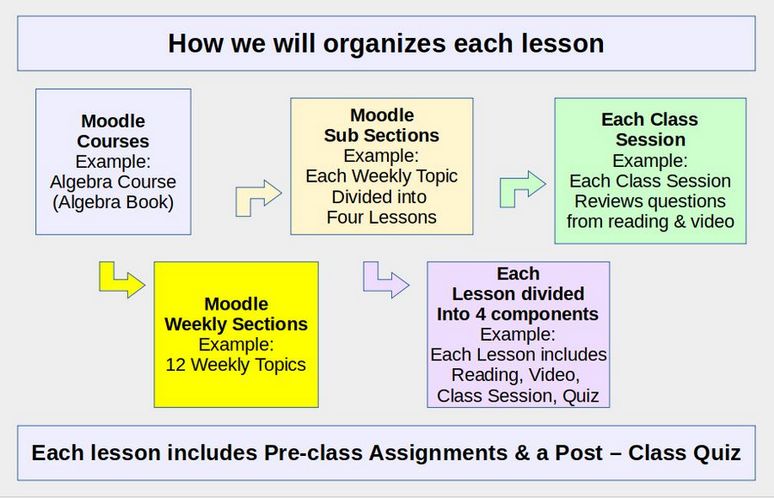
Unfortunately, Moodle calls each Lesson a Topic or a Section and assumes that we will only be covering one topic or section per week. In addition, Moodle has an Activity called Lesson which is actually a complex series of flow charts. Moodle’s use of the word Lesson to describe their complex flow chart is unfortunate because it can be extremely confusing for both students and teachers.
We will not be using the Moodle Activity called Lesson. But we will use other Moodle Activities to create each of our lessons and we will plan four of these lessons for each week!
Multiple Activities for Multiple Learning Styles
There are many theories and models attempting to explain why and how humans learn. One of my favorite theories is the Gardner theory of Multiple Intelligence. Gardner noted that some students learn better from reading a book while other students learned better from looking at images or watching videos. Other students learn better by interacting with their teacher. As children grow, they each develop their own learning styles.
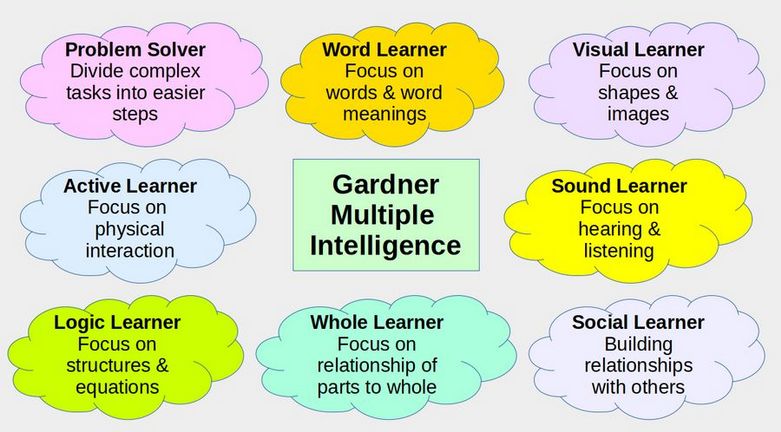
We therefore need to creating lessons that include not only readings of text but also images, videos and video conferences where students can interact with each other and with their teacher.
Create a Reading Assignment
The word Assignment is as confusing as the word Lesson. This is because Moodle has an Activity called Assignment which requires students to submit their work which is then typically graded. We will use the term Assignment more broadly to include any task or activity we ask the students to complete – whether students submit work to be graded or not.
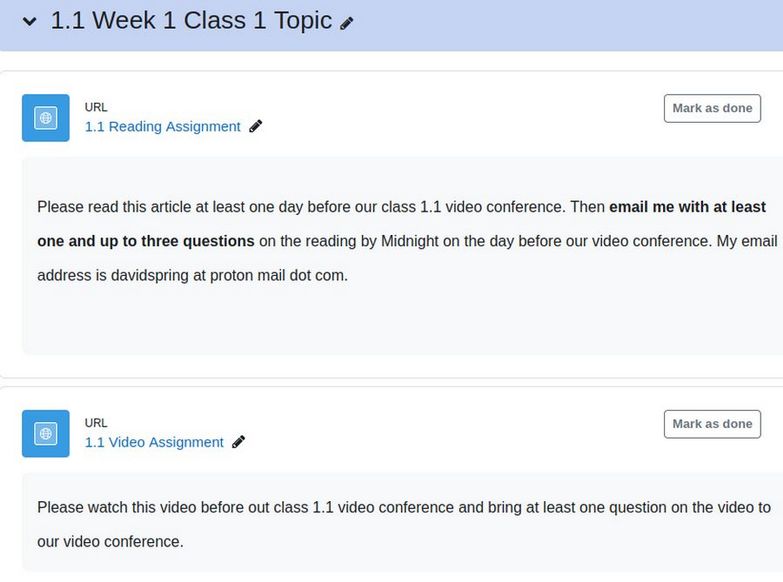
To add a reading assignment to Flexible Sections Course Template, go to Site Administration, Courses, Manage Courses and Categories. Then click on the Flexible Sections Course Template. Then scroll down and click View. Then turn on Edit Mode. Open 1.1 Week 1 Class 1 and click Add an activity or resource.
This brings up a screen with 22 learning options. These options are divided into two categories called Activities and Resources. Click on Resources. Then click on the Resource called URL. A URL is a link to an existing web page. We will use URL to add the following placeholder web page link to our Moodle sub section 1.1: https://collegeintheclouds.org/
For the description, copy and paste: Please read this article at least one day before our class 1.1 video conference. Then email me with at least one and up to three questions on the reading by Midnight on the day before our video conference. My email address is davidspring at protonmail dot com.
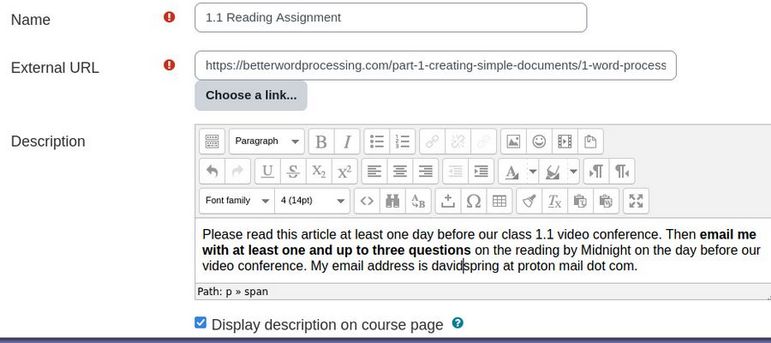
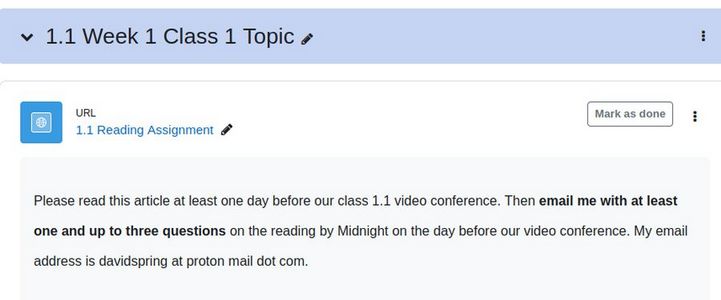
For Activity Display, choose New Window so the external web page will open in a new browser tab. Then click Save and return to course. Here is what this link will look like to your students (without the edit pencils):
Click on the link to go to a page with a link to the article and verify that this link works as intended.
Add a Class 1.1 Video Assignment
Here is a link explaining to an article how to create your own videos:
https://createasecurewebsite.com/final-steps/8-site-promotion/8-2-create-edit-and-post-informational-videos
Assuming you have created a matching video for each article and posted the video on a video sharing network, you could also add a link to the video assignment as an activity resource below the reading assignment. Click on Settings for the reading assignment and click Duplicate. Then edit the duplicate. Change the name to 1.1 Video Assignment. For external URL, we will use this placeholder link which can later be replaced with a link to the actual Class 1.1 video.
https://www.youtube.com/watch?v=yboWT4OwqEk
Here is the video assignment description: Please watch this video before our Class 1.1 Video Conference and bring at least one question on the video to our Jitsi video conference.
For Activity Display, choose New Window so the external web page will open in a new browser tab. Click Save and return to course. Here is what the reading and video conference assignments look like:
Each reading assignment is 10 to 15 pages long and should take less about 30 to 60 minutes to read. Ideally, students should use Active Reading in which they take careful notes on the main points and write down any questions they may have. The matching video assignment should be less than 30 minutes long. The reading assignment and video assignment are typically associated with a project which should take the student about 30 minutes to complete.
Thus, students are expected to spend about 2 hours doing homework to prepare for each class session video conference. Assuming there are 4 one hour class session video conferences, this means that students are expected to spend 8 hours per week on homework for each class. Combined with the one hour class session and the post class session quiz, students should spend about 10 hours per week on each 4 credit class or about 40 hours per week on four 4 credit courses. This is why four 4 credit courses are considered a full load.
The Reading and Video Assignments are just the beginning of the learning process. Our real goal is to help students gain a long term memory of the concepts covered in our course. Turning short term learning into long term learning requires engaging students in the process of active learning. We will therefore add two more Moodle Activities to each lesson. These will be attending a small group video conference (our 1 hour class session) and completing a quiz.
Add a Video Conference Activity to Class 1.1
The first step before creating the video conference activity is to download the latest version of the Moodle Jitsi Plugin from this link. https://moodle.org/plugins/mod_jitsi
Then install the plugin with the Moodle Plugin installer. The installer ends in the Jitsi settings screen. Click Save changes. Skip Notifications. Then go back to Courses, Manage Courses and Categories and click on the Template course. Then click View to go to the Course Home page. Turn on Edit Mode and go to Class 1.1 and click Add an activity or Resource. Then click Activities where Jitsi is now one of the activities. Click Jitsi to bring up the edit screen.
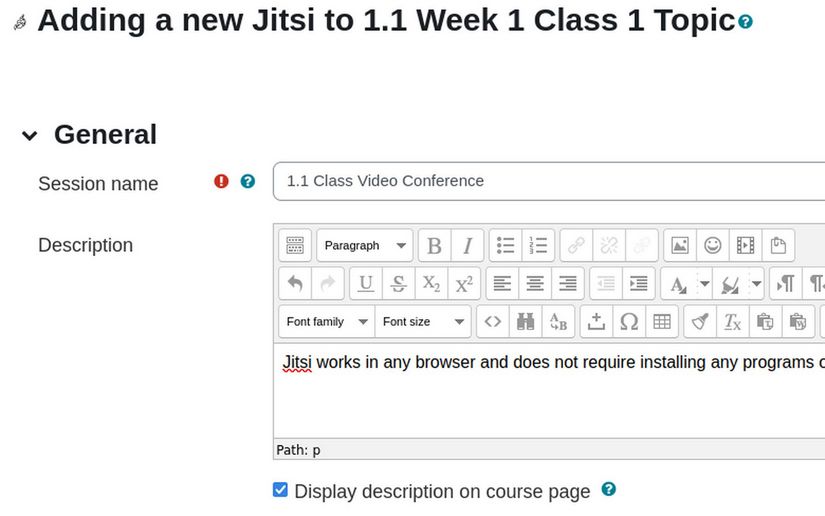
Type the Session Name 1.1 Class Video Conference. The copy paste the following into the Description:
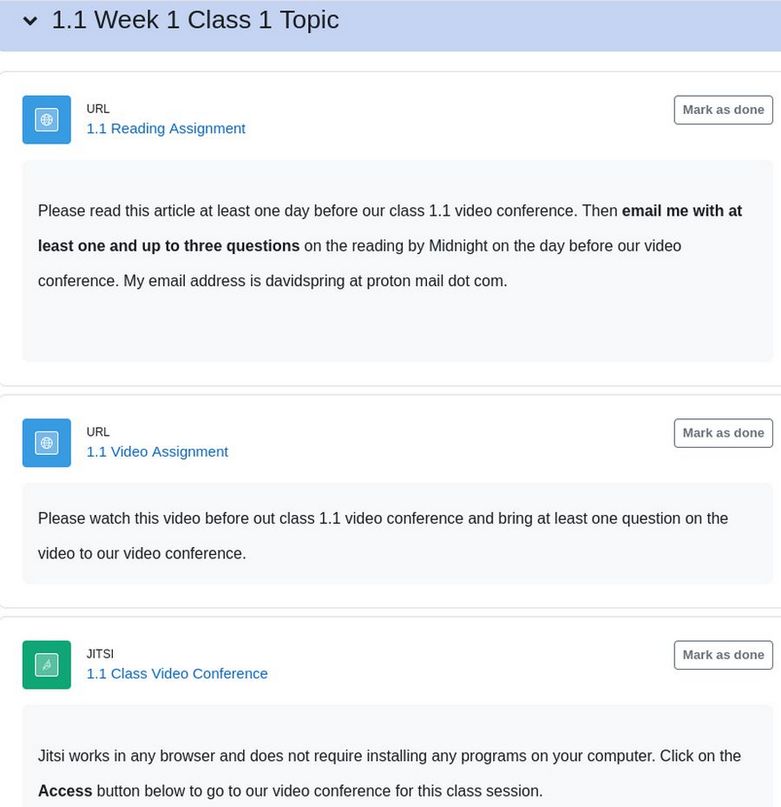
Jitsi works in any browser and does not require installing any programs on your computer. Click on the Access button below to go to our video conference for this class session.
Checked the Display Description on course page box. Then click Save and Display. The Moodle Jitsi Plugin will create an automatic link to the Class 1.1 video conference meeting using the course name followed by the class name and number. We will explain how to use Jitsi for video conferencing in a later article.
Turn off Edit Mode. Here is what Class Session 1.1 now looks like:
Put the student question submissions in a logical order and review them during the video conference class session. This will allow students to learn from the questions of other students. In addition, student questions will help us improve the course curriculum over time. Also, assuming the lesson includes a project (covered next), the Jitsi video conference can be used to review the steps for creating the project during the video conference.
Set Assignment and Quiz Default Points
In a moment, we will create an Assignment activity and a Quiz activity. By default, Moodle will assign points to these activities which sadly are not aligned to our Grading Setup (which we explain in a later article). To change the default points for the Assignment activity, go to Site Administration, Grades, General Settings and change Grade point default from 100 to 5. Then click Save changes.
There is a different setting for changing the default maximum points for quizzes. Go to Site Administration, Plugins, Activities, Quiz, General settings. Change the Maximum grade from 10 to 5. Then click Save changes.
Create Grading Categories
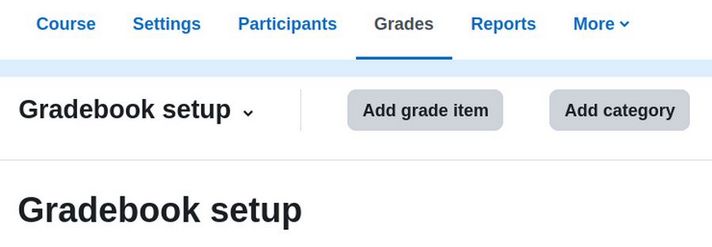
We also need to create our Grading categories before we create our Assignment and Quiz activities. Go to the Template course and click Grades in the course menu. Then change the drop down from Grader Report to Gradebook Setup:
By default, there are no categories. Click Add category. Name the category Reading Assignments. Then click Save changes. Create four other new categories called Video Assignments, Jitsi Conference Attendance, Project Assignments and Quizzes. Now that we have our custom Grading categories, we can go to the Template course home page and turn on Edit Mode. Then click on Topic 1.1 to create our first class 1.1 Project Assignment.
Add a 1.1 Project Assignment
Projects allow students to learn by actively doing something. Projects can be a short task directly related to the reading assignment. For example, in our class on Formatting, we can ask students to take a sample sentence and format it to change the font size, font color and font family. They can then save the document with their name in the file name and email the instructor the file after the class session but before taking the quiz.
To create a project assignment, click Add Activity or Resource. Then click Assignment. Moodle assignments allow students to submit work to their teacher for grading. Students click the assignment link and click “Add submission” Depending on the assignment settings, students either have a text box into which to type their work or an upload area to submit their file.
Name the assignment 1.1 Project. Then copy paste the description:
If you do not already have Libre Office installed on your computer, go to the following web page to download it.
https://www.libreoffice.org/download/download-libreoffice/
For Linux Debian, use the drop down arrow to change the ending extension from rpm to deb. For steps on installing and setting up Libre Office, visit this web page:
https://createasecureonlinestore.com/first-steps/1-secure-foundation/1-2-first-steps-after-installing-linux-debian
Then open a new Libre Office Writer blank document. Type your name and date at the top of the page. Then type the following sentence:
Formatting changes the appearance of a sentence but not the content of the sentence.
Then format the sentence to change the font size, font color and font family. Then save the document with your name in the file name and email the instructor the file after the 1.1 class session but before taking the 1.1 quiz. My email address is davidspring at protonmail dot com.
Check the box below the description to display the description on the course page.
For Availability, enable the due date for 21 September 2024 23:00 (which is 11 pm on Saturday at the end of the first week of class).
Then change the Submission type to File submission.
Also change maximum number of uploaded files from 20 to 1.
Also change the Accepted file type to document files.
Then click Grades. Check to make sure that Grade Maximum points is set for 5. Change Grade category to Project Assignments.
Then click Save and return to course.
1.1 Quiz
We will add the class 1.1 quiz questions in our chapter on student progress assessment. For now, we will just add the Quiz activity without the questions. Click Add Activity or Resource. Then click Quiz. Name it 1.1 Quiz. For Description, copy paste, Please complete this quiz by the end of the first week. Check Display Description on course page.
Click Timing and enable Close the Quiz. Change the due date to 21 September 2024 23:00 (which is 11 pm on Saturday at the end of the first week of class).
Click Grade and change the Grade category to Quizzes. (Leave grade to pass set to 0. Note there is no way to set maximum points here). Click Layout and change New page to every 6 questions. Click Question behavior and change Shuffle Questions to No. Then click Save and return to course.
Project Assignment and Quiz Due dates
We will shortly be copying our class session 1.1 activities to create class session 1.2 activities. While the reading, video and video conference activity dates and times will vary with each session, the 4 weekly project assignments and 4 weekly quizzes for Week 1 are all due on the same date and time, namely Saturday evening, September 21 at 11 pm.
We can therefore copy 1.1 project and quiz to the 1.2, 1.3 and 1.4 project and quiz without changing the due dates. But we will need to remember to change the due date for the first session of each week. For example, we will need to change the due date to September 30 when copying 1.4 activities to Week 2.1 activities.
Copy All Activities and Resources to the section class session
The first class session now has 5 assignments: a Reading assignment, a Video Assignment, a Class Video Conference, a Project and a Quiz. We need to create these same 5 assignments for all four class sessions for each week and for all 12 weeks – which is 48 class sessions. This can take a lot of time – especially if we had to do all 48 sessions for each of our 12 courses. This is why we are doing all of this work for a course template – which we can then copy and customize for each new course. As we explain in our next chapter, each session can be edited later to add their associated quiz questions.
To make our task a little easier, we can use a Moodle tool called Mass actions block to copy all five of five assignments from our first session to our second session. Then change the names from 1.1 to 1.2 and also edit the descriptions.
Download and install the Mass Actions block
Go to the following page:
https://moodle.org/plugins/block_massaction
Download the latest version and install it with the Moodle Plugin installer. On the Mass Actions settings page, check Flexible Sections course format. Then click Save changes. Skip the Notifications page.
Then go to the Flexible Sections template course. Turn on Edit Mode. Then expand the right column and click Add a block. Then click Mass Actions.
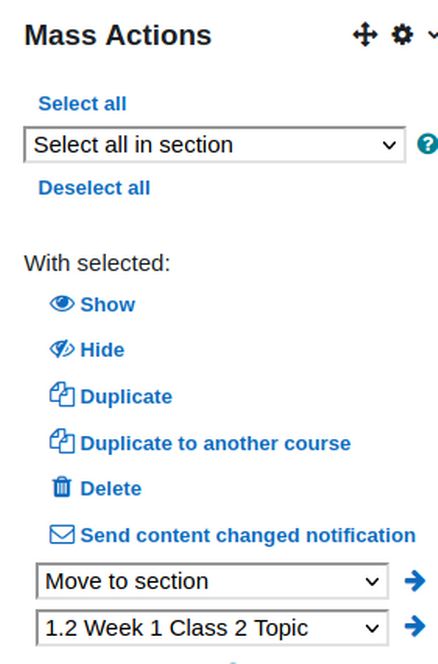
In the first drop down, click on 1.1 Week 1 Class 1 Topic which will select all activities and resources in class 1. Then change Duplicate drop down to 1.2 Week 1 Class 2 Topic. Then click right arrow.
The Mass Actions block appears only when editing is turned on. It appears only to Instructors and Course Designers, not Students.
Note: If your course uses the Show one section per page layout, and you are on a Section page, you will not be able to move items to another section using the Mass Actions block.
The screen will refresh showing the results of the action performed. All selections will be cleared. Edit the activities in Section 1.2. Then select and copy these items to section 1.3. Repeat to finish adding activities to all 48 sections.
Add a Course Forum
Moodle also has an Activity option called Forum. However, the Moodle Forum is extremely limiting. As with the Question Generator, each new course requires exporting and importing questions and forum comments from one course to the next.
If you want to add a forum component, I therefore recommend setting up a parallel Joomla website and using one of the Joomla Forum components as an ongoing and independent course subject forum. We cover using Joomla to create a Course forum at this link.
https://createasecureonlinestore.com/final-steps/7-shop-promotion/7-4-add-a-community-forum
The benefit of creating an ongoing public forum is that it allows students and members of the public to ask questions that may be outside of the regular course structure. It also provides a historical record of questions that allows future students to learn from the questions and answers of past students. Finally, forum members can answer questions from other forum members. This takes much of the pressure off of the teacher and creates a community of users helping each other learn more about a given topic.
What’s Next?
Now that we know how to set up a lesson in Moodle, in the next article, we will look at how to add a course calendar to our Flexible Sections template course.