
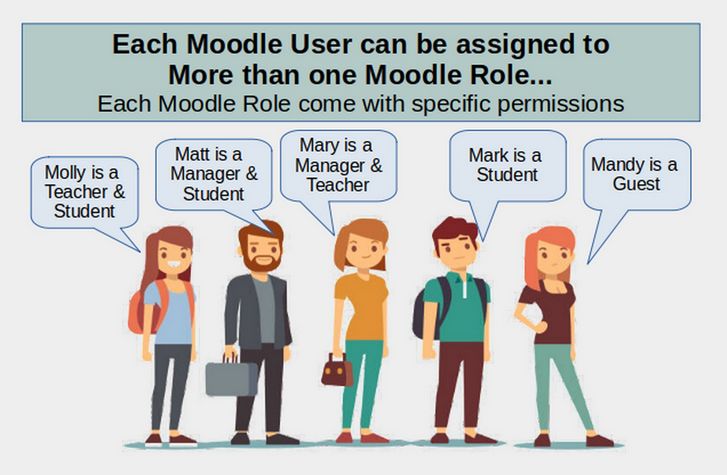
In this article, we will set up our own system of Placeholder Users in part as a learning exercise but also to demonstrate a flexible User system that can be adjusted for any Moodle website. As we noted in our previous article, each Moodle User can be assigned to several different roles
Default Moodle Roles and Permitted Actions
Moodle provides five primary roles each of which is given a specific set of possible actions. Here is a table of Moodle roles and actions:
|
Actions |
Admin Manager |
Teacher |
Non-edit Teacher |
Student |
Guest |
|
View Courses |
yes |
yes |
yes |
yes |
yes |
|
Participate in Course Activities |
yes |
yes |
yes |
yes |
x |
|
View student records |
yes |
yes |
yes |
x |
x |
|
Add and edit course activities |
yes |
yes |
x |
x |
x |
|
Create New Courses |
yes |
x |
x |
x |
x |
|
Set Roles & Permissions |
yes |
x |
x |
x |
x |
Customize our List of User Roles
Before we create our own list of users, we need to create the list of custom roles we want to assign them to. Log into your default Moodle site (or the Moodle Sandbox site). Then click Site administration, Users, Permissions, Define roles. There are 8 default assigned roles:

Note that this does not include the Administrator role, which Moodle defines in a separate screen. The difference between a Moodle Administrator and a Moodle Manager is that a Moodle Administrator has all permissions - and these permissions can not be edited or changed. There must always be at least one Moodle Administrator (the person who created the Moodle website).
A Moodle Manager also has nearly all permissions. However, the permissions given to a Moodle Manager can be changed by a Moodle Administrator and can be flexible to whatever the role of Manager is in a given Moodle Organization structure.
Three steps to take before creating new custom roles
Each new custom role will add more than 350 new permissions elements to your database. I therefore recommend only adding 3 to 5 new roles at a time. Before we start, go to the Dashboard page and make sure that Customize this page is turned off. Also go to the Home page and make sure that editing is not turned on. Finally, click Admin, Developer, Clear Cache prior to creating new roles.
Add a Custom Moodle Role
We will create 5 new roles called Tech Team, Teacher Adviser, Student Mentor, Student-Guardian and Supporter. Click Add a new role. We will begin by adding the role of Tech Team which will initially be identical to the role of Manager.
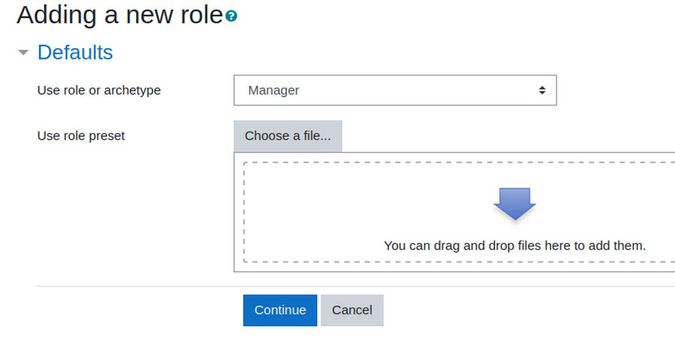
Select Manager. Then click Continue.
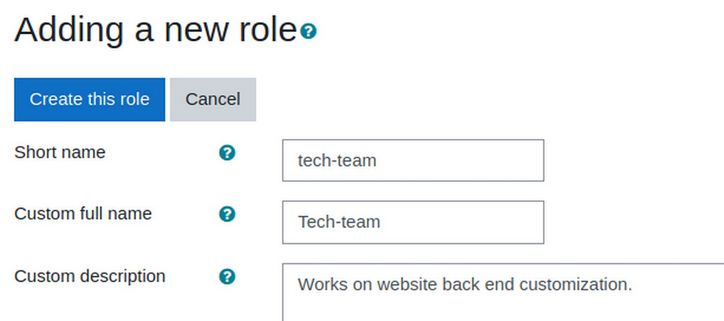
Type in the short name and full name of the role and a short description of the role. Because this role has the same permissions as the Manager role, but with different people, the remaining settings on this screen can be left at their default values.
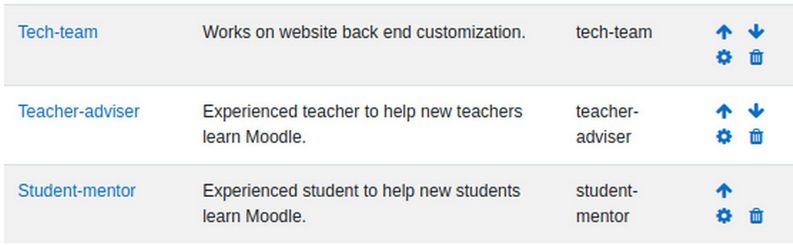
Click Create this role. Then click Back to the list of all roles. Repeat this process to add a Teacher Adviser role with the same permissions as Teacher. Description: Experienced teacher to help new teachers learn Moodle. Then add Student Mentor role with the same permissions as student. Description: Experienced student to help new students.
Then add Supporter role with the same permissions as Authenticated User. Description: Supporter of our education program.
Finally, add a Student Guardian role with same permissions as the Parent User Role on the Orange School Demo Moodle website. Click on the Parent User to see their roles. There is no Role Archetype. Here is the description: Guardians can view activity reports, grades, blog entries and forum posts about their student.
To create permissions for the Guardian role, have your website open in one browser and the Orange School Demo open in a different browser. Then scroll down the Parent page to match the settings on your Guardian page.
Customize our List of users
Now that we have defined our five custom roles, we are ready to add our List of Users. Still in your default Moodle site (or the Moodle Sandbox site), click Site administration, Users, Accounts, Browse list of users. There is only one user (you).
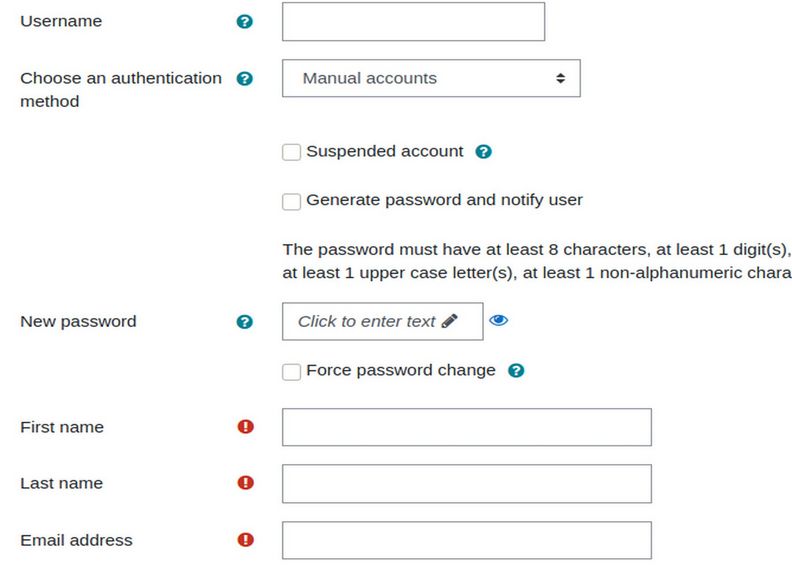
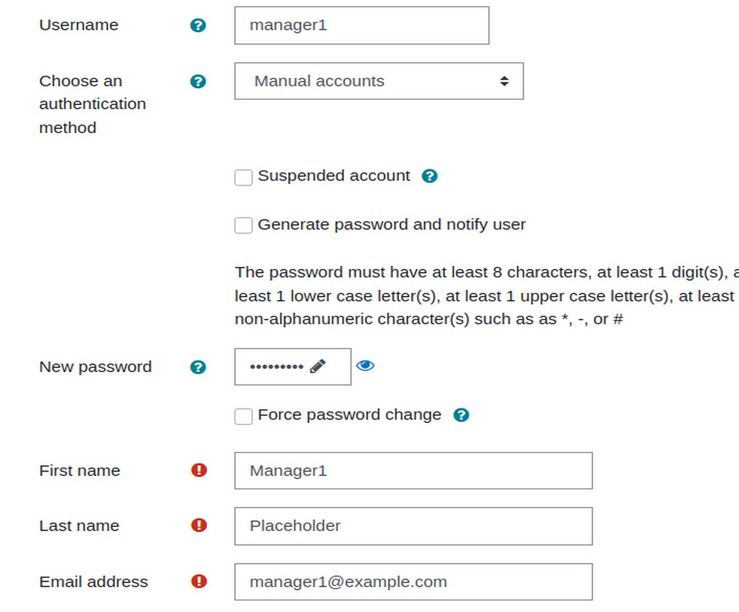
Click Add a new user to see the fields we need to fill out in order to create a new user. The fields with a Red Mark are required fields. These are first name, last name and email address. We also want to type in a username and password.
Create a Moodle Placeholder User Table
Before we create each new user, open a Libre Writer document and name it Moodle Placeholder User Table. Then create a table with 17 rows and 5 columns. Here is a table of the Placeholder Users we will add to our Moodle website:
|
First Name/Role |
Username |
Password |
|
* |
|
Site-Admin1 |
site-admin1 |
Site-admin1* |
|
1 |
|
Manager1 |
manager1 |
Manager1* |
|
2 |
|
Course-Creator1 |
course-creator1 |
Course-creator1* |
|
|
|
Teacher1 |
teacher1 |
Teacher1* |
|
|
|
Teacher2 |
teacher2 |
Teacher2* |
|
|
|
Non-edit- Teacher1 |
non-edit-teacher1 |
Non-edit-teacher1* |
|
|
|
Student1 |
student1 |
Student1* |
|
|
|
Student2 |
student2 |
Student2* |
|
|
|
Student3 |
student3 |
Student3* |
|
|
|
XXXX |
||||
|
Tech-Team1 |
tech-team1 |
Tech-team1* |
|
|
|
Teacher-Adviser1 |
teacher-adviser1 |
Teacher-adviser1* |
|
3 |
|
Student-Mentor1 |
student-mentor1 |
Student-Mentor1* |
|
Note 1: Moodle passwords must have at least 8 characters and at least 1 upper and lower case letter, at least 1 digit and at least 1 non-alphanumeric character such as *. You should create your own passwords and not use the passwords above. These passwords can and should be changed by the actual user.
Note 2: The username must be lower case letters. In our table, the username is the first name but in lower case letters. The last name for each user is Placeholder. Also, the email address is the username at example dot com.
Note 3: The Teacher Adviser group can also serve as Category for Courses Department Chairpersons. Student mentors might also be called Teaching Assistants.
Also note: Teacher and Student and other Placeholder Users will be assigned to Teacher and Student Roles and Courses and Categories AFTER and while Courses and Categories are created. For all, leave the authentication set for Manual accounts, list the First Name as their Role Name, list their last name as Placeholder, List City as City, State, leave country blank, leave timezone blank and Type in a placeholder description (such as This is the Placeholder description)
Then scroll down and click Create User.
Now click, Admin, Users, Accounts, Add a new user
Scroll down and add City, State to the City box.
Also add a short description for this user: This is the Placeholder description. Then click Create User. Repeat this process using the table above to create the remaining placeholder users. Here is what your user table will look like when you are done:

Accounts, User Management, Change the User List filter to Course role
The default User List filter is called User Full Name.

Click Users, Accounts, User Management.
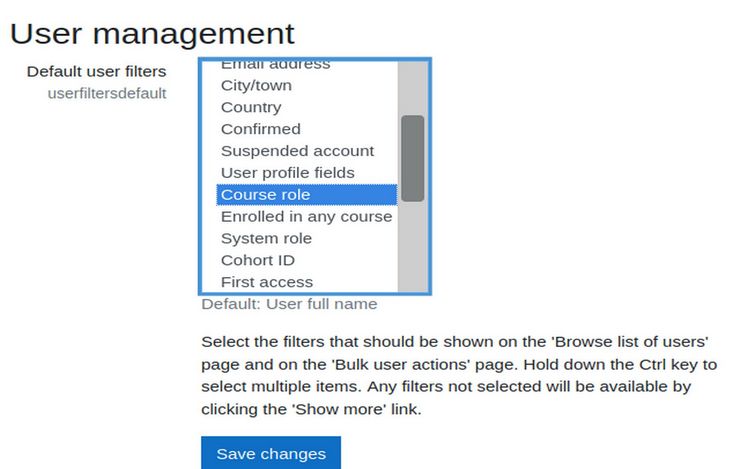
Choose the Course Role filter to be shown in the User List page. Then click Save Change. Then click on Users, Accounts, Browse list of users:

The roles we can choose from include the custom roles we created and some of the default site roles. Click Manager. Then click Add Filter. You will find that, even though we have created a placeholder with the name manager1, the search could not find any managers. In fact, regardless of the role you click on, there will be no results. This is because we still need to assign roles to our custom users.
Assign System Roles
Click Users, Permissions, Assign System Roles:
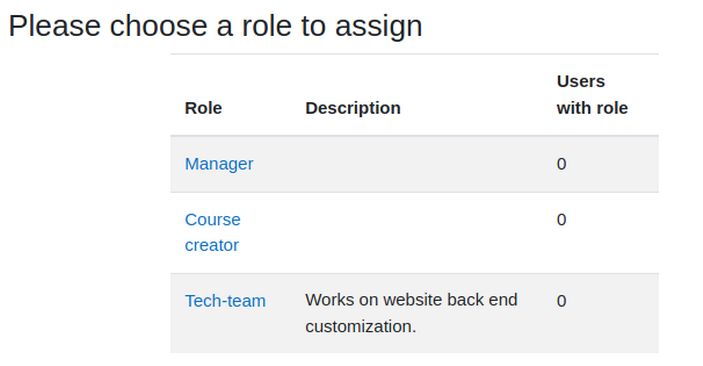
By default, only the Manager and Course Creator roles can be assigned to users. The only reason Tech team is shown is that Tech-team is based on the Manager role.
To assign users to the Manager role, click on Manager:
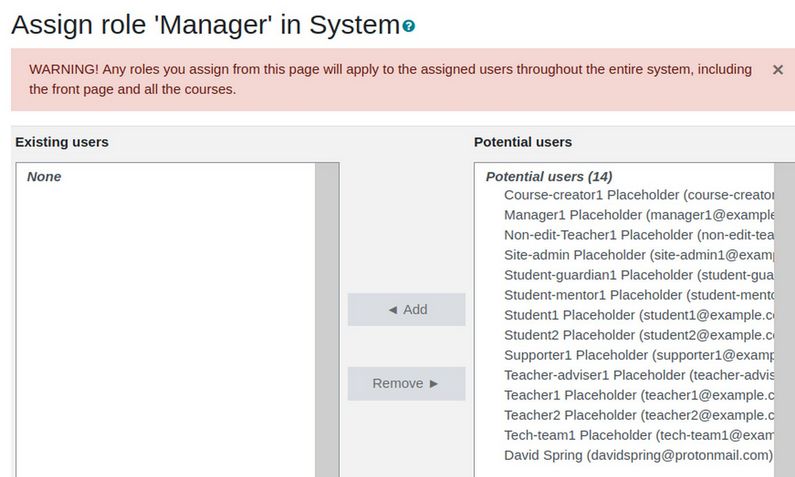
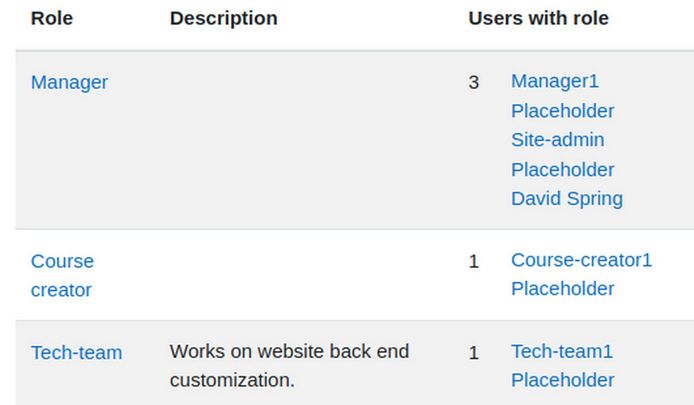
Select Manager 1, then click Add. Then click Site Admin and click Add. Also select yourself and click Add. Then scroll to the bottom and click Add Another Role. Click Course Creator and select Course-creator1. Then add. Then click Tech Team and select Tech-team1 and Add. Then click Back. Here is the result:
The remaining users will not be assigned roles until during or after we have created our Categories and Courses.
Look Up the Roles Assigned to any user
To see the roles assigned to any user, click Users, Permissions, Check System permissions. Then click on their name in the alphabetical list. Then click Show this users permissions. You will see a complete list of all users. Select the Manager 1 user. Then click Show User Permissions.
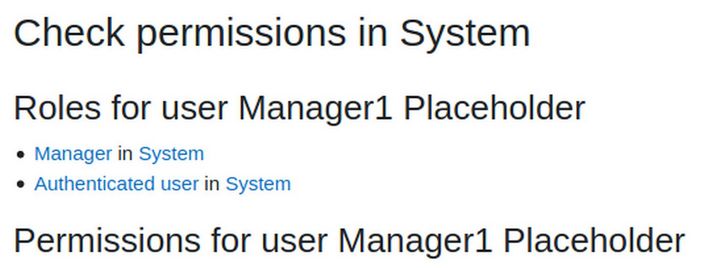
This user is a Manager and also an Authenticated user meaning that this person can make changes on the Home page.
Add another Administrator
Site administrators have the ability to change any aspect of your Moodle site. So you need to have complete trust in anyone you add as a site administrator. Moodle has a special area to add a new administrator. Go to Users, Permissions, Site Administrators. By default, there is only one site administrator and the site administrator can not be removed. You can add another site administrator.
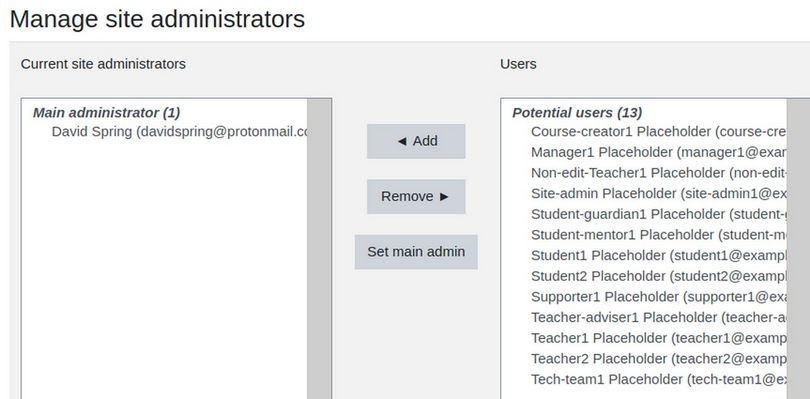
Click on Site-admin1 in the box above. Then click Add to add them to the Site Administrator column. A confirmation screen will appear.
Click Continue. You may also want to add Tech-team1 as a site administrator.
Periodically Clear the Moodle Cache
Adding all of these users has increased the Moodle cache and local cache to 10 MB. Click Administrator, Development, Purge Caches, Purge all caches. This will drop the content in the Moodle caches back below 4 MB.
Hide User Fields
The User Fields have a lot of information that you may want to keep private. In addition, some fields may just confuse students. To hide some of the user fields, click Users, Permissions, User Policies. Then scroll down to Hide User Fields.
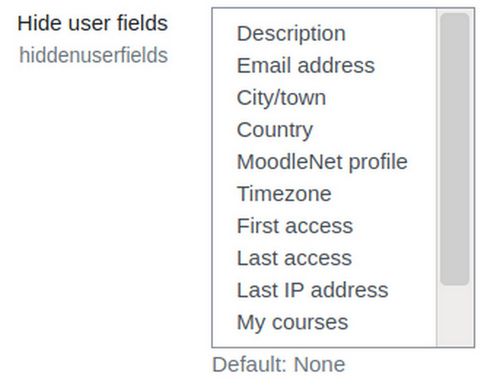
Select which user information fields you wish to hide from other users other than course teachers/admins. This will increase student privacy. Hold the Control key to select multiple fields. Select MoodleNet profile to hide this field. Then click Save Changes. There are many more user settings you may want to change. But we have now covered the most important user settings.
What’s Next?
Now that we have a list of users, we are ready to define our Categories and Courses.