
After students have applied to and been accepted into your program, the next step is to enroll them into one or more courses. While some introductory courses may be free (but still require enrollment due to space limitations), more comprehensive courses will likely require paying a course fee before enrollment can be completed. In this article, we will review how to set up a Moodle Payment Gateway.
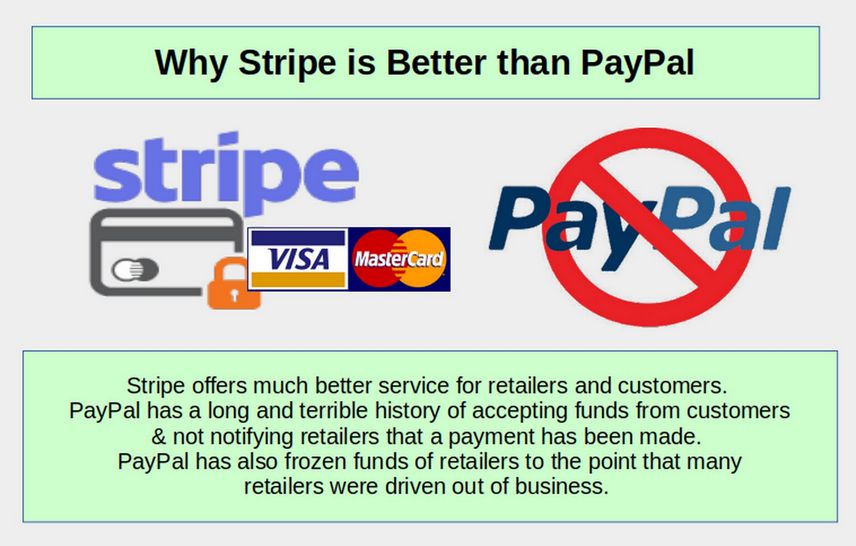
Why Use Stripe Instead of PayPal
Payment gateways are companies that charge a fee to process orders. The fee ranges from 1 percent to 5 percent. There may also be set up fees and monthly charges. Sadly, the only Payment Gateway that is included with Moodle is PayPal. The good news is that it there is a plugin you can use to offer your students the option of paying with the Stripe Payment Gateway. There are many important reasons to switch from PayPal to Stripe. Below we review just a few of these reasons.
Pay Pal Hidden Funds and Frozen Funds Problems
In 2012, there were many cases of customers ordering products online and paying for them with Pay Pal, but Pay Pal had a miscommunication with retailers who never received online confirmation that the payments were made.
Instead, Pay Pal would return a “still pending” code to the retailer. The customer had proof of payment and the retailer even received the payment. But there was a breakdown in communication.
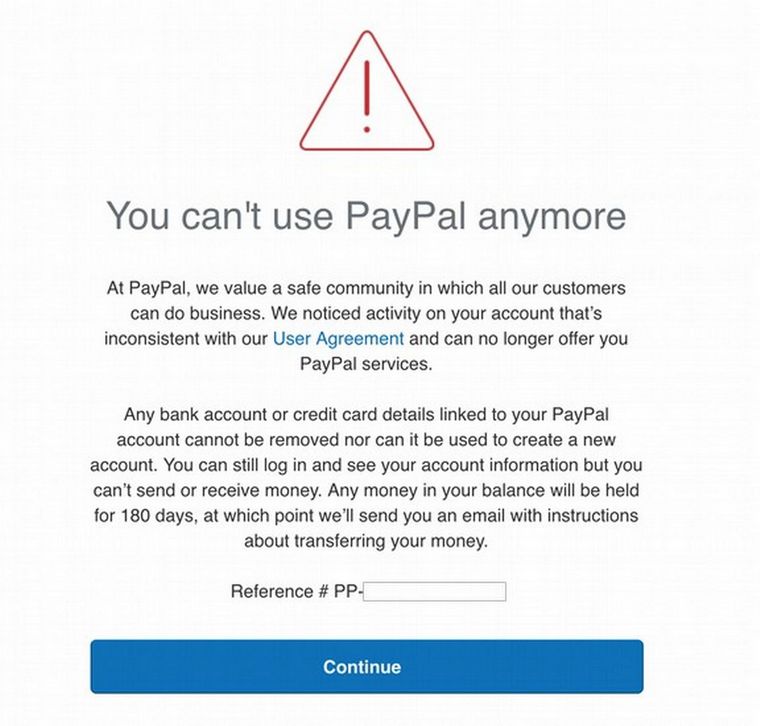
I personally do not recommend Pay Pal for an equally important reason. PayPal has frequently frozen funds of retailers and other business owners for months on end with no way for retailers to get access to those funds. PayPal has been known to suspend retailer accounts and hold retailer funds for 6 months or more. Here is a graphic you get when your account is suspended:
PayPal is therefore a bad option for both customers and retailers. By contrast, I am not aware of Stripe ever failing to notify retailers that a payment was made or failing to pay retailers in a timely fashion. Save yourself and your customers a bunch of headaches. Use Stripe instead of PayPal.
Do you need one Online Payment System or two?
In our previous course, called Create a Secure Online Store, we explained how to set up a Joomla website with a Shopping Cart called Phoca Cart. Here is a link to an article explaining how to connect Phoca Cart with a Stripe Payment Gateway.
https://createasecureonlinestore.com/more-steps/5-shop-management/5-4-payment-gateways
Each domain name needs its own Stripe account. In our case, we created a Joomla website called Better Future Books dot com to sell all of our course books. Most colleges and universities have bookstores where students can go and buy courses notebooks – as well as other items like tee shirts.
We could just use the Phoca Cart payment system we already have to provide a way for students to pay for courses. But this would be like sending your students to the bookstore to pay for their courses. If we only had a small number of students, we could also set up a Phoca Cart Payment system at our Joomla Course Curriculum website, College in the Clouds dot org. Each course would be its own product. We would then use completed payments to manually add a student to a course. This would require setting up a separate Stripe account because College in the Clouds dot org is a different domain name than Better Future Books dot com.
The third option is to not sell course books and simply post the curriculum online for free and post the articles as free downloads inside of your Moodle Course. This is what a lot of teachers do. In this case, you will only need a Stripe account for your Moodle Course payment system. The problem with this option is that students often learn better when they have a physical copy of the course notebook - which allows them to write notes in the margins and read the book even when they are offline.
I therefore advocate using a fourth option which is to have a separate Joomla website for each of your courses where students can read online. For all of the steps in this process, see our course called Create a Secure Website at this link: https://createasecurewebsite.com/
Then use a systematic process to convert your course website into a Print Book and or Ebook. For all of the steps in this process, see our course called Create and Publish your own Book at this link:
https://createandpublishyourownbook.com/
Then set up a Joomla Bookstore where students can optionally buy the Course Print book if they want to read the physical book in addition to the free online course curriculum website. For all of the steps in this process, see our course called Create a Secure Online Store at this link: https://createasecureonlinestore.com/
Then create a series of course videos and post them on a course video channel. For all of the steps in this process, see our course called Create your own Video Channel at this link:
https://createyourownvideochannel.org/
Finally, set up a Moodle website with a Moodle Payment system where students can automatically be enrolled in the course once they have paid for it. Below we will explain how to set up a single Stripe payment account and then explain how to set up a second Stripe account with a second domain name. But before we do that, we need to first review Moodle Strip Payment Plugin options.
Moodle Strip Payment Plugin options.
Moodle offers two completely different Stripe payment plugins. Go to Moodle Plugins and choose Payment Gateway for the plugin type. This leads to a plugin called Stripe. Here is a direct link to this plugin: https://moodle.org/plugins/paygw_stripe
The problem with this plugin is that it does not have as many features at the second plugin. For example, you can not set the maximum number of students per course. But it does have the coupon feature.
To see the second Stripe plugin, change the plugin type to Enrollment Method and scroll down to see the second Stripe Payment plugin called Stripe Payment with SCA and Coupons. Here is the direct link to download the latest version of this plugin: https://moodle.org/plugins/enrol_stripepayment/versions
The problem with the second plugin is that it currently suffers from a series of coding problems. We will therefore use the Stripe plugin.
How to set up and use Stripe
We will install the Stripe Payment plugin shortly. First, we will set up our Stripe account. Go to the stripe website: https://stripe.com/
Click Start Now. Then set up a Stripe account by filling out their form. Initially, all you need is an email address. However, to complete the process, you will need a business bank account… We explain how to set up a business account in our final chapter in this course. When you have your account, the following will appear:
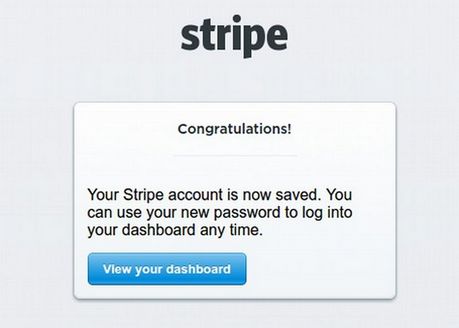
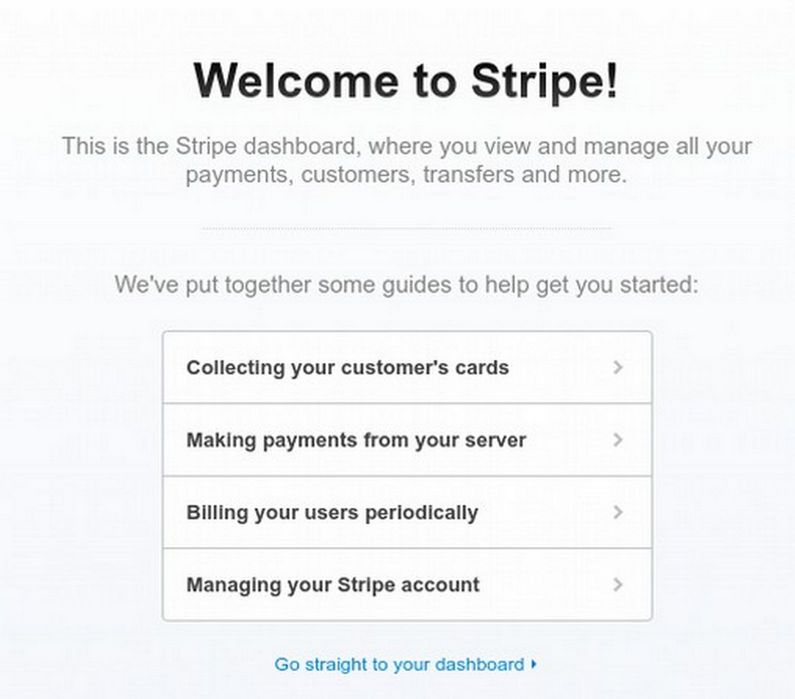
Click View your dashboard.
Stripe Tips
Click Managing your Stripe Account. Then see Test and live modes Every account is divided into two universes: one for testing, and one for running on your live website. All API requests exist in one of those two universes, and objects in one universe cannot be manipulated by objects in the other. In test mode, credit card transactions are not processed through the actual card networks and only special Stripe test card numbers can be used
Related to these universes are your API keys. Each key exists either in the live universe or in the test universe, and this is how Stripe tells what universe you are interacting with. You should only use your test API keys for testing. This will make sure that you don't accidentally modify your live customers or charges. In addition to live and test mode, there are also two types of API keys: publishable and secret.
Activating your Stripe account
Before activating your account, you can only interact with Stripe in test mode. All of Stripe's features are available in test mode, though no live charges using the card networks can be created.
Activating your account is a simple process: you fill out a form requesting some basic information about your product, your business, and your own personal relationship to your business. Once you've activated your account, you can immediately start using the live API and charge real cards.
Your account details are reviewed internally to ensure they comply with Stripe terms of service. If Stripe sees a problem, they will get in touch with you to resolve it as quickly as possible.
Next click on Your Account, then Activate Account in the top menu to fill out the application to activate your account.
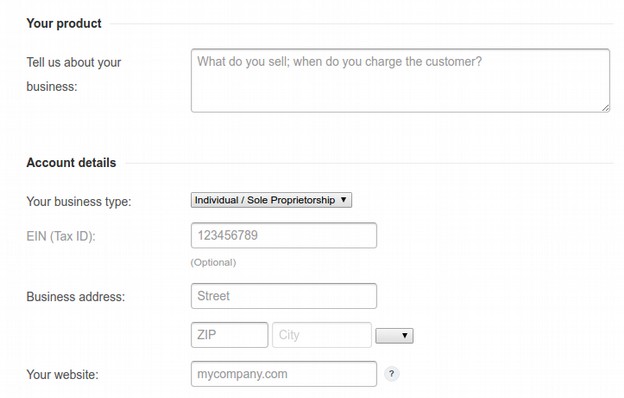
Put in what you are selling like memberships, course fees or campaign donations. If you have a business EIN number associated with your business bank account, you can enter this. It only takes five minutes to get a business EIN number from the IRS and most banks require this to set up your business account. See our final chapter for more information. Then enter the address of your business, which may be your home address. Finally, enter the domain name for your business or school website which should be online and at least partially operational. Then log in with your Google business related Gmail address to verify your identity.
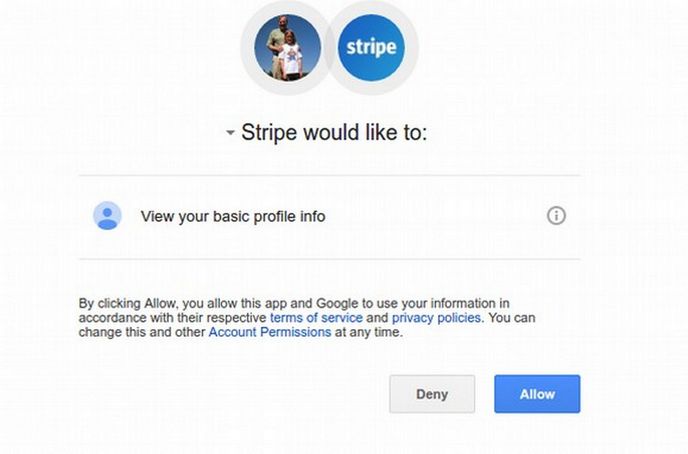
Click Allow. Then put in your Date of Birth and the last four digits of your SS number.
Credit Card statement details section:
For your business name, you can only have 22 characters.
Business Details Section:
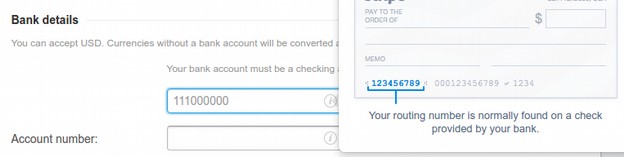
First enter your bank routing number:
Then enter your bank account number:
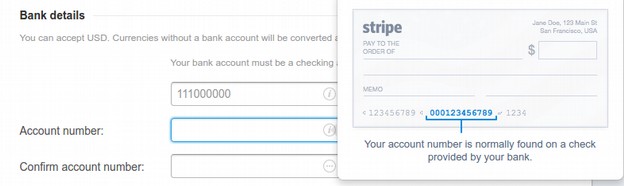
Then enter your bank account number a second time to verify it. Then click Activate Account. It may only take a couple of seconds or a couple of days to verify your account and send you a verification email. You may see the approved screen immediately:
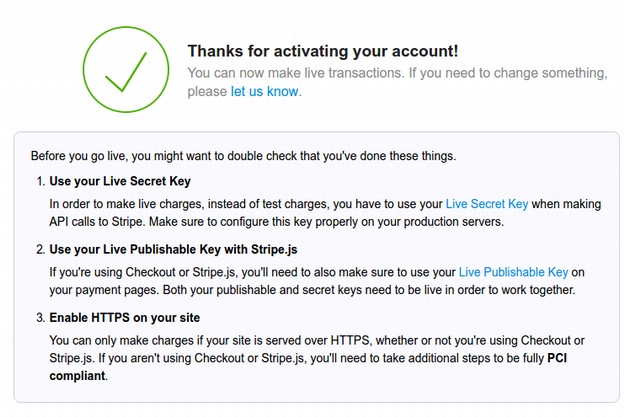
It appears to help if your site is already HTTPS compliant. So do this first. Click on the link to see your four keys.

Click emails:
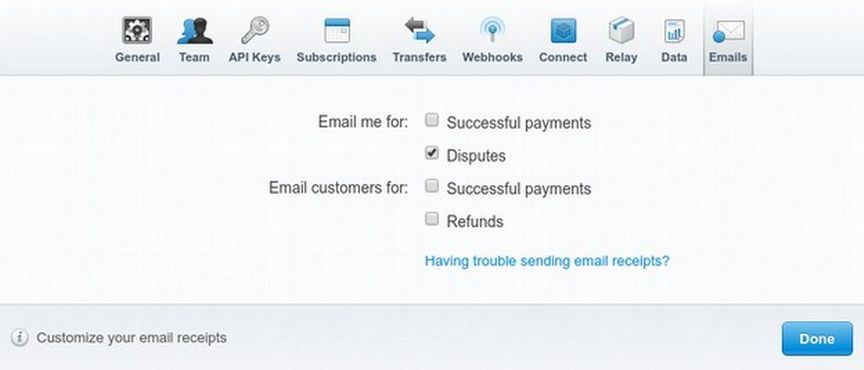
Click Customize your email receipts. Enter the name of your campaign or business to show up on the customer receipt. You can also add extra fields by clicking on Show Extra fields. Then click Done at the bottom of the screen.
Note that your Stripe account is still in test mode. We will change it to Live Mode after setting up our Moodle Payment Gateway plugin. Then log out of your Stripe account.
Here is the log in page for our Stripe account:
https://dashboard.stripe.com/login
The activation email from Stripe will look like this:
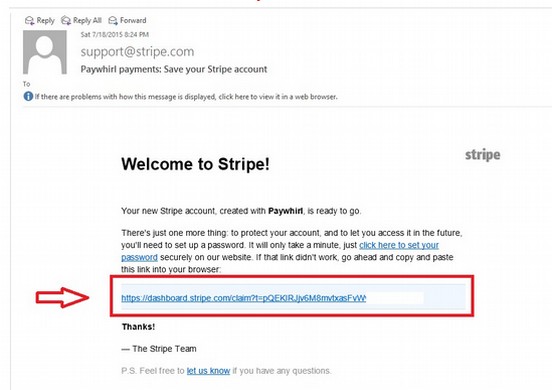
Click the link in your Stripe activation email to finish setting up a Stripe account.
Set up your Moodle Stripe Payment Gateway Plugin
Sign in to Stripe dashboard and proceed to Developers > API keys.
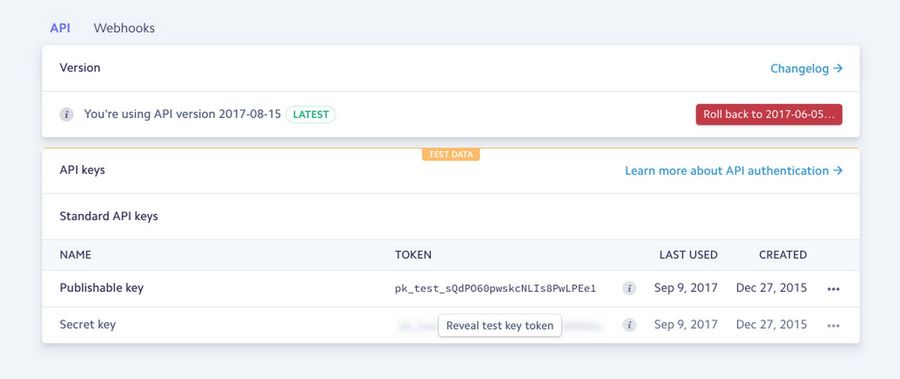
You need API keys for live and test environment. These keys should be added to Moodle Stripe plugin payment method settings.
Web hook?
While we needed to set up a web hook for our Joomla Phoca Cart Stripe Payment system, Moodle uses a process called Web Services tokens. So we do not need to set up a web hook for Moodle.
Set Up a Second Account
Each website needs its own Stripe account. Each account can be connected to the same bank account. We have previously set up a Stripe account which is connected to our online bookstore called Better Future Books dot com. We will now set up a second Stripe account to connect to our Moodle course website, College in the Clouds dot com.
The second account will be inside of and added to your Stripe primary account. Log into your Stripe primary account. Here is the link to the Stripe log in page: https://dashboard.stripe.com/login
In the left side of the top row should be the name of your primary account. Click on the Drop down arrow and click New Account.
Name the account the same as the name of your school and or school website – but without the ending extension. In our case, the new account is simply College in the Clouds. Then click Create Account. Then click Activate payments. Activating your account is a simple process - fill out a form requesting some basic information about your products, your business, and your relationship to your business.
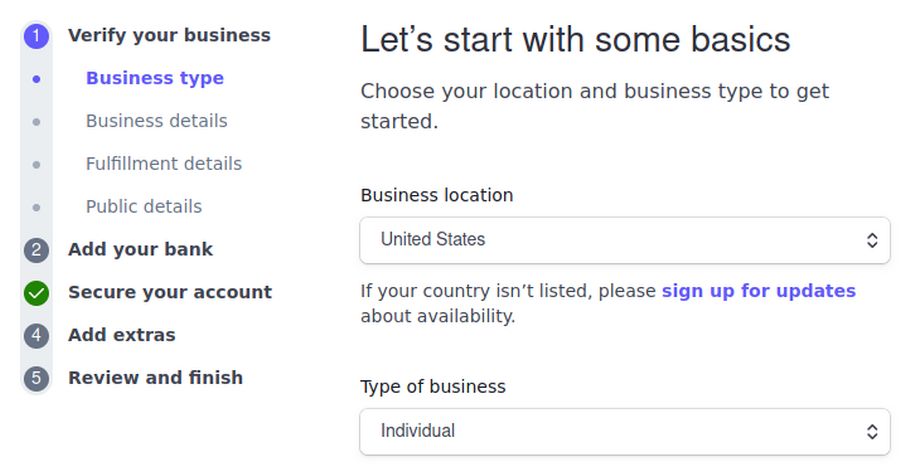
Use the drop down to change the business type from Individual to Company and click Continue. Then select the Business structure. For more information about these business structure options, see the last chapter in this course. Then click Continue. Enter the legal name of your business and your federal Employer ID number. Then if the name of the school website is different than the legal name of your business, enter the name of your school website in the Doing business as box. Then enter your business address. Next enter your business phone number. Then select your Industry and type in your website domain name (which should be an active website).
For Product description, type one to two sentences. Specify when you typically charge your customers. Here is our description:
College in the Clouds is an online school that offers courses on business technology. We charge students at the time of enrollment in one of our courses.
Then click Continue. The next screen is called Verify you represent this business. This form must be filled out by someone with significant control and management of your business.
Fill in your legal first and last name. If needed, change your email address to a business related email address. Fill in your business job title and Date of Birth. Then fill in your address and phone number. Also the last four digits of your Social Security number. Then click Continue.
The next screen is called Add your Business Owners. If you are a multi-person corporation, and another person owns more than 25% of the business, click Add a business owner. Fill in the legal name and email address. Then click Add. Then click Done, Continue.
The next screen is called Describe how you fulfill orders. On average, how long after paying will your customers typically receive their goods or services? Use the drop down arrow to select Within one day. Then click Continue.
The next screen is called Add public details for customers. Leave Statement Descriptor set for your domain name. For shortened descriptor, you are limited to 10 characters. This can later be combined with a suffix such as coursename. Then click Continue.
The next screen is called Add your bank. Click Enter bank details manually. Enter your bank routing number and business checking account number twice. Then click Save. Then click Continue. The next screen is Keep your account secure. Leave it at SMS and click Continue. The next step is Automate sales tax. Click No thanks. The next screen is Climate commitment. Click No thanks.
The last screen is called Review and finish. Here you can edit anything that needs correction. Click Agree and Submit. Hopefully, Stripe will reply with Your account is now active.
In the upper right corner, leave the Mode set to live mode. Then click on the Developers button which is to the left of the Mode button. Then click API keys. This screen will show your Live account Public Key and Secret key. Copy and paste each of these keys into a document called My Stripe account. Then press the mode button to change to the Test account. Copy and paste the Test account Public and Secret keys. Save and place the Stripe Account document with the rest of your business documents.
Congratulations! You have now set up your Stripe account!
What’s Next?
In our next article, we will set up the Moodle Stripe Payment plugin, and then test the automatic payment and enrollment process before setting our Stripe account and Moodle site to Live mode.