1.4 Final Moodle Website Setup Tasks

There are several tasks you will want to configure before going live. The most important ones are listed below.

Add Moodle Cron Jobs
Moodle requires periodic updates to several functions. The Moodle background tasks (e.g. sending out forum emails and performing course backups) are performed by a script which you can set to run at periodic intervals. This is known as a cron job. Do not skip setting up the cron process on your server for your Moodle. Your site will not work properly without it! Thankfully, Hestia makes it easy to add Cron Jobs. For more information on setting Cron jobs with Hestia, see this article:

https://createyourownvps.com/final-steps/8-firewalls-backups-and-appearance/8-3-use-hestia-to-run-a-cron-job

Note that the command for the Moodle cron job in Hestia is slightly different than the command shown in the Moodle Cron Job documentation. Specifically, you need to use php8.1 rather than just php. Thus, the command is

/usr/bin/php8.1 /path/to/moodle/admin/cli/cron.php

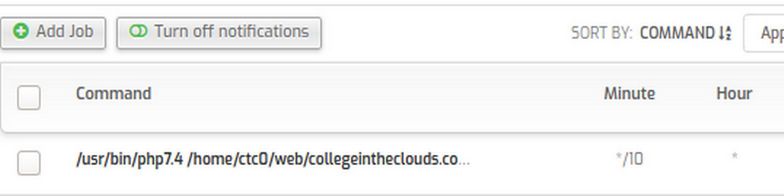
Note that there is an empty space after 8.1 and before the forward slash in front of the word path. In the future, the php version may change. To make the actual Moodle cron job, log into your Hestia user panel. In the Hestia User Panel, click Cron. There are no current Cron Jobs for this user. Click Add Job. Copy paste the command into the top box (adjust the path for your user and domain name):

/usr/bin/php8.1 /home/course0/web/collegeintheclouds.com/public_html/admin/cli/cron.php

Then use the drop down arrow to select every 10 minutes. Then click the Generate button to generate the proper time code.

01

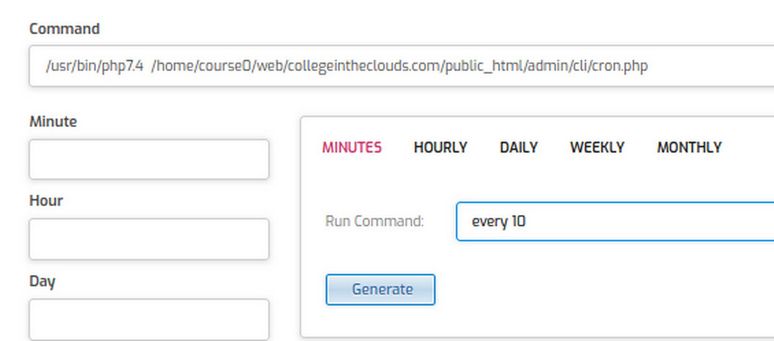
Then click Save and Back.

02

Then wait 30 minutes and log into your Hestia User email account.

1.3 Use the Moodle Installer to Complete Installation

In our previous article, we used the Hestia File Manager to install Moodle into our root public_html folder and to install the moodle data folder into the Hestia private folder. In this article, we will use the Moodle installer to complete the Moodle installation process.

Important: Due to the size of Moodle, it is important to be connected to the Internet with an Ethernet cable to complete the installation before the time out error appears!

Step 1 Open a New Web Browser and enter your Domain Name
We will still be using our Hestia Control Panel. So we need to keep a separate web browser open to keep us logged into our Hestia User account. But we also need a browser where we can clear the browser cache. So we will open a new browser and clear the cache. Then type in our domain name. The first Moodle Installation screen is called Language. Use the drop down to change it to English US.

01

Then click Next.

Step 2 Set the correct path for the Moodle Data Folder
The next screen is called Confirm Paths. Change the Moodle Data path to add the private folder to the path:

/home/course0/web/collegeintheclouds.com/private/moodledata

Then click Next.

Step 3: Change the Database Driver to Maria DB
The next screen is Choose Database driver. The default is mysqli. Use the drop down to change this to MariaDB.

02

Then click Next.

Step 4: Enter your Database Name, User Name and Password
The next screen is to set Database Connection information.

03

Replace the database name moodle with the actual database name. Then type your Hestia created database username and password. Note that the password has a capital letter. Then click Next. The next screen is the Copyright screen. Click Continue.

1.2 How to Install Moodle on a Hestia VPS

In this article, you will learn a new, easier and dramatically less expensive way to create and manage a Moodle website using the free Hestia Control Panel combined with a secure CanHost Virtual Private Server (VPS).

Why you should use Hestia and CanHost VPS to create your own Moodle Website
Moodle has many functions that will not work well on a Shared Hosting account. But Moodle will work well on a Virtual Private Server (VPS) provided the VPS has at least 4 GB of RAM. Hestia is the world’s most advanced free open source VPS control panel.

01

Historically, the most difficult obstacle to setting up a fully functioning Moodle website has been the difficulty of installing Moodle on a server. While there are one click installers for Moodle, one click installers are intended for cheap but insecure Shared Hosting websites. Teachers quickly discover that Moodle does not work well on a Shared Hosting account. So what are the other options?

Some teachers try Canvas and/or Google Classroom. But both have huge annual hidden per user fees and both subject your students to data mining. And both have per user fees that mean you pay more as your courses grow.

For example, if you offer six two month courses per year and each course has 20 students, then 120 students with the Google Education Plus fee of $50 per student will cost $6000 per year. The Canvas fee is even higher as Canvas also has a hidden Set Up fee. Both Canvas and Google also limit branding and customization.

02

The cost of a typical “outsourced” Moodle website is not much lower. The average set up fee for a Moodle Partner is $5,000. Branding and customization fees can be more than $10,000. Finally, annual per user server fees are about $60 per student – times 100 students gets it up to another $6,000 per year. Some Moodle Partners have been known to charge over $25,000 for set up, customization, training and ongoing tech support!

Even then, you still may not have a secure Moodle website. Visit the Moodle.com Partners page and you will see that there are only five official Moodle Partners in the US. Visit each of their websites and right click on the Home page. You will see that one is using Wix, another is using Square Space, another is using an outdated and insecure version of Bootstrap (3.3) and the two remaining official Moodle Partners are using extremely insecure versions of Wordpress!

In short, none of the official Moodle Partners know how to build a secure website for themselves. So it is unlikely any of them will know how to build a secure Moodle website for you!

1.1 Tour of the Moodle Back End

In this article, we will first take a look at the structure of a Moodle Demo website with content – called the Mount Orange school. We will then look at a Moodle Demo website without content to see how it will first appear when you install Moodle.

Moodle Demo Website with Content
Here is a link to the Moodle Demo site with content: https://school.moodledemo.net/

01

Click Log In in the upper right corner of the Home page:

02

For username, type the role manager. For password, type moodle. Then click Log in.

The log in takes you to the My Courses page for the Manager.

03

If you were a student, you would see the courses you were enrolled in here. The theme being used to control the appearance is called Boost which is the default Moodle theme. We will later learn how to supplement Boost with a theme called LearnR which is a child theme of the Boost theme.