9.4 Make a Custom Moodle Student Guide

Many schools, colleges and Universities that offer Moodle online courses provide special Moodle Guides for Administrators, Teachers and Students. Sadly, these guides are often written by someone at the “Tech Department” who may know a lot about Moodle but tend to know little about teaching or learning. I have created a 400 page course and website to help administrators and teachers learn how to use Moodle. But it is unrealistic to expect students to read a 400 page book just because they want to take a Moodle course. We will therefore use this last article providing steps for creating a brief but understandable Custom Moodle Student Guide – a guide which includes not only text but also images. In this example, we will use screen shots from our online Moodle school, College in the Clouds dot com. But you should take the time to replace our screen shots with screen shots from your online school.

Student Guide to Moodle
Welcome to our series of courses on how to use free, secure online tools! Each of our courses combine a Curriculum website called College in the Clouds dot org – which uses the Joomla Content Management System (CMS) with an instructional website called College in the Clouds dot com which uses the Moodle Learning Management System (LMS). We do this because it is much easier to post and organize dozens of course readings and hundreds of course images using Joomla. At the same time, it is much easy to post and organize learning activities such as completing assignments, taking quizzes an tracking progress using Moodle. Combining these two powerful tools results in courses that are easier to build and easier to complete for both teachers and students.

All of our courses use a similar format of weekly assignments which start with course readings followed by course videos followed by course video conferences followed by projects and quizzes. Thus this student manual should be useful regardless of the exact courses you are taking.

We have divided this student guide into the following 6 sections:
1 Two Program Home Pages
2 View our first course Home Page as a guest
3 How to enroll in a course & Logging In as a student
4 Edit your Profile & Change your password
5 Taking Quizzes, Submitting Assignments & Tracking Progress
6 Tips to succeed in your online course

1 Two Program Home Pages
Here is the Home Page of our Course Readings website:

01

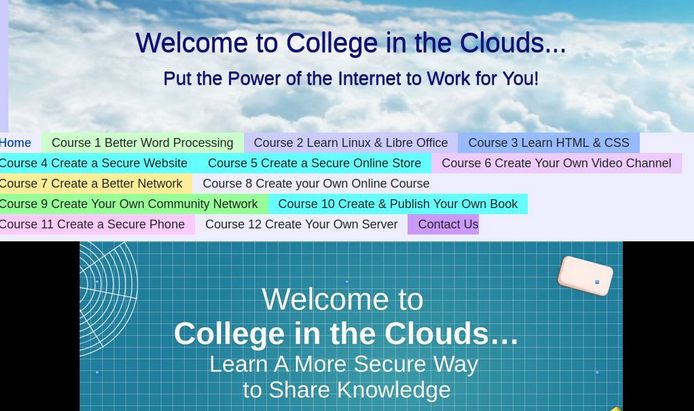
It has links to all 12 of our courses on learning free, secure online information sharing tools. Click on any course to see the 36 course readings displayed in a well organized Mega Menu:

9.3 Update Moodle on your Test Site

In this article, we will update our Test Site and then if all goes well, we will update our Live Site.

Step #11 Update Moodle on your test site.
Also check that all of the plugins and themes are updated. We are finally to update Moodle on our Test site.

11A Create a new Backup of both the test site and live site
In addition to having a test site, before upgrading to new Moodle version, you should have a proper backup of both your test site and live site. Download the Backup file in your Hestia User Backup.

11B Download the latest moodle package
Download latest moodle package from:

https://download.moodle.org/releases/latest/

Download the plus version (for example, 4.3.2 + version) to get the latest updates. Download the zipped file. It will be about 84 MB.

11C Put your site in Maintenance mode
Before you begin upgrading your site, you should put your test site back into maintenance mode to stop any non-admin users from logging in. Then you should wait for any currently running cron processes to complete before proceeding. To put Moodle into Maintenance mode, go to Site Administration > Server > Maintenance Mode. When enabled, an “Under Maintenance” banner is displayed on the website. The message on this banner can be customized with this Editor:

01

When in Maintenance Mode, there is no log in button on the Home Page. However, you can still login as the Admin by using the login URL: https://test1.onlineschool.org/login/index.php

11D Create a new folder in your Moodle Test site public folder called OLDSITE.

Note: These instructions assume you have installed Moodle in your Test Site and Live Site public folder. If you installed in a sub folder, for example onlineschool.org/moodle, then the sub folder takes the place of the public folder.

Log into your Hestia User account and click Files. Click the web folder. Then click on your Test Site domain. Then click on the Public folder. Create a new folder called OLDSITE.

9.2 Set Up a Moodle Test Site

In our previous article, we set up our Backup system. In this article, we will set up a Moodle Test site which we can then use to test updates before doing an update of our Live site.

Step #4 Set up DNS for a test1 subdomain
Log into your Canhost account and click on Domains to edit your Moodle domain. Then click Manage Name Servers. Then DNS to open your site DNS table. Click Add Record. For Type, click A. For Name, type test1. Then enter your server IP address and click Save:

01

Then click Save Changes at the bottom of the table.

Step #5A Copy the Moodle data folder
Before copying folders, it is essential to log into your Live site and place it in Maintenance Mode to insure that the files and database remain in sync. To put Moodle into Maintenance mode, go to Site Administration > Server > Maintenance Mode. When enabled, an “Under Maintenance” banner is displayed on the website. The message on this banner can be customized with this Editor:

9.1 Create a Moodle Site Backup System

In this article, we will provide a Step by Step guide explaining how to update your Moodle website.

01

The average Joomla site has about 40 data tables while the average Moodle site has over 400. Because Moodle is about twice as big and ten times as complex as a Joomla site, updating a Moodle Site to the latest version of Moodle is much more difficult than updating a Joomla website to the latest version of Joomla. Updating a Joomla site takes only minutes. You first update your extensions. Then update Joomla. It is common to update a Joomla site to the latest version of Joomla about every two months. However, updating a Moodle site can take an hour or more. I therefore recommend updating the minor versions of a Moodle site only about once a year.

In addition, I do not recommend updating to the first major release of Moodle as it is common to have bugs which need to be worked out. For example, I updated to Moodle 4 only after Moodle 4.1 came out, which was in February 2023. After that update, I also used Hestia to update PHP to PHP 8.1 for this website. Because Moodle updates minor versions about every six months, I updated to Moodle 4.3 in January 2024.

However, to increase the odds that all of my Moodle custom plugins and themes will still work, I left the PHP version at PHP 8.1.

Moodle follows a half-yearly cycle for the new version releases. The six-monthly release is termed as Major release. Major versions are intended to introduce new features & functionality in Moodle core.

About every two years, Moodle provides a long-term support release (LTS). The most recent LTS was Moodle 4.1. The next LTS will be Moodle 4.5. Here is a table of recent releases: