
In our last article, we set up our online school Stripe account. In this article, we will install the Moodle Stripe Payment Plugin and test both the payment gateway and the automatic course enrollment process.
Install the Stripe Payment Plugin
If you have not already downloaded the Stripe Payment plugin, here is a link to download the latest version: https://moodle.org/plugins/paygw_stripe
The Moodle Stripe Payment Gateway plugin can be installed as a typical Moodle plugin. The install ends in the New Settings Stripe screen:
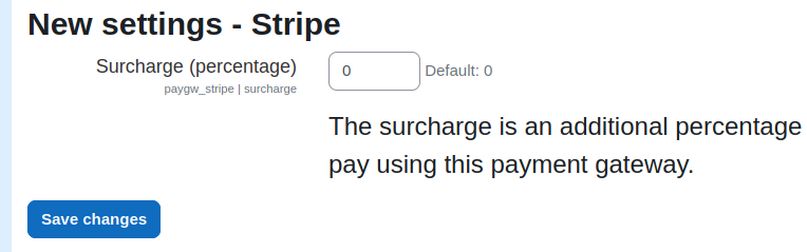
Leave it set for 0 and click Save changes. Skip the Notifications screen.
Enable the Stripe payment gateway
Go to Plugins, Payment gateways, Manage Payment Gateways. Click on the eye to enable the Stripe plugin. Then use the arrows to move it to the top of the list
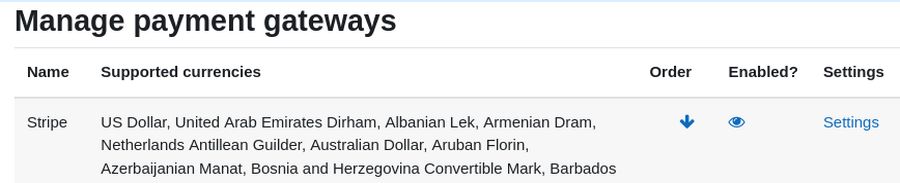
Then click Plugins, Payment Gateways where Stripe now appears as an option.
Create a new payment account
To add the Stripe API keys, go to General, Payments, Payment accounts and create a payment account for the Site administrator.

Initially, the account will be shown as Not Available.
Configure the Stripe Payment gateway
Click on the word Stripe to open the Stripe settings page.
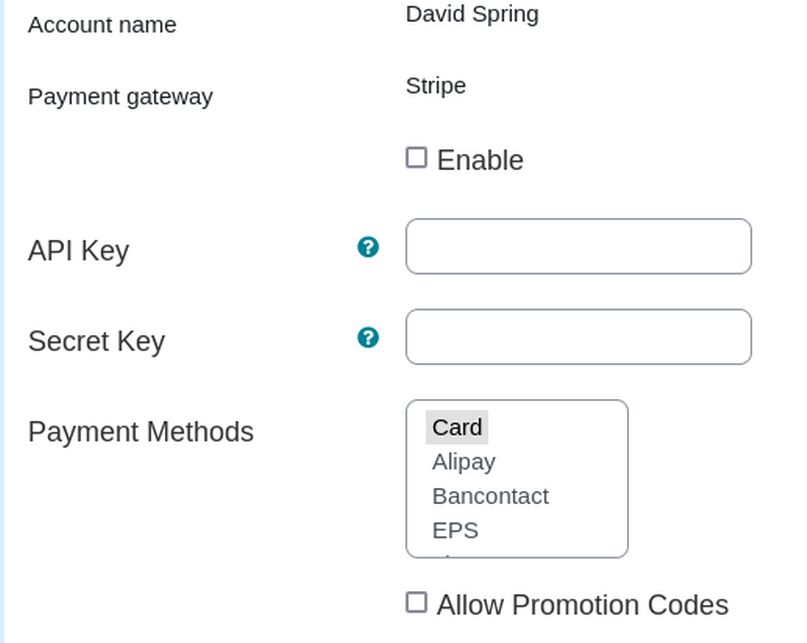
Check Enable. Then enter the Stripe Test Public and Secret keys. Check Allow Promotional Codes. Then click Save changes. The payment account is now available and the Payment Gateway Stripe has a green check mark.
Add a Course Payment Method
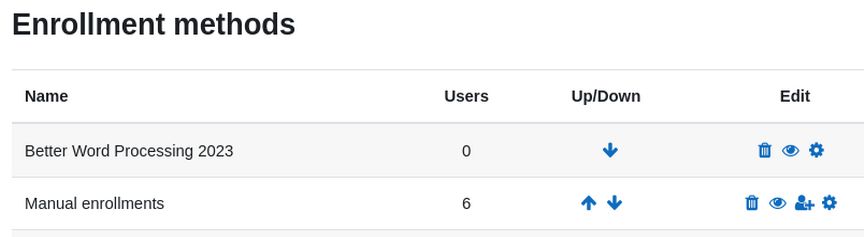
Go to My Courses and click on your first course. Then click on Participants. In the drop down to the left of the Enroll users button, click Enrollment Methods.
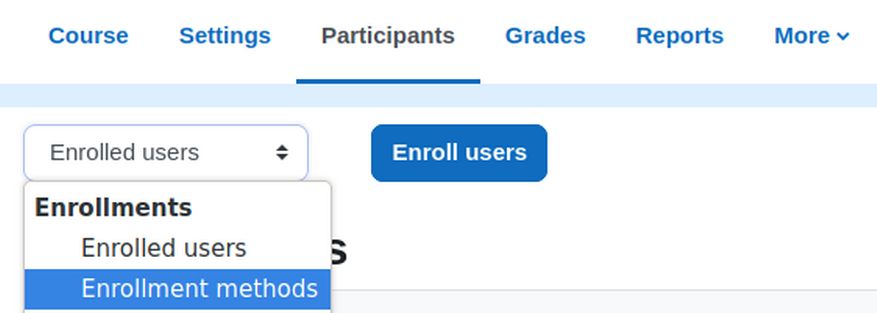
This brings up the Enrollment Methods screen. Then click Add Method and click Enrollment on payment. Note that by default, only Administrators can add enrollment methods to courses. If you want teachers to be able to add this method to their courses, you will need to give them this capability called enroll/fee:config. The next screen is called Enrollment on payment:
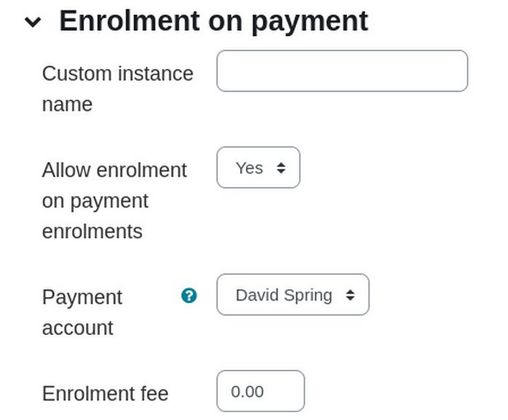
For Custom instance name, if you have the same price for all courses, type Course Auto Enroll. If you want to have different prices and other custom settings for each course, type in the name and year of the course. We will call our first custom instance 1 Better Word Processing 2023
For Enroll fee, enter the course fee.
How to determine a reasonable course fee
Normally the course fee is based on the student – instructor contact hours. All of our courses at College in the Clouds are intended to be 4 college level credits which is 4 contact hours per week.
The contact hours are generally 2 hours of group instruction and 2 hours per week of individual or small group instruction. In addition, students are assigned two hours of homework for every hour of in class instruction. A full load is 3 courses which is 12 contact hours per week PLUS 24 hours of homework for a total of 36 hours per week.
The same time allotment applies to instructors as they are expected to spend 2 hours of curriculum preparation and student assessment for every hour of instruction. So if they are teaching three 4 credit courses, they are also working a total of 36 hours per week. In reality, most instructors spend far more time on course curriculum and review of student assignments and projects. Most dedicated instructors will work 6 days a week including evenings and average more than 60 hours per week on their three 4 credit courses.
In terms of calculating a reasonable course fee, we need to multiple the weekly contact hours times 12 weeks for a 12 week or 3 month “one quarter” course. This is 48 total contact hours. A common rate at most colleges for experienced teachers with an Advanced Degree is $20 to $40 per contact hour. At $20 per hour, this comes to $960.
For a traditional brick and mortar college, about half of the fee goes to the instructor with the remaining half used for pay for administration, building classrooms and utilities. However, because online courses do not have the overhead of normal college courses, it is more reasonable to use a course fee of $10 per contact hour – all of which goes to the instructor if there are no administration or building costs. $10 per contact hour comes to $480 for 48 contact hours.
Assuming a minimum of 6 students per course, the instructor would be making $60 per contact hour. But including the time required to prepare curriculum and provide students with feedback on their projects, the instructor is actually only making $20 per hour. So we will enter an Enrollment cost of $480.
Finally, to encourage early enrollment, it is common to offer a special rate to students who sign up more than one month in advance. So we will explain how to set up a coupon code process so that the first few students who sign up can take the course for half price or $240.
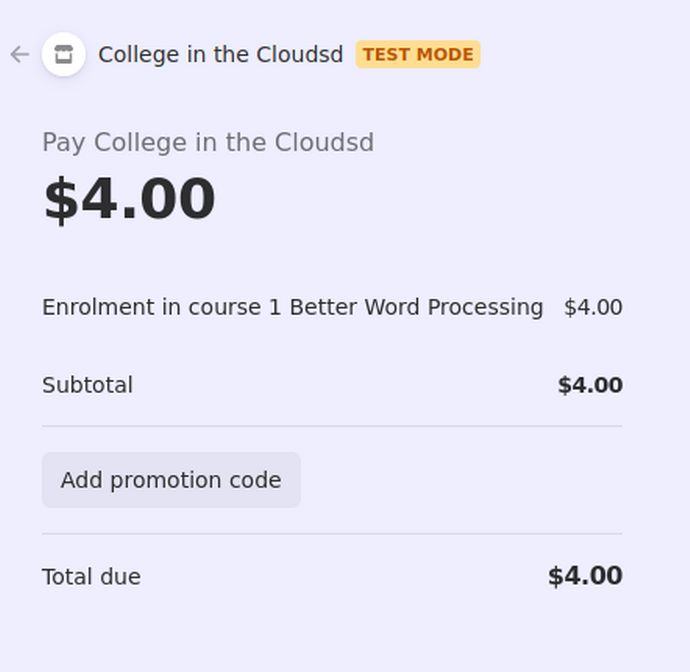
For Testing purposes, change the enrollment fee on the first course to $4. We will change it back when we are done testing.
Leave Enrollment duration and start and end dates unchecked (not enabled). Then click Add Method. Use the up arrow to move your course Enrollment method to the top of the Enrollment Methods list.
As the school administrator, you will need to set up a custom enrollment method for each course.
Add an Early Bird coupon
Log into your Stripe account. Then go to Products > Coupons > Create a coupon.
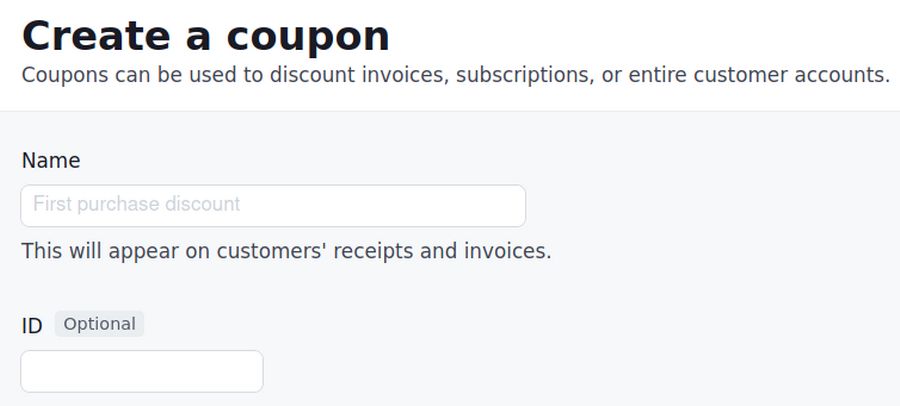
Type in the coupon’s name: it can be anything and for your reference only. We will call it Early Bird Discount
Coupon ID: This is the Coupon code which your students will need to enter to use the discount. Stripe recommends leaving this blank so that they can generate a random ID number to use. We will leave it blank but add a Code students will use (see below).
Coupon Type: We will check the Percentage discount and enter 50% in the box.
Coupon Duration: This applies mainly to subscriptions – whether the coupon should apply to just the first monthly payment or to all monthly payments. Because we have only one payment, change it to Once.
Coupon Redemption: The max_redemptions and redeem_by values apply to the coupon across every customer you have. For example, you can restrict a coupon to the first 50 customers that use it, or you can make a coupon expire by a certain date. If a coupon has a max_redemptions value of 50, it can only be applied among all your customers a total of 50 times, although there’s nothing preventing a single customer from using it multiple times. Because this coupon may be used for many courses, we will not set a date or number limit. This coupon can always be edited or replaced later.
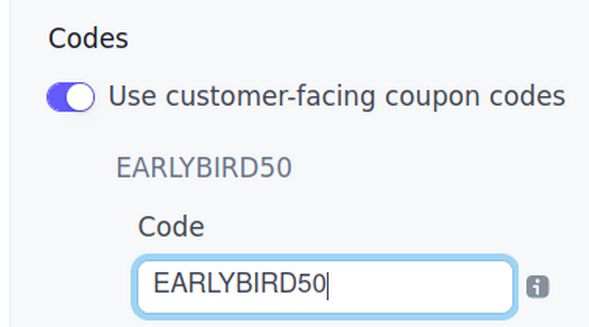
Coupon Codes: Customer facing coupon codes are better than random ID numbers. Check this box to add a coupon code. This opens a box to enter a code. The code is case insensitive but must be unique among all coupons. We will call our code EARLYBIRD50
Then click Create Coupon. We could create a second coupon allow some students such as mentors or students repeating the course to take the course for free. However, it is better to add these special students manually in order to give them special roles and special permissions.
Add a Test Mode Coupon
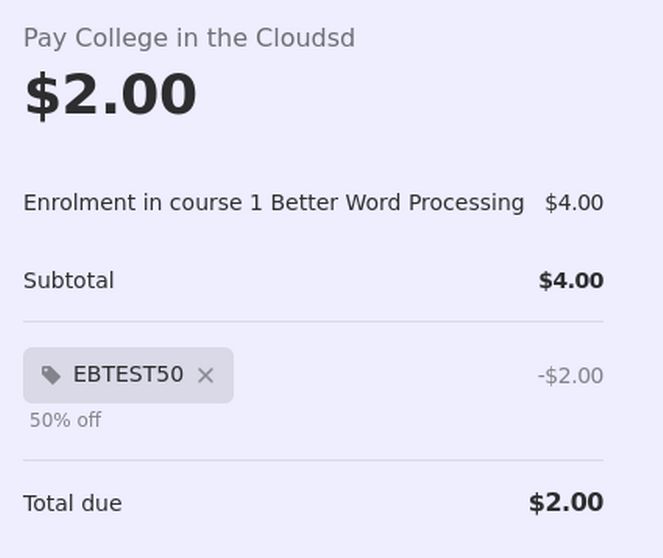
By default, coupons are Live mode. Click on Test mode in the upper right corner of the Products page. Then click on Create a Test Coupon. Call it Early Bird Discount Test. For type, use Percentage 50 percent. For Duration, use Once. Click Codes and enter EBTEST50 Then click Create Coupon.
Customize Stripe Settings
While in your school account, click on Live Mode. Then click on the Settings wheel to go to Product Settings. Then click Checkout and Payment Links. In Custom Options, click on Branding settings. Click Customize to customize the font and border. Change the background from white to light blue #eeeeff.
Then click Save changes. Add a logo? Your Stripe Branding Logo dimensions should be equal to or greater than 128px by 128px. Sadly, adding a logo replaced the words College in the Clouds with a very tiny logo. We will therefore skip the logo. Go back to Settings, Checkout and Payment Links.
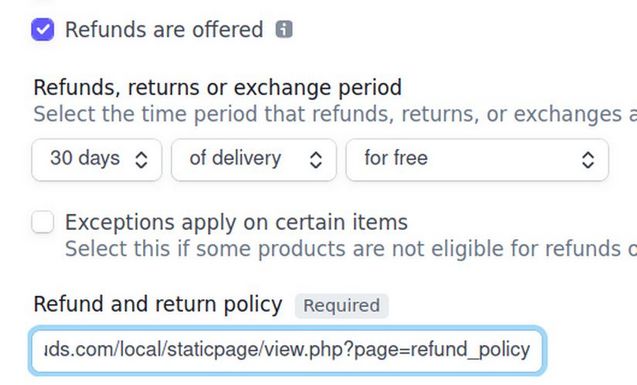
Add a refund policy
Scroll down to Store policies. Then turn on Refund and Return policy. Check Refunds are offered.
Then click on Test mode to put stripe back in test mode.
Test the Stripe Enrollment System
First use Moodle to create and register a demo user. We have previously created a demo user called Student1 Placeholder with an email address of
We will assume that Student 1 has filled out our Program Application form and been accepted to our Program. We emailed this student back with a user name student1 and password. Log in as student1. Then click on My Courses to see that this student is not yet enrolled in any courses. In the Home menu, while logged in as a student, click on Courses. Then click Better Word Processing.
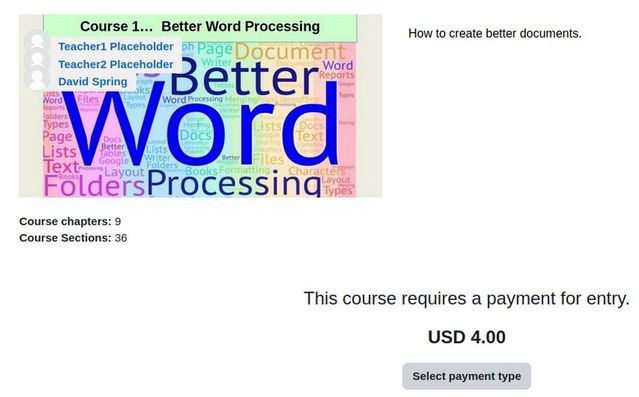
Click Select Payment type
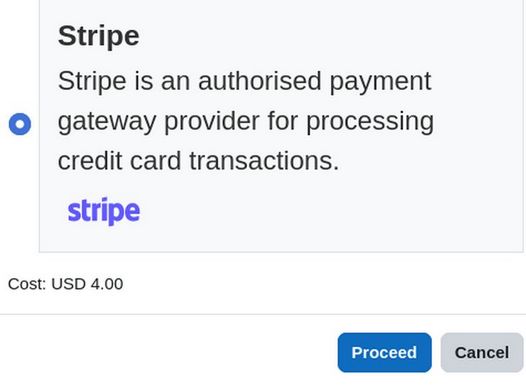
Click Proceed.
Click Add promotional code. Then Enter a test coupon code EBTEST50. Click Apply code.
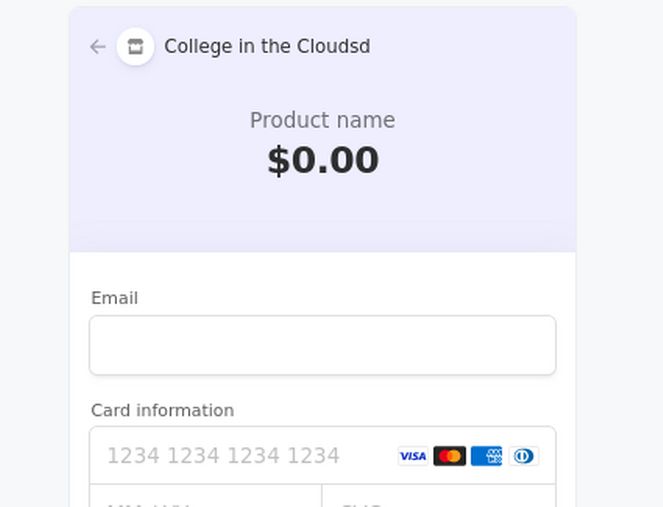
Enter Special Test Credit Card Information
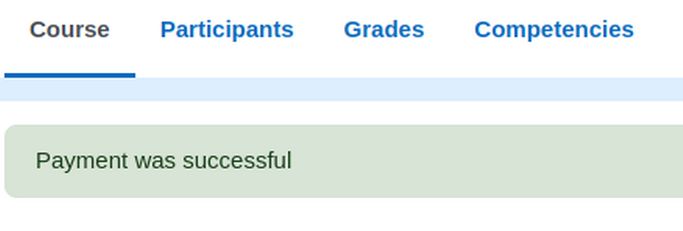
When testing, use the Stripe test card number 4242 4242 4242 4242. Enter the card number in the test payment form. Use a valid future date, such as 12/34 and any three digit code. For name on the card use Test Person and any zip code. Uncheck Save info with Link. Then click Pay.
This takes us back to the Course page where the course activities appear in the left side menu for Student 1 to start working on.
In your Stripe account, you will now see 1 redemption for the Early Bird Coupon Test with their email address shown below. Change the account from Test to Live Mode. Go to Products, Coupons and click on the Early Bird coupon name to bring up the coupon details page. Note that there are no Live redemptions yet.
Test with a Real Credit Card
For a variety of reasons, sometimes the Test system works but the Live system does not. We therefore also need to test the Live system. Log out as Student 1. Then log in as Site Admin and click Site Administration, General, Payments, Payment Accounts. Then click on Stripe to edit it. Change the public and secret keys from the Test keys to the Live keys. Then click Save changes.
Next to create a real user, go to Users, List of Users. Note the email address associated with your Site Admin account. Then click Add a new user. You will need to use a different username than your Site Admin username (the name you use to log in). We will use testspring. Enter a password with at least one special character. Then enter your First and Last name. Enter an email address and make it hidden. Then click Create User. Then in a different browser, log in as this new user.
Note: You should not use the same Moodle user for both the test account and the live account – as it will lead to an error! This is one reason we created a new user. The second reason is I am going to use my real credit card to enroll this student. It is helpful that this student use my real name.
Click Add promotion code. Add the code EARLYBIRD50.
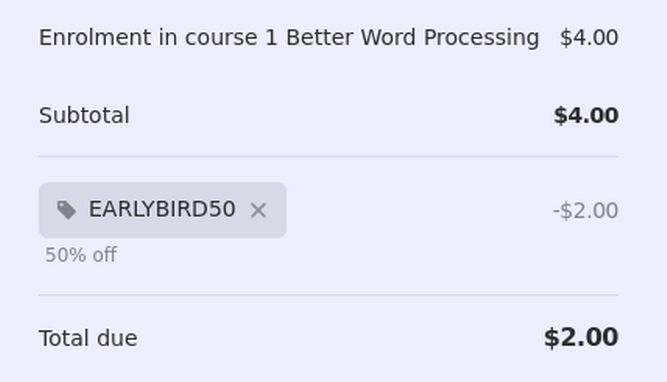
Then enter your real credit card information. Uncheck Add to Link. Then click Pay. This should end with the new student entered into the Course Welcome page with all of the activities in the left menu. Log out of your student account.
Check your Stripe Account for Updated Information
Reload the stripe page to see that 1 real redemption occurred. Click Payments to see that a payment was made of $2. It will take about one week for Stripe to transfer this payment to my business bank account. Click on Customers to see that a customer was added to the list of Stripe customers. Click on Products to see that our first course was added as a Product. Log out of Stripe.
Log into your Moodle site as the Site Admin and go to My Courses. Then click on the first course. Then click Participants. You will see that both Student 1 and your alter ego have been added to the course.
Change the Course Fee to the Correct Amount
While on the Participants page, click the button to the left of Enroll Users. Then click Enrollment Methods. Click the Settings wheel to edit the settings for your first course. Change the enrollment fee to the normal amount. Then click Save changes.
This completes all the steps from the administrator end. Registered users can login to the Moodle site and pay for a course to automatically enroll in the course. On successful payment, they can access the course Moodle events schedule, video conferences, reading and video assignments as well as quizzes and their course project progression page.
What’s Next?
In the next chapter, we will review how to set up teacher course activities.