
In this article, you will learn a new, easier and dramatically less expensive way to create and manage a Moodle website using the free Hestia Control Panel combined with a secure CanHost Virtual Private Server (VPS).
Why you should use Hestia and CanHost VPS to create your own Moodle Website
Moodle has many functions that will not work well on a Shared Hosting account. But Moodle will work well on a Virtual Private Server (VPS) provided the VPS has at least 4 GB of RAM. Hestia is the world’s most advanced free open source VPS control panel.

Historically, the most difficult obstacle to setting up a fully functioning Moodle website has been the difficulty of installing Moodle on a server. While there are one click installers for Moodle, one click installers are intended for cheap but insecure Shared Hosting websites. Teachers quickly discover that Moodle does not work well on a Shared Hosting account. So what are the other options?
Some teachers try Canvas and/or Google Classroom. But both have huge annual hidden per user fees and both subject your students to data mining. And both have per user fees that mean you pay more as your courses grow.
For example, if you offer six two month courses per year and each course has 20 students, then 120 students with the Google Education Plus fee of $50 per student will cost $6000 per year. The Canvas fee is even higher as Canvas also has a hidden Set Up fee. Both Canvas and Google also limit branding and customization.
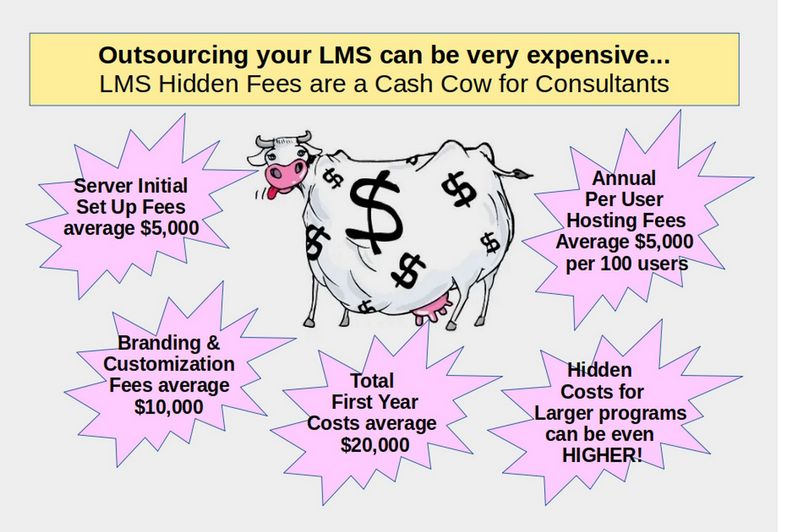
The cost of a typical “outsourced” Moodle website is not much lower. The average set up fee for a Moodle Partner is $5,000. Branding and customization fees can be more than $10,000. Finally, annual per user server fees are about $60 per student – times 100 students gets it up to another $6,000 per year. Some Moodle Partners have been known to charge over $25,000 for set up, customization, training and ongoing tech support!
Even then, you still may not have a secure Moodle website. Visit the Moodle.com Partners page and you will see that there are only five official Moodle Partners in the US. Visit each of their websites and right click on the Home page. You will see that one is using Wix, another is using Square Space, another is using an outdated and insecure version of Bootstrap (3.3) and the two remaining official Moodle Partners are using extremely insecure versions of Wordpress!
In short, none of the official Moodle Partners know how to build a secure website for themselves. So it is unlikely any of them will know how to build a secure Moodle website for you!
To make matters worse, two of the five openly state that they will host your Moodle website on the Amazon cloud. Please take a few minutes to read this article I wrote summarizing the security problems of using the Amazon cloud: https://createyourownvps.com/final-steps/9-migrate-from-cpanel-to-hestia-vps/9-1-how-to-choose-a-secure-canadian-vps-host
The other three Moodle Providers refuse to say where your website will be hosted. Four of the five do not even bother to list their prices – falsely claiming that it is too difficult to tell you how they determine prices. In fact, what they are really doing is hiding their massive hidden fees from public view.
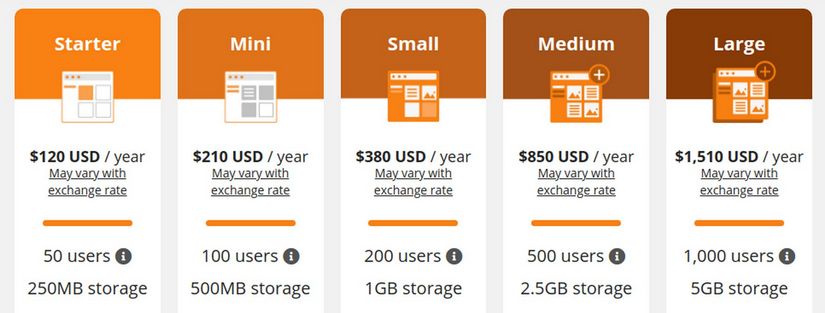
The final option is using the Moodle Cloud which starts out at $10 USD per month. But you are limited to only 50 users and 250 MB of storage. Moodle itself takes up 200 MB so there is no room for course content. For a real course, you need at least 1 GB of storage which is $32 per month. Even paying $130 USD per month will only get you 5 GB. Sadly, the Moodle Cloud will not let you install Moodle Plugins!:
Our goal is to offer Moodle users a new, better and dramatically less expensive option. Take the time to learn how to set up your own Hestia VPS and you can set up your own Moodle website and have as many users as you want and as many plugins as you need and up to 30 GB of storage for only $20 USD per month. No hidden set up fees. No hidden branding or customization fees. No annual per user fees. No plugin limitations. Just $20 per month!
How much RAM do you need on your VPS?
Moodle recommends 1GB for every 20 concurrent users. Keep in mind that the server and the control panel also need RAM. Thankfully, a Hestia Debian VPS uses less than 1 GB of RAM. Therefore with a 4 GB VPS, you can have up to 60 students online at the same time. For just a few dollars more, you can switch to an 8 GB RAM VPS which will be enough to have 140 students online at the same time.
VPS Assumptions
We assume that you have already gotten a VPS hosting account with at least 4 GB of RAM - and that you or your VPS host have installed a Debian server on the VPS and then installed Hestia CP on your Debian server. If you would like to learn more about this process, visit our separate course and website which goes into great detail about how to install and use Hestia CP on a Debian VPS: https://createyourownvps.com/
As we explained in our prior course, we also assume that you obtained a domain name from your VPS host and that you are using your VPS host as a DNS Manager to properly connect your domain name and website to the Internet. In this article, we will use the domain name collegeintheclouds.com which is hosted on CanHost.ca. Hestia is set up on our VPS server called ns1.collegeintheclouds.com which is managed by the CanHost DNS Manager.
Step 1: SSH to change PHP INI settings
In previous courses, we changed several settings in our VPS PHP.INI file. Here are links to the articles where this was done:
https://createasecurewebsite.com/first-steps/2-create-a-secure-vps/2-3-install-and-use-midnight-commander
https://createasecureonlinestore.com/first-steps/1-secure-foundation/1-4-use-midnight-commander-to-change-vps-settings
In addition to the changes we made to the PHP INI file for our VPS, we need to make two more change in our VPS files for Moodle. These changes are required because Moodle is three times bigger than Joomla and therefore takes at least three times longer to install. First, in our PHP INI file, we need to increase the maximum execution time from 600 seconds (10 minutes to 6000 seconds (100 minutes).
Second, we need to increase PHP max input vars from 1000 to 5000. Then in our Apache and Ningx configuration files, we need to increase the timeout allowance.
To do this, start a root SSH session to you VPS IP address. Then type mc to open Midnight Commander. Then click on the two dots to go up to the root folder. Then click the ETC folder. Then click the PHP folder. Then click the 8.1 folder. Then click the php.ini file to select it. Then click File, Edit. To add line numbers to the Midnight Commander edit screen, press Alt plus c to show the line numbers. Then use the down arrow on your keyboard to scroll down to line 409 and increase max_execution_time from 600 to 1800. This will increase the loading time from 10 minutes to 30 minutes. Note that this value is hard coded for the command line to unlimited. Then scroll down to line 426. Delete the semi-colon at the beginning of the line and change the maximum variables value from 1000 to 5000. Then click Control plus o then press Enter to save the change. Then control plus x to close the PHP INI file.
Open the /etc/apache2/apache.conf file and change:
timeout from 300 to 1800.
Open the /etc/nginx/nginx.conf file and change:
fastcgi_read_timeout increase from 300s to 1800s and
proxy_read_timeout from 300 to 1800s
Then type exit to exit Midnight Commander. Then type exit to exit the SSH session. Then in your Hestia Control Panel, go back to the Admin screen and restart PHP8.1-FPM and Nginx and Apache.
Step 2: Change DNS settings for your domain name to point to your VPS IP address and Hestia Server
If your domain name is hosted on Canhost, they provide a DNS record for it. But this DNS record points to the Canhost IP address rather than our VPS IP address. To change this, log into your Canhost account. Then click on My DNS in the left side menu. Then click on the Edit button to edit the DNS Zone for your domain name. There are 10 records. But only the first four need to be changed:
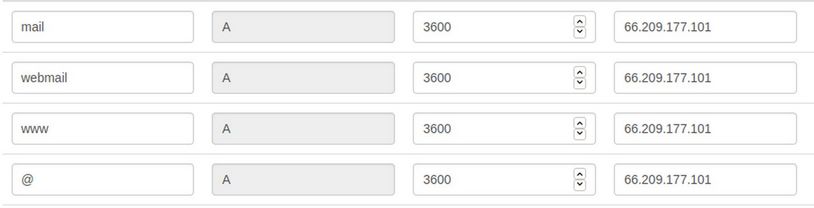
Use your cursor to delete the 4 Canhost IP addresses. Then copy paste your VPS IP address into the boxes. Then click Save Changes. To get a free Lets Encrypt SSL certificate, you also need to create two CAA records. Click Add Record and choose CAA for the Type. Type in your domain name (example mysite.com) for the Name. Type 0 for the Flag. Type issue for the Tag. Type letsencrypt.org for the Target. Then click Add Record. Then repeat to add a second CAA record using issuewild instead of issue for the Tag. Then click Save Changes.
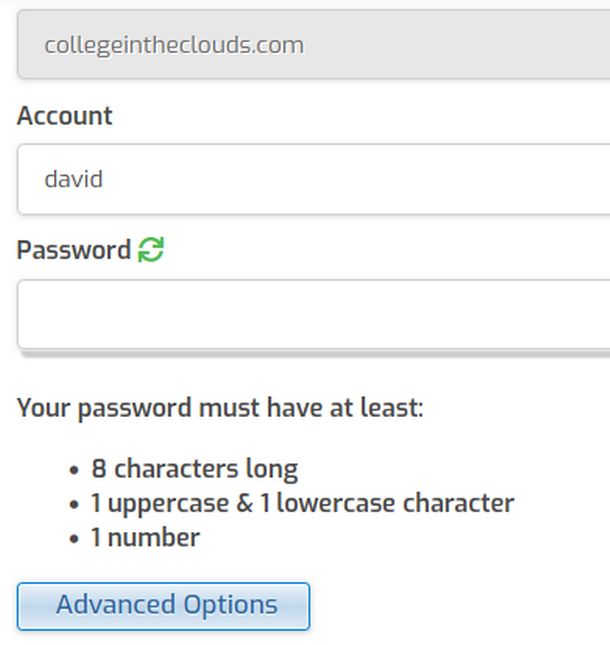
Step 3 Create a New Hestia User
Log into your Hestia Admin Control Panel and create a new Hestia user. In our example, the new user is called course0.
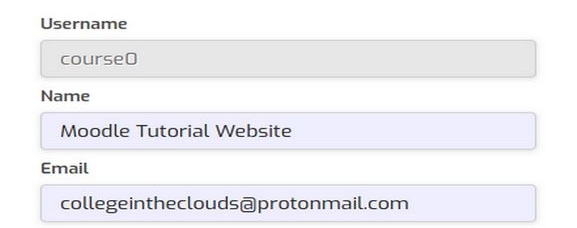
Add a secure password. Then click Save and Back. Then log out of the Hestia Admin Panel and log into the course 0 Hestia User Panel.
Step 4 Add a New Web Domain
Click Add Web Domain. Then type in the domain name of your website and the IP address of your VPS. Also click Create DNS Zone and click Enable mail for this domain in order to set up custom email addresses such as
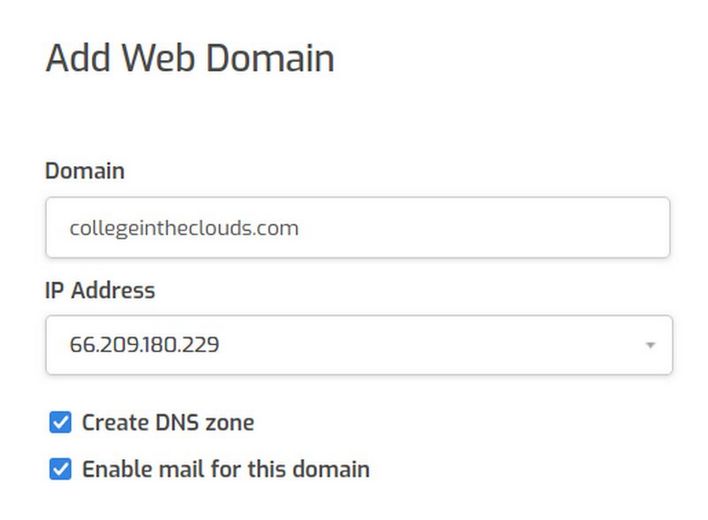
Then click Save and Back.

Select the domain name and click on the pencil to edit the domain name. Check Enable SSL and Use Let’s Encrypt.
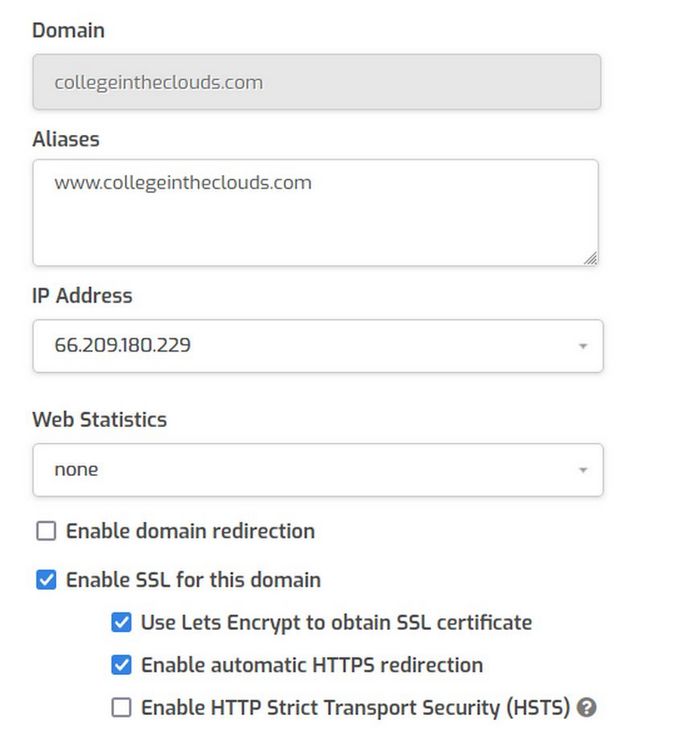
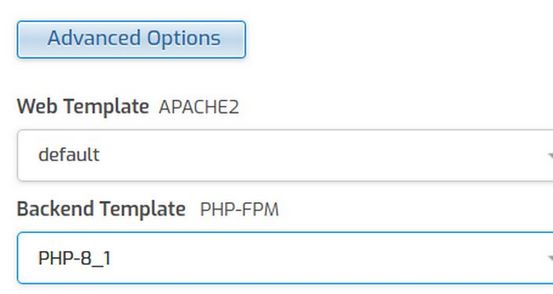
Then scroll down and click Advanced Options. Change the Backend template PHP version to 8.1
Click Save. Wait for the green approval message. Then click Back.
Step 5 Add a secure email address
Click Mail. Then click the hidden Edit pencil. Check Enable SLL and Use Lets Encrypt. Then click Save and wait for the green approval message. Then click Back. Then click on the hidden PLUS sign. Add your email account name.
Add a secure password. Then click Advanced Options and forward the email to your secure Proton Mail aggregator account. Then click Save. Then click Back.
Step 6 Use Hestia to Create a Database
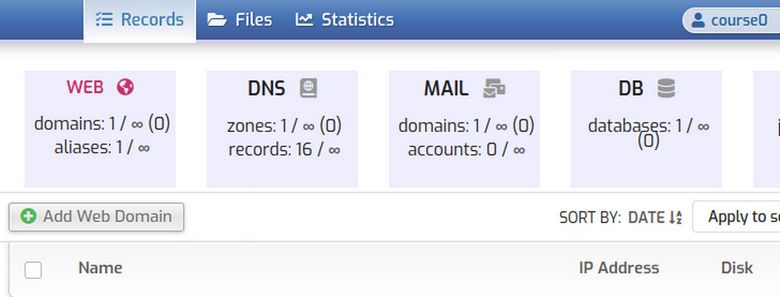
The website has 16 DNS records and an email domain. But it does not yet have a database. Since Moodle needs, a database, click on DB. Then click Add Database.
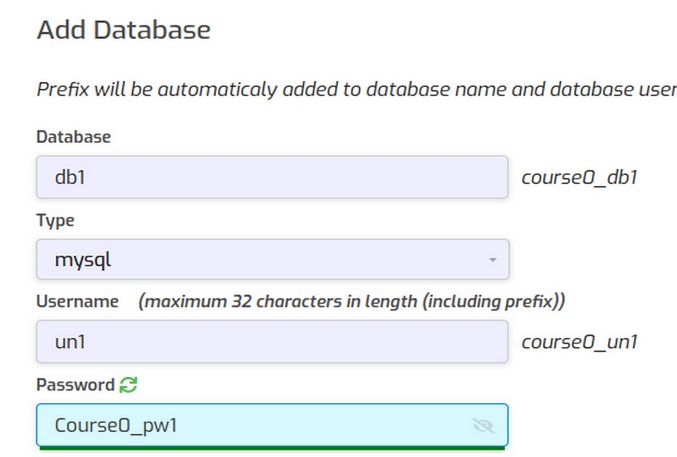
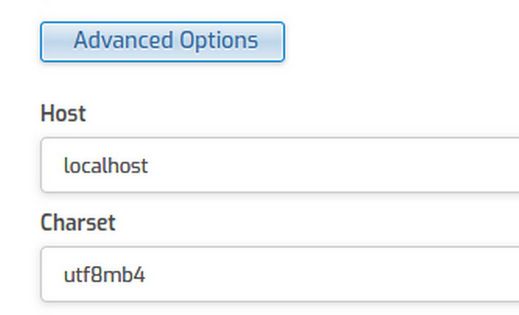
Also click on Database Advanced Options and change the Charset to utf8mb4.
Click Save and Back.
Step 7 Use the Hestia File Manager to Add Moodle
Go to the Moodle downloads page to download the latest version of Moodle. https://download.moodle.org/releases/latest/
Version 4.1.1 stable made on February 10 2023. This package is built every week. Download the zipped file. 81.4 MB
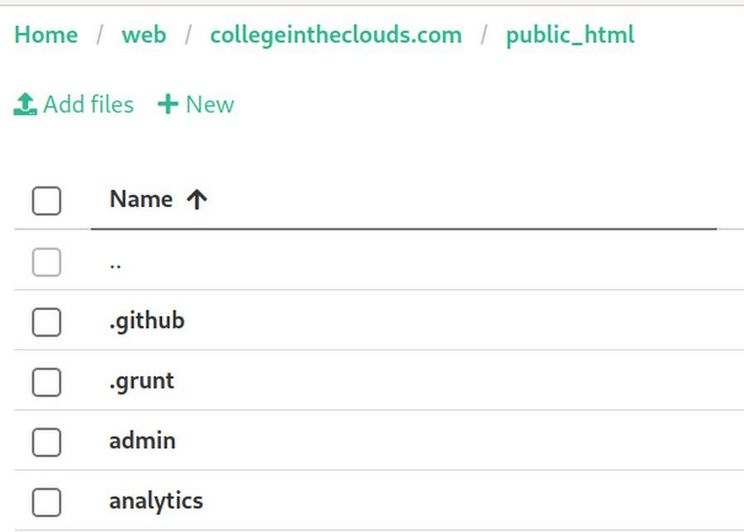
Then go back to Hestia and click on Files, web, your-domain-name, public_html. Click Add Files to add the moodle zipped file.
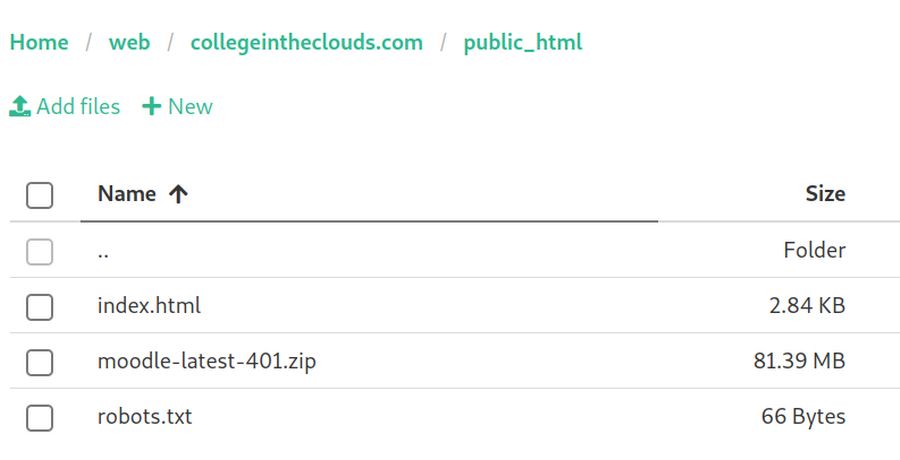
Click on the 3 dots to the right of the moodle zipped file and click Unzip. This will create a folder called moodle with the moodle files and folders in it. To move these files and folders to the root public_html folder, open the moodle file.
Then click at the box on the top to select all files and folders. This will bring up a hidden option called Move.
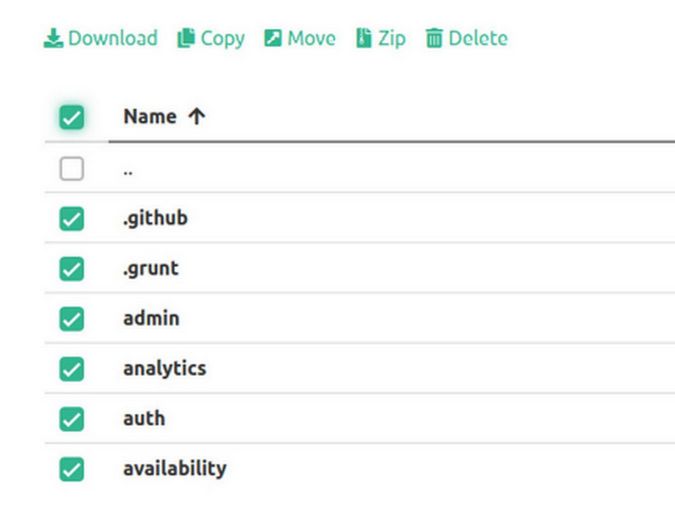
Then click Move. This will bring up the Select Folder screen. Click on the plus sign to the left of web. Then the plus sign for your domain name. Then click on public_html (not the plus sign). This will move all of the files. Go back to the public_html folder:
Now that we have our files in the root folder, scroll down and click on the three dots to the right of the moodle folder and delete it.
Then scroll down and click on the three dots to the right of the moodle-latest zip file. Then click Delete. Then click on the three dots to the right of the index.html file to rename it old-index.html.
Step 8 Use the Hestia File Manager to Create a Moodle Data Folder
Moodle needs to have a special folder called the moodledata folder. For security reasons, this folder cannot be in the public-html folder but instead needs to be in a private folder located in the domain-name folder. Hestia has already created the private folder. Here we will create a moodledata folder in the Hestia private folder. Still in the Hestia File Manager, click on the domain name folder and click on the private folder. Then click New to create a folder called moodledata.
What’s Next?
We will continue to leave the Hestia User Account open in one browser (where we will not clear the cache – which would log us out of Hestia). Then in the next article, we will open a new browser, clear the cache and use the Moodle Installer together with our Hestia Control Panel browser, to complete several additional installation steps.