
We are nearly done creating the course template. There are 2 more plugins we should add. At 5 activities per lesson and 4 lessons per week times 12 weeks, a college level course can involve hundreds of activities. To help students see their progress in completing these activities, we will install 2 completion progress plugins.
Moodle Completion Progress
Completion Progress is a way to help students quickly see tasks they have and have not yet completed and when uncompleted tasks should be completed by. The normal Moodle Completion Progress plugin assumes that your course only uses Moodle Assignment and Quiz activities – both of which include precise due dates. However, many courses have a mixture of activities that include some tasks with either Weekly Due dates or Monthly due dates. For example, our Reading and Video Assignments have weekly due dates – but there is no way to set these weekly due dates in the URL activity settings.
In addition, rather than setting up a Completion Progress for the entire course – with 240 activities, we want to set up 12 Weekly checklists – each with 20 to 24 activities. Therefore, rather than using the normal Moodle Completion Progress plugin, we will use a more flexible progress organization tool called the Checklist Activity. Download the latest plugin version from this link:
https://moodle.org/plugins/mod_checklist
One or more custom checklists can be created by a teacher and then the students or teachers can check-off each item as they are completed. In addition, the Checklist Progress Bar can be displayed as a Block by downloading the Checklist block plugin from this link:
https://moodle.org/plugins/view.php?plugin=block_checklist
Then install the Checklist Module plugin using the Moodle Plugin installer. The checklist module will end at a Settings page. Accept the defaults and click Save changes. Then skip the notifications page. Then click Plugins and install the checklist block plugin.
Add a Week 1 Checklist activity to the Course Template
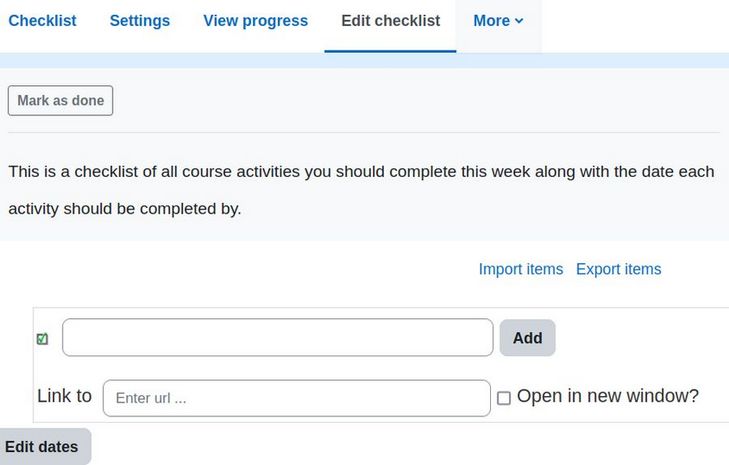
Go to the Course Template Home page and turn on editing. Then go to the Week 1 Topics Section. Click Add an activity or resource. Then select Checklist. On the Adding a new Checklist page, enter a name for the checklist. We will call it Week 1 Checklist. In the Introduction field, provide instructions for your students. For example, copy and paste: This is a checklist of all course activities you should complete this week along with the date each activity should be completed by.
Check Display description on course page. Under Settings adjust the settings for the Checklist. Leave User can add own items set to No. Leave User can add their own comments to No. Change Updates by to Student and Teacher. Note: The Student and teacher option requires teachers to confirm student input to update the checklist
Leave Add due dates to calendar set to No. Leave Teachers can add comments set to Yes Change Maximum grade to 0 to make the checklist ungraded. Leave Email teachers when checklist is complete set to No. Leave Show course modules in set to No. Leave Check-off when modules complete set for Yes, can override. Leave Lock teacher marks set to No. Then click Save and display to open the Checklist activity.
Create a Table of Week 1 Checklist Items and Due Dates
|
Weekly Activities Checklist Item – Due Date |
|
1 Sign up for Saturday Jitsi Small Group by Sunday 11pm |
|
2 Read First Reading Assignment by Sunday 11pm |
|
3 Submit First Reading Assignment Question(s) by Sunday 11pm |
|
4 Read Second Reading Assignment by Sunday 11pm |
|
5 Submit Second Reading Assignment Question(s) by Sunday 11pm |
|
6 Watch First Video Assignment by Monday 5pm |
|
7 Watch Second Video Assignment by Monday 5pm |
|
8 Attend First Jitsi Conference at Monday 5pm |
|
9 Attend Second Jitsi Conference at Monday 6pm |
|
10 Read Third Reading Assignment by Tuesday 11pm |
|
11 Submit Second Reading Assignment Question(s) by Tuesday 11pm |
|
12 Read Fourth Reading Assignment by Tuesday 11pm |
|
13 Submit Fourth Reading Assignment Question(s) by Tuesday 11pm |
|
14 Attend Third Jitsi Conference at Wednesday 5 pm |
|
15 Attend Fourth Jitsi Conference at Wednesday 6 pm |
|
16 Attend Saturday Jitsi Small Group on Saturday am or pm |
|
17 Submit First Reading Project by Saturday 11pm |
|
18 Submit Second Reading Project by Saturday 11pm |
|
19 Submit Third Reading Project by Saturday 11pm |
|
20 Submit Four Reading Project by Saturday 11pm |
|
21 Take First Reading Quiz by Saturday 11pm |
|
22 Take Second Reading Quiz by Saturday 11pm |
|
23 Take Third Reading Quiz by Saturday 11pm |
|
24 Take Fourth Reading Quiz by Saturday 11pm |
Add Checklist Items to your first checklist
To add an item to the list, in the blank text field, enter a name and click Add. The item will appear on the checklist. Repeat to add all 24 checklist items.
Move the Weekly Checklist above the Small Group Signup Sheet
Click on the three dots to the right of checklist, then click Move. Click to expand Week 1 Topics. Then click Before activity “Week 1 Small Group Signup.”
Use Mass Actions and your first weekly checklist to create your remaining weekly checklists
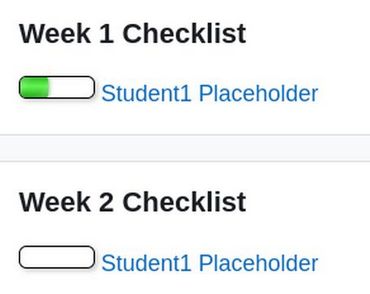
In Week 1 Topics, check the box above the Week 1 Checklist. Then use the Mass Actions block Duplicate to section and choose Week 2 Topics. Then click the Right arrow to start the process. Then edit the settings for the new checklist to change its title to Week 2 Checklist. Then click Save and return to course. Select the Week 2 checklist and duplicate it to create the Week 3 Checklist. Repeat to create checklists for the remaining weeks.
Update a Checklist for each student
On your course home page, click on the Week 1 checklist. Then click the View Progress tab to see a chart of how all students are currently progressing through the checklist.
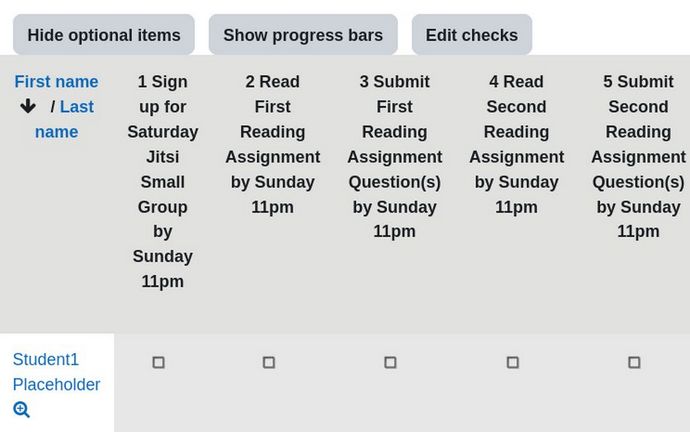
Then click the Magnifying glass near a particular student's name.
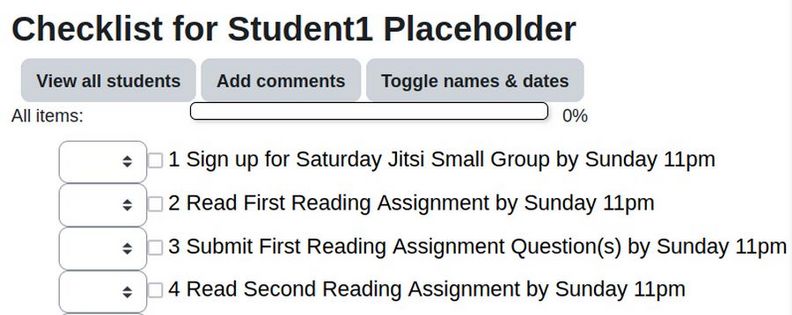
Choose Yes for each item. Then click Save or Save and show next.
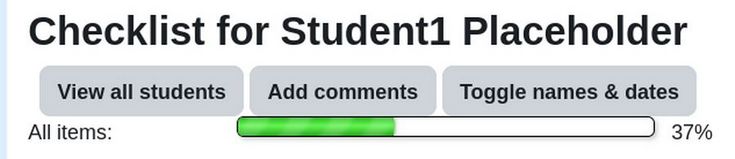
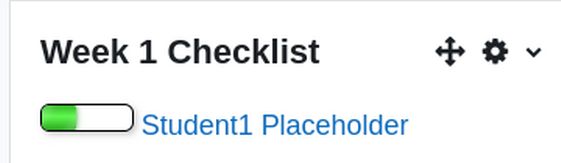
From a student point-of-view the Checklist is simple to use. All students need to do is tick the box next to an item. Once the boxes are ticked the progress bar will be updated.
Display the Checklist Block in the Block Side Panel
From the course home page, click on the Blocks side panel to open it. Then click Add a Block. Then select the Checklist block. Then click the Settings wheel. Click Configure Checklist Block. For Choose Checklist, select the Week 1 Checklist. Then Save changes.
Click Add a block again and choose the checklist block again.
Click the Settings wheel. Click Configure Checklist Block. For Choose Checklist, select the Week 2 Checklist. Then click Save changes. Repeat to add additional weeks if needed. Then turn off Edit Mode.
Use Course Creator to make a copy of the Course Template and move it to another category
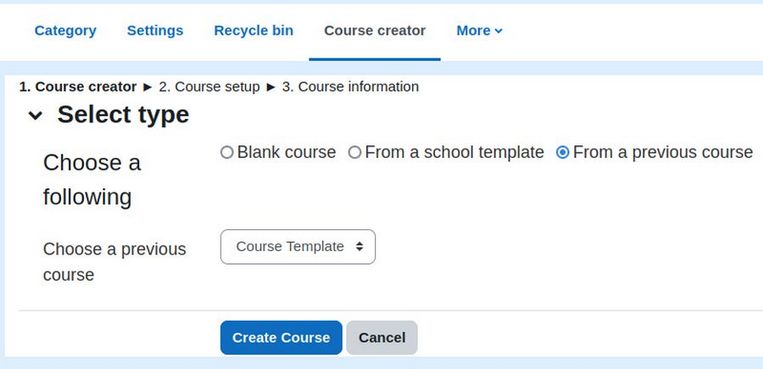
Once we have finished adding all of our course activities and small group sign up sheets and weekly checklists, we are ready to copy the course template as the first step in creating each of our 12 real courses. To copy the course template, go to Site Administration, Courses and click Manage Courses and Categories.
Then click Course Creator in the top menu. Change type from Blank Course to Previous Course. The Course Template should already be selected:
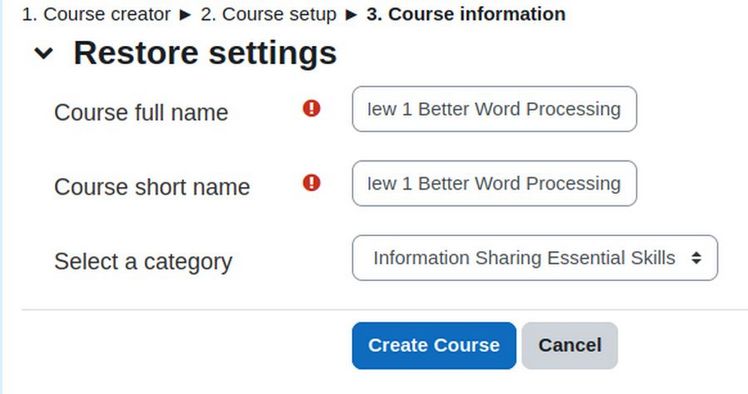
Click Create Course. This brings up the Backup settings screen with lots of options. Leave the defaults checked but uncheck the following: Include User role assignments, then uncheck include enrolled users. Then scroll down the page and click Next. On the Restore Settings screen, add a Course full name and short name. Select the category.
Then click Create Course. This process ends in the new course home page. Click Participants and click Enroll Users to assign yourself as the teacher. Check the Calendar. Select the New course 1 to verify all course events are shown in the new course calendar. You are then ready to add the actual course section titles and dates.
Create a Moodle Course Backup File to Download the Course template to move to a different Moodle website
Creating the structure for a Moodle website with 48 one hour video conferences and 5 assignments per video conference is a lot of work. In total, we needed to set up and schedule nearly 250 events in our course calendar. We now have a process for copying this structure as a shell for each of our 12 courses at College in the Clouds. However, we would also like to provide this same structure to other instructors so they can use it as a starting point for their own College level courses on their own websites. Let’s see how this is done.
A course can be saved with some or all of its parts by creating a course backup file. The site administrator can use the Hestia Control Panel to schedule automated daily backups for the whole site. But in addition, each teacher can create and download a course backup of any of their existing courses for safe keeping or for use on another Moodle website.
To create a course backup file, log in as the course teacher or administrator and click My Courses. Then go to the course or course template Home page. Then from the course menu, click More. Then click Course Reuse. Then change the Selection button in the upper left corner from Import to Backup.

On the Backup Settings screen, uncheck User role assignments and uncheck Include enrolled users. Then click either Jump to final step or the Next Button. (If you click the Next Button instead of the Jump button, you can unselect any particular course sections and or any specific activities in any course sections).
Be patient as the process may take a few minutes. This is especially true if you have included questions in the course Question bank (which we did not). The process should end with a Backup Successfully Created confirmation message.
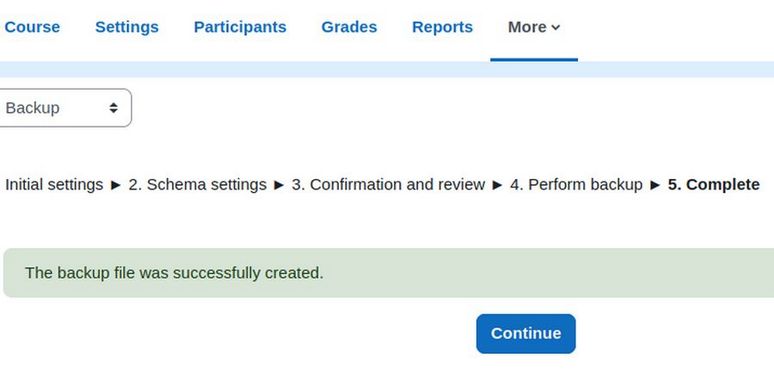
Click Continue. The process ends in this screen:

Then click Download to download the MBZ file which is only 352 KB. Here is the file name:
backup-moodle2-course-14-course_template-20230409-2223-nu.mbz
Import a Course or Course Template to a New Moodle Website
Before we load the course template to a new website, we first need to add all of the plugins that the course template was based on to the new website. Here are some of the most important plugins we have used to create our course template:
Download the latest Flexible Sections plugin from this page:
https://moodle.org/plugins/format_flexsections
Download the latest Course creator local plugin from this page:
https://moodle.org/plugins/local_course_creator
Download the latest AlmondB theme from this page:
https://moodle.org/plugins/theme_almondb/versions
Download the latest Static Pages plugin from this page:
https://moodle.org/plugins/local_staticpage
Download the latest Jitsi activity Plugin
https://moodle.org/plugins/mod_jitsi
Download the latest Local Event Reminders plugin
https://moodle.org/plugins/local_reminders
Download the latest Mass Actions Block plugin
https://moodle.org/plugins/block_massaction
Download the latest Signup Sheets plugin from this page:
https://moodle.org/plugins/mod_tutorialbooking
Download the latest Checklist plugin
https://moodle.org/plugins/mod_checklist
Download the latest Checklist Block plugin
https://moodle.org/plugins/view.php?plugin=block_checklist
Log into the new Moodle website as an admin. Go to Site Administration, Plugins, Install Plugins to install each plugin one at a time. Then go to Appearance, Themes, Theme Selector to make sure it is set for the default Boost theme.
Then go to Courses, Course Default Settings and change the default course format from Topics to Flexible sections. Increase the Maximum Number of Sections to 60. In Appearance, change the number of Announcements to 0. Then click Save changes.
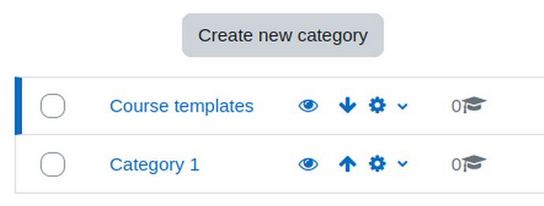
Create a Course Templates Category
Click Site Administration, Courses. Then Manage Courses and Categories. There is a default category called Category 1. Click Create New Category and uncheck the Category 1 parent category. Then use the search box to select the Top category. Name the new category Course templates. Then click Create Category. Then move the Course template category to the top of the category list:
Then in the course template category, click Create New Course. Name the course full name and short name Course Template. Then click Save and Return. Then in the Breadcrumbs menu, click Courses, Course templates. Then click on Course template to go to the course template home page. Click Skip Tour. Then in the course menu, click More. Then click Course Reuse. In the upper right corner, change the selection from Import to Restore.

Drag the MBZ backup file into the box. Then click Restore. Scroll down the screen to view the files. Then click Continue. On the next screen, you will be given the option to restore as a new course or into an existing course. In the Restore as a new course box, select the Category 1 category and click Continue. The next screen is Restore settings. Click Next. The next screen is Course Settings. Scroll down and click Next. The next screen is Restore settings. Scroll down and click Perform Restore.
The restore will take a few minutes. When down it will reply The Course was successfully restored. Click Continue which will take a minute to go to the Course home page. Click Collapse All.
Click on the Blocks panel which will display the Latest events and calendar. Click Full Calendar. Sadly, the events for the new course have not been imported to the calendar yet. When restoring a course containing calendar events from activities e.g. assignment due dates, these events will appear in the calendar a short while after restoring the course. The events are added to the calendar via a cron task.
So wait one hour before checking out the calendar. Note that restoring multiple courses will result in queued tasks with a possible delay of several hours before events appear in the calendar.
Using the Course Category to restore a course
Above we created a shell course in order to reach the Restore function. You can also go to Site administration > Courses > Manage courses and categories to restore a course from a backup file. Go to the Course templates category and delete the blank course we just created. Then click Continue. Now with no courses in this category, click on the down arrow to the right of the settings wheel for the Course templates category:
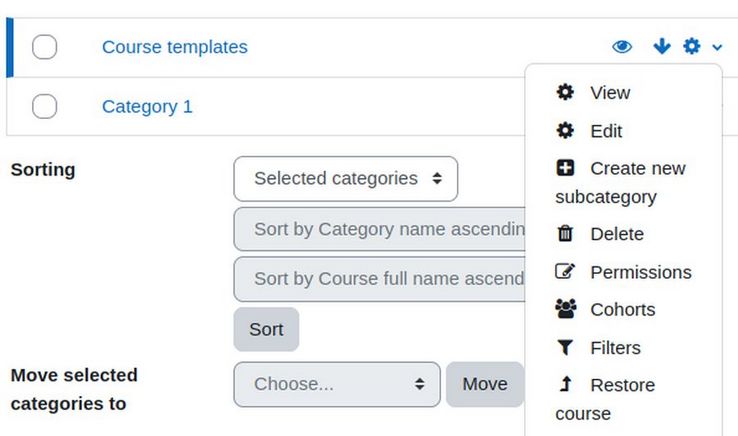
Then click Restore Course. Drag the course backup file into the Import a backup file box. Then click Restore. Then scroll down the Backup settings screen and click Continue. Then in the Restore as a New Course option, choose the Course templates category and click Continue. Then scroll down the Restore settings screen and click Next. Then scroll down the Course settings screen and click Next. Then scroll down the Restore settings screen and click Perform Restore. After a few minutes, the success message should appear. Click Continue.
Expand the Right side blocks panel and click Full Calendar. There are no courses shown yet. Come back to this in a few hours. Once confirmed that events work properly with the boost theme, and new them has been configured, we can switch to the new theme.
We can then add the new section names and change the dates to match the dates of the new course. Finally, we can add the quiz questions and set up the grade book.
What’s Next?
Now that we have finished building an actual course, in our next article, we will review how to create course templates and courses for an entire annual cycle of courses.